Adyen is no longer developing the Classic API integration
This page is for the Classic API (/authorise) integration, which we no longer accept new integrations with.
We strongly recommend switching to the newer Web Drop-in and Components integration.
Local payment methods
If you want to learn how to accept local payment methods, see Directory Lookup.
The Classic API integration lets you accept payments on your website and mobile application, if you support PCI compliance at Level 1 or 2. This tutorial explains how you can collect raw card data from your shoppers and pass this data in payment requests to the Adyen API.
When you want to reduce your PCI compliance requirements, we recommend that you integrate with our Client-Side Encryption library instead.
Before you begin
Before you begin to integrate, make sure you have followed the Get started with Adyen guide to:
- Get an overview of the steps needed to accept live payments.
- Create your test account.
After you have created your test account, get your API key or basic authentication credentials. Save a copy as you'll need it for API calls you make to the Adyen payments platform.
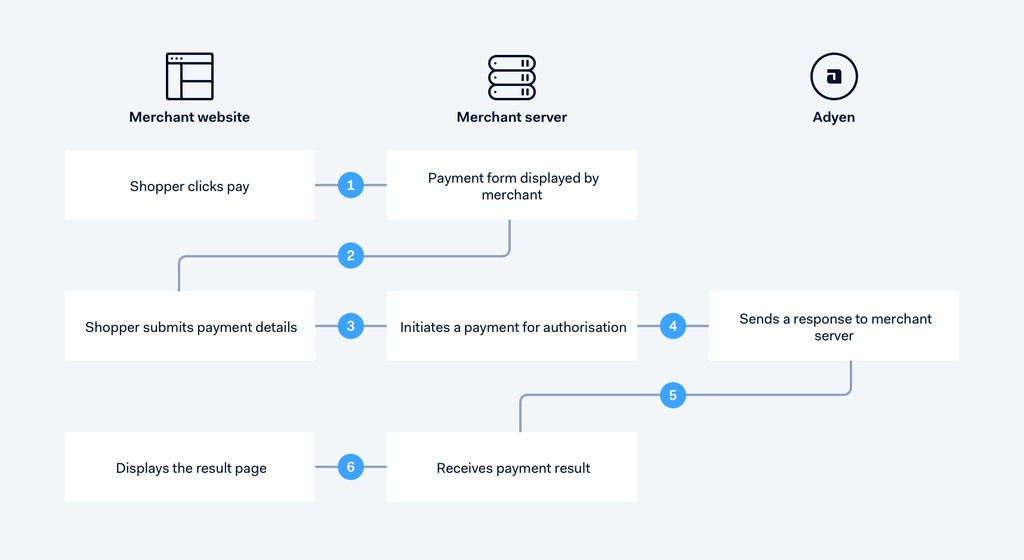
Overview
Your card payments go through many stages. The diagram below helps you understand the flow:
If you are integrating the Adyen payments platform of products and services with a third-party system, we strongly recommend you follow defensive programming best practices.
Authorise request
Test cards
To test the payment request, use one of our test credit cards.
From your server, make an HTTP POST request to the /authorise endpoint.
In this request, include merchantAccount, reference, and the payment amount. The amount's value is in minor units, e.g. 20000 is 200 euros. You can find the number of decimal points per currency in Currency codes.
In addition, include card information, as shown in the example below.
{
  "card": {
    "number": "4111111111111111",
    "expiryMonth": "10",
    "expiryYear": "2020",
    "cvc": "737",
    "holderName": "John Smith"
  },
  "amount": {
    "value": 1500,
    "currency": "EUR"
  },
  "reference": "payment-2016-9-4-11",
  "merchantAccount": "NewCoCOM"
}
To know more about the required fields see PaymentRequest.
Authorise response
If the message passes validation, the system performs a risk analysis. Depending on the outcome, the system attempts an authorisation and you receive a payment response. The response includes a PSP reference, which uniquely identifies each payment and can be used later for cancel/refund if needed.
{
  "pspReference": "8814689190961342",
  "resultCode": "Authorised",
  "authCode": "83152"
}
For other possible response codes and fields of the payment response, refer to PaymentResult.
Requirements for co-badged cards
Regulatory guidelines for some regions require the following:
- When a shopper presents a co-badged card, they must be allowed to select their preferred brand.
- If the shopper selected a preferred brand, the payment must be completed with this brand.
To comply with these guidelines:
- If a card is co-badged, present all supported brands to the shopper, allowing them to click on the brand they want to pay with.
- If the shopper makes a choice, pass their selected brand as selectedBrand in your /authorise request.