Adyen is no longer developing the Classic API integration
This page is for the Classic API (/authorise) integration, which we no longer accept new integrations with.
We strongly recommend switching to the newer Native 3D Secure 2 for iOS integration.
PSD2 compliance
If you are implementing 3D Secure to comply with PSD2 SCA, learn more from our comprehensive guide.
The Adyen 3DS2 iOS SDK gets the device fingerprint and presents the challenge to your shopper. From your server, you need to send a payment request, the encrypted device fingerprint, and the challenge result to Adyen.
In a full 3D Secure 2 implementation, a payment can go through either a frictionless or a challenge authentication flow before it can be authorised.
If you only want to perform a 3D Secure 2 authentication and then authorise the payment later, refer to the Authentication-only documentation.
How it works
Here's how a 3D Secure 2 challenge authentication flow works:
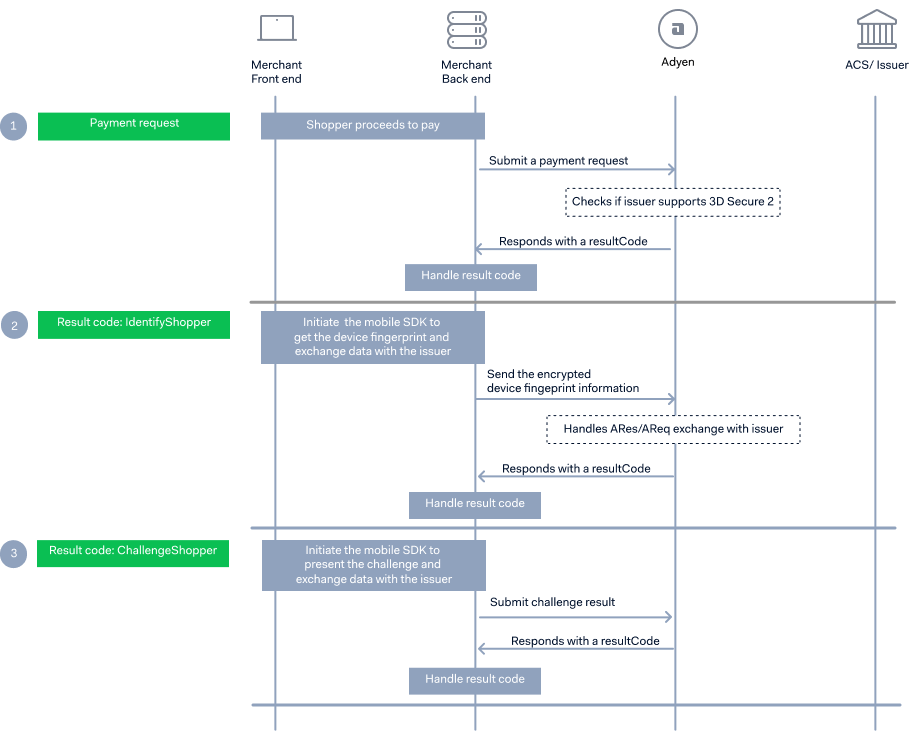
- Submit a payment request with the required 3D Secure 2 objects to start the authentication process. Build your implementation depending on the
resultCodereturned in the response. If the transaction is exempted from 3D Secure, you might get an Authorised result code. - If you receive an IdentifyShopper
resultCode, get the 3D Secure 2 device fingerprint and send the encrypted device fingerprint information to Adyen. After you send the device fingerprint, it is possible that you receive an AuthorisedresultCodein the response. This means that the 3D Secure 2 authentication was frictionless, and the payment was authorised. - If you receive ChallengeShopper
resultCode, this means that the issuer requires further shopper interaction and you need to present a challenge to the shopper.
The payment might also be routed to 3D Secure 1, based on issuer performance. This is indicated by a RedirectShopper resultCode. If you don't want to automatically fall back to 3D Secure 1, contact our Support Team.
To test your integration, see Testing 3D Secure 2.
Before you begin
Adyen 3DS2 iOS
Subscribe to our GitHub repository to get the latest updates and versions.
Before you begin to integrate, make sure you have followed the Get started with Adyen guide to:
- Get an overview of the steps needed to accept live payments.
- Create your test account.
After you have created your test account:
-
Get your API Key. Save a copy, because you'll need it for API calls you make to the Adyen payments platform.
-
Install one of our Libraries to connect with the Adyen APIs.
-
Install the Adyen 3DS2 iOS SDK latest version. You must use version 2.3.0 or later to trigger the 3D Secure 2 native flow. You can install the SDK through CocoaPods, Carthage, or by manually installing the SDK as a dynamic or static framework.
- Add pod
'Adyen3DS2'to your Podfile. - Run
pod install.
Step 1: Submit a payment request
Collect your shopper's card details then make a payment with a POST /authorise request, and include the following:
| Parameter name | Required | Description |
|---|---|---|
| card |  |
Object that contains the shopper's card details. |
| threeDS2RequestData.deviceChannel | |
Set to app. |
| browserInfo | |
Object that contains the userAgent and acceptHeader fields. Indicates that your integration can handle 3D Secure 1 redirect authentication in case the transaction is routed to 3D Secure 1. If your integration is unable to generate this information, you can send the same data as in the request below. |
| sdkVersion | |
We recommend you use the ADY3DS2SDKVersion() function to determine your 3DS2 sdkVersion. You can also get the sdkVersion from Github |
You can send additional parameters for better authorization rates, and to increase the chance of a frictionless flow. You do not have to send all the additional parameters. Send parameters that you know you can provide accurately, or that are mandatory in specific scenarios.
Here is an example of how to make a request for a EUR 150 purchase:
You receive a response containing a resultCode of:
-
IdentifyShopper. This means that you need to perform the Identify the shopper flow. You also get the following parameters from the response, which you'll need to create a transaction in the SDK:
additionalData.threeds2.threeDS2DirectoryServerInformation.directoryServerIdadditionalData.threeds2.threeDS2DirectoryServerInformation.publicKeyadditionalData.threeds2.threeDS2ResponseData.messageVersionadditionalData.threeds2.threeDS2DirectoryServerInformation.rootCertificates
You will also receive a
threeds2.threeDS2Tokenwhich you will need to store for later use.
To optimize authorization rates, Adyen's Authentication Engine routes each payment to either the 3D Secure 2 or the 3D Secure 1 flow, based on issuer performance. See 3D Secure fallback for more information.
For a complete list of resultCode values and the actions you need to take, see Result codes.
Here's an example of a response showing an IdentifyShopper result code:
Step 2: Get the 3D Secure 2 device fingerprint
If your server receives IdentifyShopper resultCode, start the 3D Secure 2 device fingerprinting process.
-
In your app, create an instance of
ADYServiceParameterspassing thedirectoryServerIdand thepublicKeyparameters from the/authoriseresponse or from your prefetched cached keys.ADYServiceParameters *parameters = [ADYServiceParameters new]; [parameters setDirectoryServerIdentifier:...]; // Retrieved from /authorise response. [parameters setDirectoryServerPublicKey:...]; // Retrieved from /authorise response. [parameters setDirectoryServerRootCertificates:...]; // Retrieved from /authorise response. -
Use the
ADYServiceclass to create a transaction.When using Adyen 3DS2 iOS SDK version 2.2.0 and later, you must set
transactionWithMessageVersionto the value ofadditionalData.threeds2.threeDS2ResponseData.messageVersionfrom the/authoriseresponse.
For more information about the latest version, refer to Migrating to 3DS2 SDK version 2.2.0.Keep a reference to your
ADYTransactioninstance until the transaction is complete.The following example shows how to create a transaction, using the
messageVersion.
-
Get the transaction's
authenticationRequestParametersclass and pass the contents to your server.
You'll get the following information:deviceInformationSDKTransactionIdentifierSDKApplicationIdentifierSDKReferenceNumberSDKEphemeralPublicKey
-
From your server, make a POST /authorise3ds2 request to send the encrypted device fingerprint information to Adyen, specifying the threeDS2RequestData object containing:
sdkEncData: Device informationsdkTransID: SDK Transaction IdentifiersdkAppID: SDK Application IdentifiersdkReferenceNumber: SDK Reference NumbersdkEphemPubKey: Object that contains the SDK Ephemeral Public Key. The SDK provides output as a string. Transform this string into a JSON object to send in your /authorise3ds2 request.
Also make sure you include the
threeds2.threeDS2Tokenthat was returned in the previous request.You can send additional parameters for better authorization rates, and to increase the chance of a frictionless flow. You do not have to send all the additional parameters. Send parameters that you know you can provide accurately, or that are mandatory in specific scenarios.
You receive a response containing a
resultCode. Some of the possible values forresultCodeare:- Authorised – Indicates that the 3D Secure 2 authentication was frictionless, and the payment authorisation was successfully completed. This means that you can already proceed with the delivery of goods and services.
- ChallengeShopper – The issuer has requested further shopper interaction. This means that you'll have to perform the challenge flow. You also get the following parameters from the response, which you'll need to start the challenge flow in the SDK:
threeds2.threeDS2ResponseData.threeDSServerTransIDthreeds2.threeDS2ResponseData.acsTransIDthreeds2.threeDS2ResponseData.acsReferenceNumberthreeds2.threeDS2ResponseData.acsSignedContentthreeds2.threeDS2Token
For a complete list of
resultCodevalues and the actions that you need to take, see Result codes.Here's an example of a challenge flow response:
Step 3: Present a challenge
If your server receives ChallengeShopper resultCode, this means that the issuer would like to perform additional checks in order to verify that the shopper is indeed the cardholder.
-
Create an instance of
ADYChallengeParametersand pass the following:- The values from the
/authorise3ds2response. -
threeDSRequestorAppURL: Supported in 3D Secure version 2.2.0 and later. By regulation, it is required to provide your app's URL in universal link format:[NSURL URLWithString:@"https://{YOUR_UNIVERSAL_URL}"]. In an out-of-band (OOB) authentication, the authenticating app uses this URL to call your app after an OOB authentication occurs. If you specified a previous version of 3D Secure in step 2, this parameter is ignored. For more information about the latest version, refer to Migrating to 3DS2 SDK version 2.2.0.Make sure to add the URL should to the app build settings. Go to Info.plist > URL Types. For more information, refer to the Apple Developer documentation.
- The values from the
-
Present the challenge.
-
When the challenge flow has been completed, get the
transactionStatusfrom theresultand pass this to your server. -
From your server, make a POST /authorise3ds2 request specifying the
transStatusgenerated by the SDK and thethreeds2.threeDS2Token.You receive Authorised as the
resultCodeif the payment was successful.
UI customizations
The SDK inherits your app's theme to ensure the UI of the challenge flow fits your app's look and feel. If you require further UI customizations, the SDK provides some customization options through the ADYAppearanceConfiguration class.
To customize the UI:
-
Create an instance of
ADYAppearanceConfiguration, configure the UI elements that you want to customize, and pass the configuration instance when you initializeADYService.
For example, to change the color of the Continue button to red and to change its corner radius:
Customizable UI elements
Refer to ADYAppearanceConfiguration class reference documentation for a complete list of customizable properties.
You can also customize the following UI elements used in the challenge flow:
| Customizable elements | Customizable properties |
|---|---|
|
Body |
|
|
Header |
|
|
Info items |
|
|
Input fields |
|
|
Input fields header |
|
|
Navigation bar |
|
|
Screen |
|
|
Submit/Next/Continue button |
|
|
Cancel button |
|
|
Resend button |
|
|
OOB button |
|
Get the SDK version
Testing 3D Secure 2
Before going live, use the following card numbers and credentials to test your integration.
We recommend testing each Card Type.
To test how your integration handles different 3D Secure 2 authentication scenarios, use our test card numbers.
All our test cards use the following expiry dates and security codes:
| Expiry Date | CVC/CVV | CID |
|---|---|---|
| 03/2030 | 737 | 7373 |
When prompted for 3D Secure 2 text challenges, use the following credentials:
- For mobile, use password: 1234
- For web, use password: password
| Card Type | Card Number |
|---|---|
| Cartes Bancaires | 4035 5014 2814 6300 |
| Maestro 1 | 5000 5500 0000 0029 |
| Mastercard | 5454 5454 5454 5454 |
| Visa | 4917 6100 0000 0000 |
1 This card doesn't require a CVC.
When you make a payment request with these cards, you'll receive the following result codes depending on your integration:
- RedirectShopper: You'll receive this result code if you are using the Redirect authentication.
- IdentifyShopper: You'll receive this result code if you are using the Native authentication.
- ChallengeShopper: You might get this result code after you submit the 3D Secure 2 device fingerprinting result in a Native authentication, indicating a challenge flow.
To test the web-based flow where the device fingerprinting step is skipped (because the issuer's ACS has not configured a threeDSMethodURL), and you get a ChallengeShopper resultCode immediately after submitting the payment request, use the following card:
| Card Type | Card Number |
|---|---|
| Visa | 4212 3456 7891 0006 |
To test the frictionless flow, specify in your payment request:
amount.value: 12002
App-based integration
To test different authentication scenarios for app-based integration, use the following test cards:
| Card number | Authentication scenario |
|---|---|
| 5201 2855 6567 2311 | Basic text authentication |
| 5201 2874 9905 2008 | Basic single select |
| 5201 2815 9233 1633 | Basic multi select |
| 5201 2888 2269 6974 | Basic out-of-band (OOB) authentication |
| 5201 2895 0084 3268 | HTML OOB authentication |
| 5201 2861 5377 1465 | App single select then text authentication |
Other scenarios
| Card number | Scenario |
|---|---|
| 4199 3500 0000 0002 | The card is not enrolled for 3D Secure transactions, |
| 5201 2829 9900 5515 | There was a technical error. |