The classic Checkout SDK integrations are being phased out
This means we are:
- No longer developing the classic Checkout SDK integration.
- Not accepting new classic Checkout SDK integrations.
You have until March 31, 2024 to migrate.
The Checkout SDK is tied to version 1 of Apple Pay, and does not support all card networks.
For a list of countries where Apple Pay is available, see Countries and regions that support Apple Pay.
For a list of Apple Pay compatible devices, see Apple Pay compatibility list.
Apple Pay supports liability shift for Mastercard, American Express, Discover, but not Visa. Adyen currently does not support China UnionPay (CUP) cards through Apple Pay.
| Payment Type | Payment flow | Recurring | Refunds | Partial Refunds | Captures | Partial Captures | Chargebacks |
|---|---|---|---|---|---|---|---|
| Wallet | No | Yes | Yes | Yes | Yes | Yes | Yes |
You can accept Apple Pay payments with:
Prerequisites
Before you can accept Apple Pay payments, you'll need to:
- Create and configure an Apple Development Account.
- Create a Merchant Identity Certificate.
- Create a Payment Processing Certificate and send this to Adyen.
If you want to accept Apple Pay on your website, you'll also need to validate your domain.
For more information, see Enable Apple Pay.
Integrate with iOS SDK
The Adyen Checkout SDK for iOS provides built-in support for Apple Pay. All you need to accept Apple Pay payments is to install the corresponding package from Adyen, and enable Apple Pay in your mobile app's settings.
Prerequisites
Refer to the iOS SDK integration for Checkout page to learn how to build a checkout integration.
Step 1: Install the Apple Pay package
By default, Apple Pay is not included in the Adyen package you install from CocoaPods. To enable Apple Pay, add the Adyen/ApplePay package to your Podfile:
pod 'Adyen'
pod 'Adyen/ApplePay'
Make sure to install the package after you change the Podfile:
$ pod installStep 2: Configure Apple Pay in Xcode
Apple Pay API calls require your app to have the proper entitlements. To enable Apple Pay and obtain the entitlements for your app:
- In Xcode, choose View > Navigators > Show Project Navigator.
- Choose the target from the Project/Targets pop-up menu (or in the Target section of the second sidebar if it appears).
- Click Capabilities to view app services you can add to your app.
- Enable the Apple Pay capability.

- Click the Add button (+) at the bottom of the Apple Pay Identifiers table.
- In the dialog that appears, enter your merchant ID and click OK.
For more information, see Apple documentation.
Step 3: Display company name in the summary line
To show the total in a summary line, you must send us your company name.
- Add the
companyobject to the request:
{
   ...
   "company":{
      "name":"My Company"
   },
   ...
}
If it is not included, the company name will default to the value in the reference field.
Step 4 (optional): Display line items before the summary line
You can display line items in Apple Pay, as shown below:
- Include line items in the
paymentSessionrequest, for example:
{
   ...
   "lineItems":[
      {
         "description":"Oversized Tweed Scarf",
         "amountIncludingTax":2400,
         "amountExcludingTax":1984,
         "taxAmount":416
      },
      {
         "description":"Leather Messenger Bag",
         "amountIncludingTax":5870,
         "amountExcludingTax":4851,
         "taxAmount":1019
      }
   ],
   ...
}
If the description is missing for any of the line items, none of the line items will be shown.
To display the amounts with tax included, use the amountIncludingTax parameter.
To display the amounts with tax excluded, use the amountExcludingTax and taxAmount parameters. In this case, an extra line item will be displayed containing the tax total.
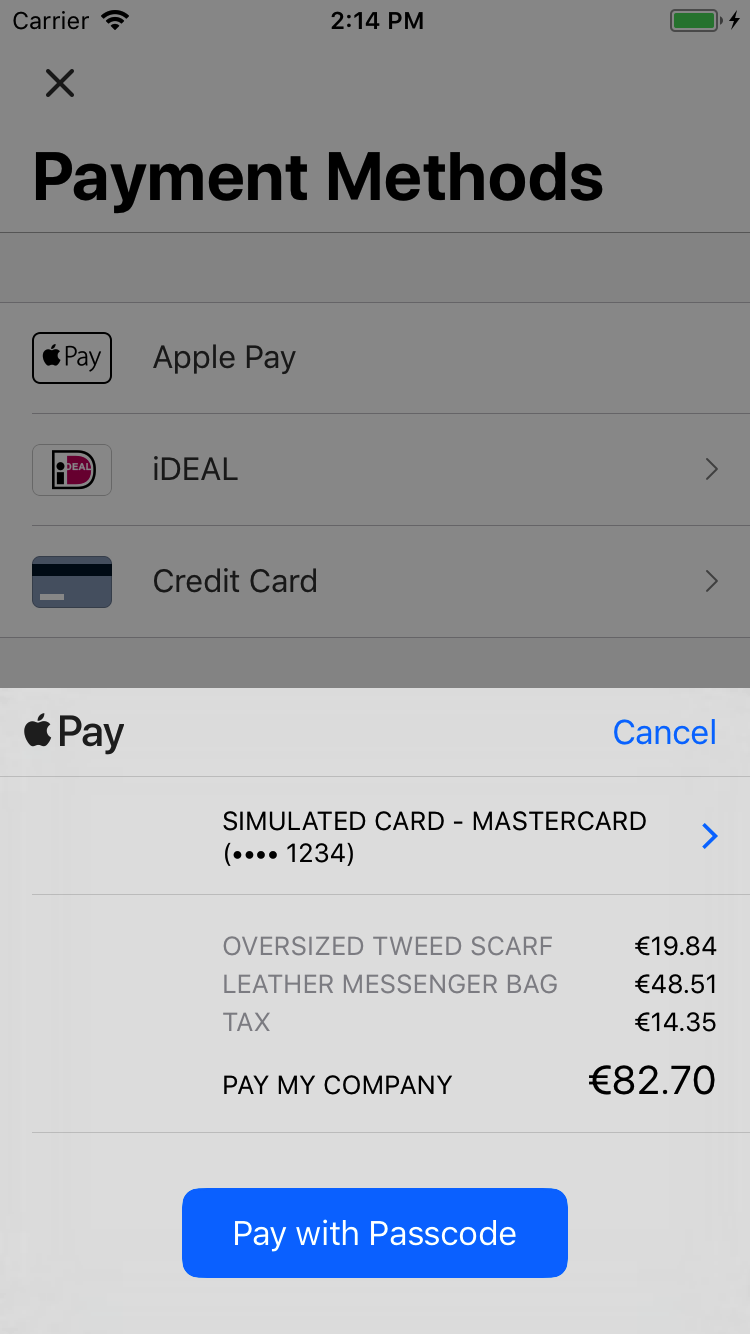
The SDK will always give preference to the amountIncludingTax parameter, unless it is missing in any of the line items, or the total for all items does not add up to the total in the amount object. In this case, the SDK will default to amountExcludingTax/taxAmount. If these are also missing, or do not add up, the line items will not be displayed.
Integrate with Web SDK
Prerequisites
Step 1: Provide a MerchantSession - Web SDK
You will need to create a new MerchantSession for every payment. You can do this by implementing the moreDetailsRequired hook.
In the moreDetailsRequired hook:
- You call your server with the
pExtraData.url(thevalidationUrl). - Your server calls the
validationUrl(as described in Requesting an Apple Pay Payment Session) to request a session from Apple Pay. - Your server receives a new
MerchantSession. - You resolve a
Promisefrom themoreDetailsRequiredhook with thatMerchantSession
Example:
chckt.hooks.moreDetailsRequired = function(pExplanation, pExtraData) {
    return new Promise(function(resolve, reject) {
        // Call URL on Merchant server that provides a POST endpoint to obtain a Merchant Session for Apple Pay.
        // pExtraData.url is the validationURL from the ApplePayValidateMerchantEvent - an (apple.com) URL the merchant's
        // server must use to request an Apple Pay Payment Session
        // Upon proving to be a vaild merchant the response will contain an opaque Merchant Session object which
        // can be used to resolve the Promise created below
        // Merchant validation is always carried out server side rather than on the client for security reasons.

        var xhr = new XMLHttpRequest();

        xhr.open(
            "POST",
            "YOUR_SERVER_URL"
        );

        xhr.onload = function() {
            if (this.status >= 200 && this.status < 300) {
                resolve(JSON.parse(xhr.response));
            } else {
                reject({
                    status: this.status,
                    statusText: xhr.statusText
                });
            }
        };

        xhr.onerror = function() {
            reject({
                status: this.status,
                statusText: xhr.statusText
            });
        };

        xhr.setRequestHeader("Content-Type", "application/json");

        var params = JSON.stringify({ url: pExtraData.url });

        xhr.send(params);
    });
};
Step 2: Display company name in the summary line
To show the total in a summary line, you must send us your company name.
- Add the company object to the request:
{
   ...
   "company":{
      "name":"My Company"
   },
   ...
}
Step 3 (optional): Display line items
You can also display line items before the summary, as shown below:
Include line items in the paymentSession request, for example:
{
   ...
   "lineItems":[
      {
         "description":"Oversized Tweed Scarf",
         "amountIncludingTax":2400,
         "amountExcludingTax":1984,
         "taxAmount":416
      },
      {
         "description":"Leather Messenger Bag",
         "amountIncludingTax":5870,
         "amountExcludingTax":4851,
         "taxAmount":1019
      }
   ],
   ...
}
If the description is missing for any of the line items, none of the line items will be shown.
To display the amounts with tax included, use the amountIncludingTax parameter.
To display the amounts with tax excluded, use the amountExcludingTax and taxAmount parameters. In this case, an extra line item will be displayed containing the tax total.
The SDK will always give preference to the amountIncludingTax parameter, unless it is missing in any of the line items, or the total for all items does not add up to the total in the amount object. In this case, the SDK will default to amountExcludingTax/taxAmount. If these are also missing, or do not add up, the line items will not be displayed.
Apple Pay webhook
Our webhooks inform you of important events related to your account. Although accepting webhook events is not required for Apple Pay payments, we strongly recommend that you do.
To inform you of the outcome of a payment, we send you a webhook event with:
eventCode: AUTHORISATION.pspReference: Adyen's unique reference associated with the payment request.-
success: Indicates the outcome of the payment. Possible values:- true: The payment was authorised.
- false: The payment failed.
AUTHORISATION is just one of the events that trigger a webhook event. Refer to Webhooks to accept events and learn about their structure and content.
Make a recurring Apple Pay payment
If you have a recurring or subscription business model we recommend tokenizing the shopper's payment details.
When you create a shopper token from a card payment, we store their payment details with the token. The token can be used to make recurring payments for the shopper.
To make recurring payments with the token you'll need to use the /payments endpoint.
Maestro cards and card payments authenticated with 3D Secure don't support recurring payments.
Create shopper token
Tokenize the shopper's payment details when you make the initial card payment.
- When you call /paymentSession to create a payment session, additionally include:
shopperReference: Your unique ID for this shopper (minimum length three characters).enableRecurring: true
- When you receive the response (or the webhook) that the payment was authorised, note the
recurringDetailReference. This is the token you will need to make recurring payments for this shopper.
Make recurring payment
For each recurring payment for this shopper:
-
Make a cards payment with a /payments call, and additionally include:
recurringDetailReference: Token you received back in the initial payment.shopperReference: The shopper ID you provided when you created the shopper token.shopperInteraction: ContAuth
{
   "merchantAccount":"YourMerchantAccount",
   "reference":"Your Reference Here",
   "amount":{
      "value":1000,
      "currency":"EUR"
   },
   "paymentMethod":{
      "type":"applepay",
      "recurringDetailReference":"7219687191761347"
   },
   "returnUrl":"https://your-company.com/...",
   "shopperReference":"YOUR_UNIQUE_SHOPPER_ID_IOfW3k9G2PvXFu2j",
   "shopperInteraction":"ContAuth"
}
If the payment was successful you'll receive an Authorised
resultCodeand apspReference, our unique identifier for this transaction.
Testing Apple Pay
Before going live, use Apple's test card numbers to test your integration.
For a full list of test cards and instructions how to add these to your test device, see Sandbox testing on Apple's Developer website.
Check the status of an Apple Pay test payment in your Customer Area > Transactions > Payments.