Hosted Payment Pages are no longer available
To accept payments through an Adyen-hosted page, use our Hosted Checkout.
This page is for the classic Hosted Payment Pages (HPP) integration, which has reached end-of-life. We are no longer processing transactions though HPP.
This chapter covers the basics of editing the Skin files you downloaded from the Customer Area. Adyen provides some example Skins should you need a reference or starting point. If your requirements are not too complex, creating your Skin may only consist of replacing a logo and one or two images.
As described previously, a Skin comprises of some files available in the Adyen CA as a ZIP archive with the following structure. The CA as a ZIP archive with the following structure (assuming that the SkinCode of your Skin is 57Hw8sLg):
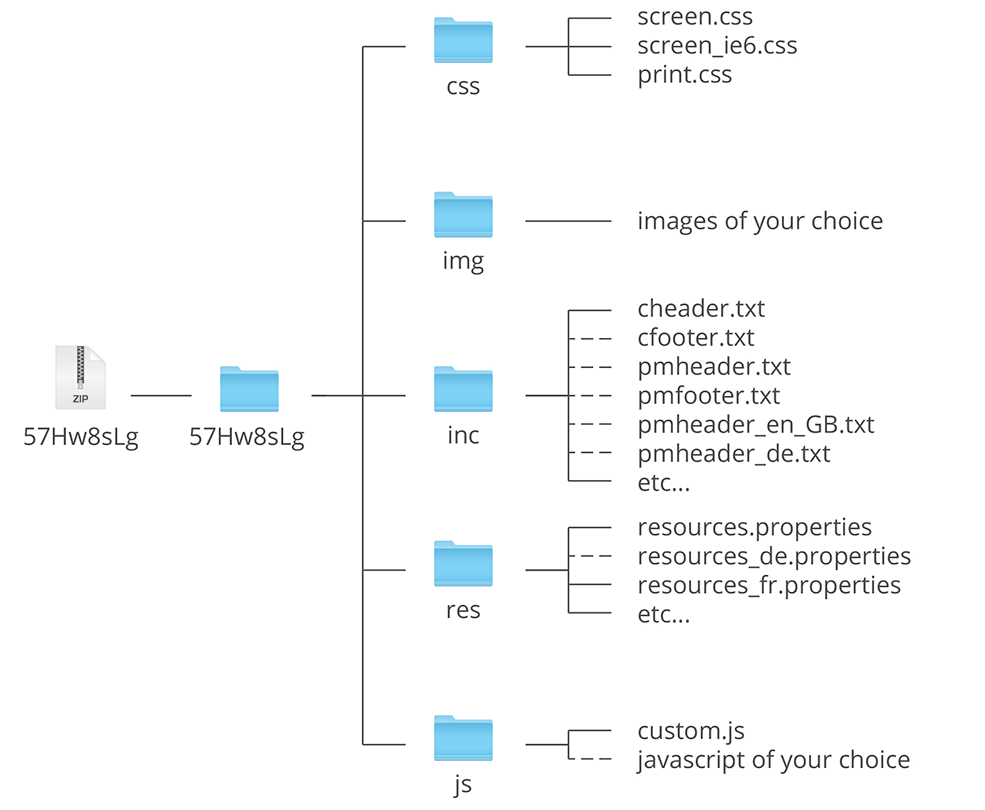
The contents of the ZIP file must exactly match the layout above else the CA rejects ZIP file while uploading. File names and directory names are case-sensitive and, as a rule, extra subdirectories are not allowed and filenames should be composed of simple characters (specifically only characters in the range [a-z A-Z 0-9_-.])
Expected contents of each subdirectory:
-
css
This directory contains the customized stylesheets for including in each page. The main stylesheet is screen.css, which is valid for the media type screen. Optionally, you can also supply a print.css to format a print version of the page. The optional screen_ie6.css file is included conditionally in Microsoft Internet Explorer version 6 or lower as a workaround for some non-standard interpretations of the CSS stylesheet standard. To include stylesheets in the pages, see HTML Skeleton.
-
img
You can include any images referenced in the stylesheets or HTML include using this directory. Filenames should be composed of simple characters.
-
inc
You may provide custom HTML content such as menus, shop links, navigation, etc. This directory contains the HTML fragments that enable you to do so. If an included file is language-dependent, it is possible to supply an include for each language locale. To know the location of these includes in a page, see HTML Skeleton.
-
res
This directory contains files named resources_$localename.properties with text overrides for the text in payment pages. The main file is resources.properties which overrides the default string (language locale en_GB). For overriding a string in French, you create file resources_fr.properties. The format of the resource files, as well as the allowed overrides, are described below.
-
js
This directory contains the JavaScript code for the Skin. Add all the custom JavaScripts to the custom.js file to be included on each page.
Refer the payment reminder email for more details about using and skinning.
Payment page
A skin payment page has the following structure:
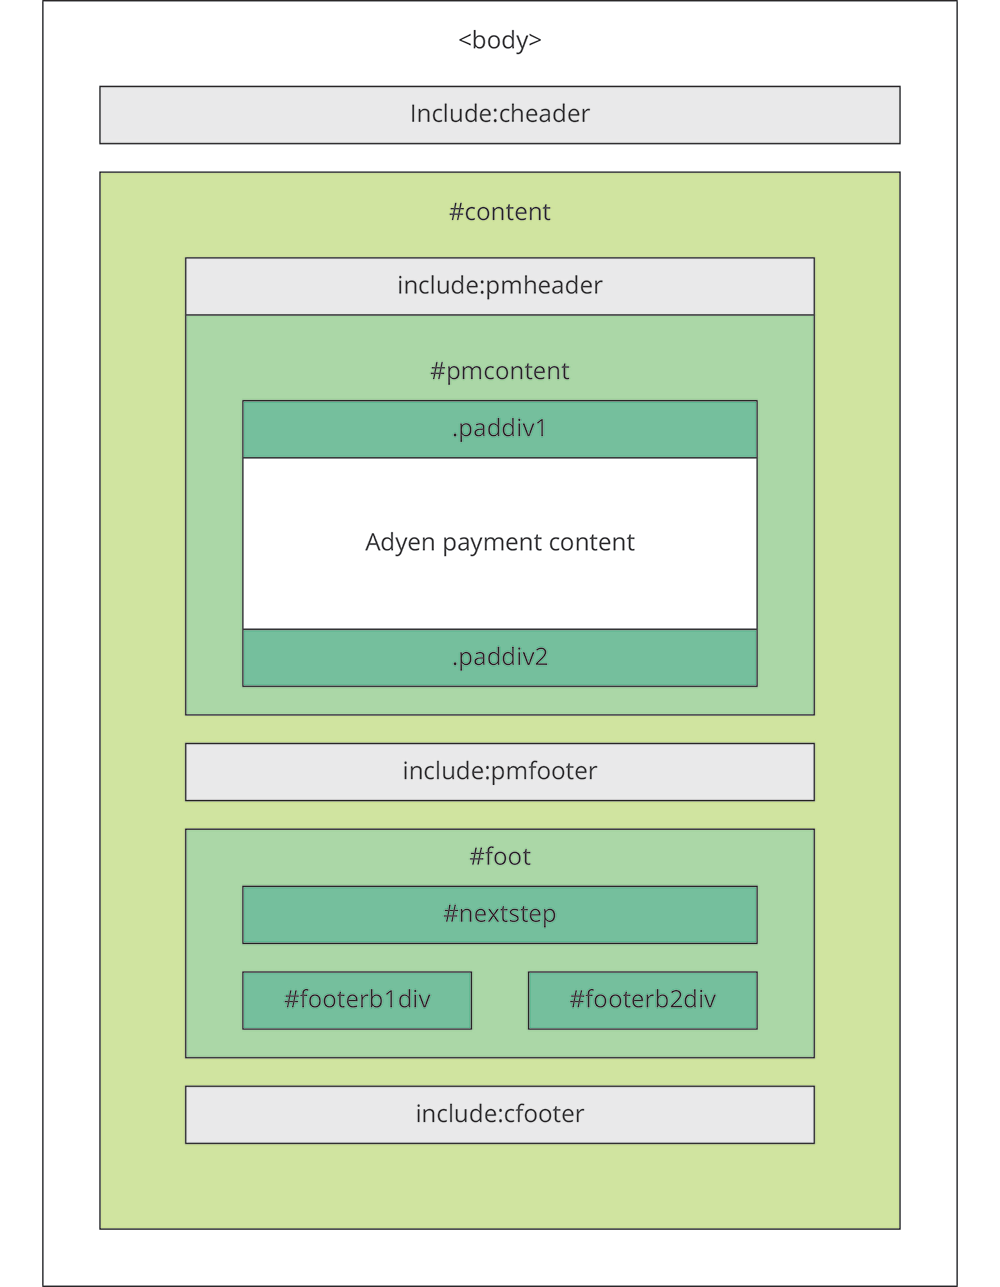
Payment page's HTML skeleton
    <!DOCTYPE html PUBLIC "-//W3C//DTD XHTML 1.0 Strict//EN"
        "http://www.w3.org/TR/xhtml1/DTD/xhtml1-strict.dtd">
    <html xmlns="http://www.w3.org/1999/xhtml" xml:lang="en">
    <head>
        <meta http-equiv="Content-Type" content="text/html; charset=utf-8" />
        <title>Page Title</title>
            <link rel="stylesheet" media="screen" type="text/css" href="/hpp/css/reset.css" />
            <link rel="stylesheet" media="screen" type="text/css" href="/sf/$SkinCode/css/screen.css" />
            <link rel="stylesheet" media="print"  type="text/css" href="/sf/$SkinCode/css/print.css" />
            <script type="text/javascript" src="/hpp/js/default.js"></script>
            <script type="text/javascript" src="/sf/$SkinCode/js/custom.js"></script>
        <!--[if lt IE 7]>
            <link rel="stylesheet" type="text/css" href="/sf/$SkinCode/css/screen_ie6.css" />
        <![endif]-->
    </head>
    <body>
        <!-- ### inc/cheader_[locale].txt or inc/cheader.txt (fallback) ### -->
        <form id="pageform" action="" method="post" onsubmit="return formValidate(this);">
        <script type="text/javascript">
        //<![CDATA[
        if (notNull(document.getElementById('pageform'))) {
            document.getElementById('pageform').setAttribute("autocomplete","off");
        }
        //]]>
        </script>
        <div id="content">
            <div id="pmcontent">
            <!-- ### inc/pmheader_[locale].txt or in/pmheader.txt (fallback) ### -->
            <div class="padDiv1"></div>

            <!-- ==================== -->
            <!-- Adyen Main Content  -->
            <!-- ==================== -->

            <div class="padDiv2"></div>
            <!-- ### inc/pmfooter_[locale].txt or inc/pmfooter.txt (fallback) ### -->
            <!-- ### inc/customfields_[locale].txt or inc/customfields.txt (fallback) ### -->
            </div>
        </div>
        <div id="foot">
            <div id="footc">
                <div id="nextstep">
                    <div id="nextstepc">Next Step Text</div>
                </div>
                <div id="footerb1div">
                  <input onclick="" type="submit" id="mainSubmit" value="continue" class="footerB nextB" />
                </div>
                <div id="footerb2div">
                   <input onclick="" type="button" id="mainBack" value="previous" class="footerB backB" />
                </div>
            </div>
        </div>
        </form>
        <!-- ### inc/cfooter_[locale].txt or inc/cfooter.txt (fallback) ### -->
    </body>
    </html>
Stylesheet
The skin framework was designed to provide maximum flexibility when designing and creating your layout.
Payment page structure shows the HTML skeleton, which generates each page and indicates where to represent each element of skin files, However, if the default flow model is modified using a stylesheet virtually, you can create any layout.
If you examine the HTML in HTML Skeleton, you see that the first included stylesheet is reset.css. This stylesheet is always included to nullify the default HTML styling applied by the browser (default styling can vary between browsers). Using the reset.css stylesheet makes it much easier to create a layout which renders consistently across browsers.
@media screen {
    /* Do not forget to set a foreground and background color */
    /* on the 'html' or 'body' element! */
    html,body,div,span,applet,object,iframe,h1,h2,h3,h4,h5,h6,p,blockquote,pre,a,abbr,acronym,address,big,cite,code,del,dfn,em,font,img,ins,kbd,q,s,samp,small,strike,strong,sub,sup,tt,var,dd,dl,dt,li,ol,ul,fieldset,form,label,legend,table,caption,tbody,tfoot,thead,tr,th,td
    {
        margin: 0;
        padding: 0;
        border: 0;
        font-weight: inherit;
        font-style: inherit;
        font-size: 100%;
        line-height: 1;
        font-family: inherit;
        text-align: left;
        vertical-align: baseline;
    }
    a img,:link img,:visited img {
        border: 0;
    }
    table {
        border-collapse: collapse;
        border-spacing: 0;
    }
    ol,ul {
        list-style: none;
    }
    q:before,q:after,blockquote:before,blockquote:after {
        content: "";
    }
}
@media print {
    .hideforprint {    display: none;}
}
/* Some Layout Shortcuts */
.r { text-align: right; }
.l { text-align: left; }
.fr { float: right; }
.fl { float: left; }
.b { font-weight: bold; }
.mid { vertical-align: middle; }
.red { color: #c00; }
You may notice that there are some simple stylesheet classes, which do not strictly belong in reset.css. This is purely an optimization to reduce the number of requests to the server.
Editing the files
The default settings for a skin are as follows:
After you have downloaded a skin, you can edit the files and directories to customize it. Here are some quick changes that you can easily implement.
Header image
-
Save the header image that you want to use in the image directory of the skin files.
-
Update the screen.css file to reference your header image.
-
The latest version of the default skins has an HPP new style V2 section added to the screen.css file. Make sure to replace the #logoheader code in that section.
# logoheader:
{
    height: 118px;
    background: url("../img/<imageName>");
    background-position: left;
    background-repeat: no-repeat;
    background-color: white;
}
-
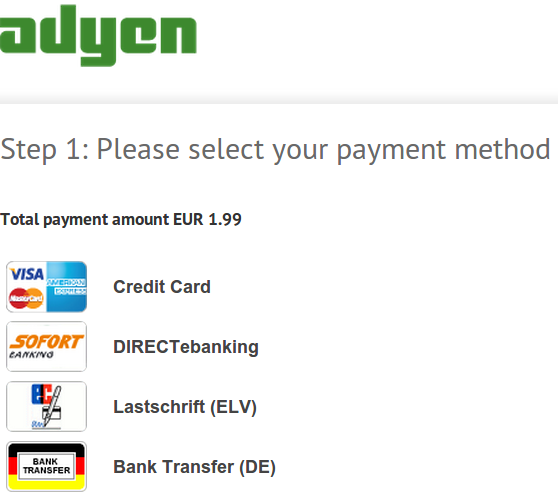
Payment method logos
-
Save the logos you want to use in the img directory of the skin files.
-
Update the screen.css file to override the .pmB element as shown:
.pmB<paymentMethodName>
{
    background-image: url("../img/<imageName>");
    width: 400px;
    height: 42px;
    padding-left: 85px;
    text-align: left;
    margin-bottom: 6px;
    font-size: 1.1em;
    background-color: transparent !important;
}
Font colors
Update the screen.css file to set the fonts you want to use:
html
{
    font-family: Arial, Helvetica, sans-serif;
    font-size: 1.1em;
}
Pay button
-
Save the logos you want to use in the img directory of the skin files.
-
Update the screen.css file to add the following line to the .paySubmit block:
.paySubmit
{
    background: url("../img/<imageName>");
    background-repeat: no-repeat;
    height: 16px;
    width: 50px;
    font-size: 0px;
    border: 0px;
}
Automatically open the credit card payment option
-
Open the cfooter.txt file from the inc folder of the skin files.
-
Add the following script to the file and save:
</div>
<script type="text/javascript">
  if (collapsecard) {
    setTimeout(function() {
         show(collapsecard, 'completeCard.shtml', 'card', 'brandCodeUndef');
    }, 1000);
  }
</script>
Custom payment methods
Adyen offers an option to display custom payment methods on your payment page. To configure your customer payment method, contact the Support Team.
After the Support Team has configured your custom payment method, you can set a custom payment method button and a custom payment method name. A custom payment method's name starts with "c_" (for example, "c_customPaymentMethod").
Button image
To change the button image that is shown for a standard payment method or to add the image of your custom payment method, you must add the image file to the img directory of your skin. You then need to add an extra style to your screen.css file. The syntax of this style in shown in the code block:
.pmB<paymentMethodName> { background-image: url("../img/<imageName>") !important; }For example, if your custom payment method name is c_mycustomPayment and you have added an image file mycustomPayment.png to the img directory of your skin, the style that you should add to your screen.css file is:
.pmBc_mycustomPayment { background-image: url("../img/mycustomPayment.png") !important; }Button name
Add the button name of your custom payment method to the resources.properties file. If you require specific translations for different languages, you can add this to the resource files.
The syntax for the button name is:
pm.<payment method name>.buttonName=<Insert display name>For example, if your custom payment method is c_mycustomPayment the entry in your resource file would be:
pm.c_mycustomPayment.buttonName=My Custom Payment Method NameCustom favicon.ico
To override the default icon shown in the URL area when on the payment pages, place your favicon.ico file in the img directory of the skin. It will be picked up automatically by the payment pages.
If you do not have tools to create a custom favicon.ico file, you can generate one online at: http://www.favicon.cc/
Numeric keyboard
A full keyboard is shown if a shopper makes a payment using mobile or tablet. To overcome this issue, Adyen introduced a card.card_number_field_type field, which shows only the numeric keyboard when a shopper selects credit card field.
To integrate this field to your skin, follow these steps:
For a new skin
If you are adding a new skin, the resource key called in the resource.properties file is card.card_number_field_type. Make sure that the value of the card.card_number_field_type is tel.
If the value entered is an integer the input type also should be integer. After you have entered the values, the numeric keypad is shown on mobile devices, including tablets.
For an existing skin
If you are using an old skin, it should be extended to use this feature. Add key and value in the resource.properties the card.card_number_field_type.
Add the following CSS in the screen.css to hide the number controls for desktop:
input[type='tel'] {
    -moz-appearance:textfield;
}

input::-webkit-outer-spin-button,
input::-webkit-inner-spin-button {
    -webkit-appearance: none;
}