In-store Pay by Link is no longer available for new integrations.
In-store Pay by Link lets you use the payment terminal to direct your shoppers to an online checkout. This also means you can offer additional online (ecommerce) payment methods.
We originally developed this feature in aid of efforts to limit the spread of COVID-19. With Pay by Link, a QR code with a payment link appears on the payment terminal. The shopper scans the QR code with the camera app on their phone and selects the payment link to complete the payment on a secure, Adyen-hosted checkout page on their phone.
You can implement in-store Pay by Link in various ways:
| Flow | Contactless | Note | How it works |
|---|---|---|---|
| Default | No | When you initiate a payment, the QR code with the payment link appears after the shopper (or your store staff) selects a menu option on the display of the terminal. | |
| Default - launched directly | Yes | Only with a Terminal API integration. | You launch the QR code with the payment link directly from your payment request. |
| Automatic | Yes | Not compatible with offering QR code wallets as payment options on the terminal. | The QR code with the payment link appears automatically a few seconds after you initiate a payment. |
Pay by Link transactions are processed as online payments, but are routed over your existing point-of-sale merchant account or store, with the existing capture settings.
You can use in-store Pay by Link as an extension to your existing Adyen point-of-sale integration. It is supported with Terminal API as well as with the standalone solution.
When you consider using in-store Pay by Link, be aware that it increases the time at checkout, that there are limitations, and that it is separate from Pay by Link for web stores and apps.
Limitations of in-store Pay by Link
Apart from increasing the time at checkout, in-store Pay by Link has some limitations:
-
In-store Pay by Link is not possible when the internet connection is down.
-
A Pay by Link transaction doesn't support special payment features such as tender options, tipping, currency conversion, and tax-free shopping.
-
Your payment terminal needs to be one of the following models: e285, M400, P400 Plus, V240m Plus, V400c Plus, V400m or S1F2.
-
You do not have the protection against chargebacks that you have when a shopper presents their card to the terminal. To remedy this, you could use 3D Secure, which offers liability shift for fraud chargebacks.
Supported payment methods and eligibility
In-store Pay by Link currently supports the following payment methods:
- PayPal.
- Klarna. Not supported in Poland and Portugal. The
TransactionIDfrom your payment request is the merchant reference that shoppers need if they contact Klarna customer services about their purchase.
Consult with your Adyen contact to ensure you are eligible to use this solution with your current setup and commercial agreements.
Default Pay by Link flow
There are two ways to start the default Pay by Link flow:
- Option A: let the shopper select the payment link QR code on the terminal.
- Option B: launch the payment link QR code directly. This is possible in a Terminal API integration, as an alternative to Option A.
-
Start the flow.
Option A- You initiate a payment like you usually do.
- When prompted to present their card, the shopper selects the QR code option.
-
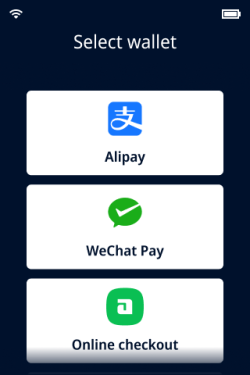
From the list of wallets, the shopper selects Online Checkout.
Option B
You make a payment request withTransactionConditions.AllowedPaymentBrand: paybylink, to launch the payment link QR code directly. -
The terminal shows the payment link QR code and a prompt to scan the code.

-
The shopper scans the QR code with the camera app on their smartphone and selects the payment link.
-
Pay by Link obtains the details of your payment request from the terminal, and the terminal shows Follow instructions on your mobile to pay.
-
The shopper completes the payment on the online checkout page using their preferred payment method.
-
The terminal receives the payment result from Pay by Link. In a Terminal API integration, you receive the response to your payment request.
-
If the payment is successful, the terminal shows Approved and, if it has a built-in printer, prints the receipt.
If the payment fails, the terminal shows Declined.
Automatic flow
The automatic flow is not compatible with making QR code wallet payments from the terminal. This means your terminals will no longer offer QR code wallets such as Alipay and WeChat Pay as payment options.
- You initiate a payment like you usually do.
- The payment terminal shows the payable amount and a prompt to complete the payment. At this point, the shopper can still choose to use another payment method.
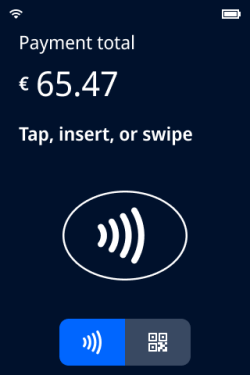
- After a five-second delay, the terminal shows the payment link QR code and a prompt to scan the code. If the shopper doesn't want to pay online, they can select the contactless icon to go back to the previous screen.
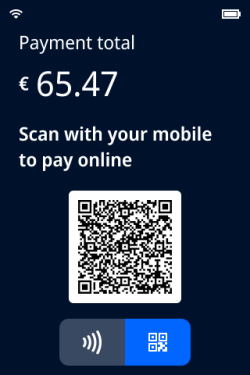
- The shopper scans the QR code with the camera app on their smartphone and selects the payment link.
- Pay by Link obtains the details of your payment request from the terminal, and the terminal shows Follow instructions on your mobile to pay.
- The shopper completes the payment on the online checkout page using their preferred payment method.>
- The terminal receives the payment result from Pay by Link. In a Terminal API integration, you receive the response to your payment request.
- If the payment is successful, the terminal shows Approved and, if it has a built-in printer, prints the receipt.
If the payment fails, the terminal shows Declined.
Enable in-store Pay by Link
Before you can offer Pay by Link in your store, you need to:
-
Make sure that your terms and conditions are available on your website.
-
In your Customer Area, add the URL to your terms and conditions.
-
Contact our Support Team to configure your account.
Let them know:-
Whether you want to enable the default flow or the automatic flow of in-store Pay by Link.
You can also discuss optional settings. For example, to change these default time-outs:- Total time that the QR code remains visible (default 115 seconds).
-
For the contactless flow, the delay before the Pay by Link QR code appears (default 5 seconds).
-
(Optional) Whether you want to set up 3D Secure.
Because the shopper is present and fraud is less likely, 3D Secure is not mandatory. But we still recommend you let us set up 3D Secure for you, to make use of the liability shift for fraud chargebacks. -
The online (ecommerce) payment methods you want to add to your account or store.
We may need to configure settings for these payment methods before you can add them. For example, for Klarna we first need to set up automatic capture. Otherwise, it is set up with manual capture regardless of your capture settings. -
Your API credential username, for example ws@Company.TestCompany. Our Support Team will check that your API credential has the required permissions.
-
-
Add one or more of the supported online payment methods to your point-of-sale merchant account or store.
Customize Pay by Link
A theme allows you to specify a background image and a brand logo to customize the appearance of the payment page. With in-store Pay by Link, you can create one theme that will be used for all your payment links.
Create a new theme
To create a theme, you must have one of the following user roles:
- Merchant admin
- Pay by Link Settings
To create a new theme:
- Log in to your Customer Area and switch to your merchant account if necessary.
- Go to Payments > Payment link themes.
- Select Create a new theme.
- Enter a Theme name. This name is visible to the user creating the payment link in the Customer Area.
- Enter a Display name. This name is visible to the shopper.
- Upload a favicon.
- Upload a brand logo.
- If you want this theme to be the default theme for all payment links, select Set as default. Available only on the merchant account.
- Select Create.
Sort payment methods
The list of payment methods shown by Pay by Link is ordered by popularity, the most popular payment methods in the shopper's country/region appearing at the top.
To configure these settings, you must have the Change payment methods user role.
If you want to present the payment methods in a different order:
- Log in to your Customer Area.
- Go to Payments > Checkout settings.
- Select a Country. The list of payment methods you now see are in the order they will appear to shoppers in this country/region.
- Drag the payment methods into the order that you want them to appear.
- Select Submit at the bottom of the page.
Remove payment methods
To remove a payment method from the list shown by Pay by Link, we recommend that you deactivate this payment method:
- Log in to your Customer Area.
- Go to Payments > Payment methods.
- Select the checkbox next to the payment method that you want you disable.
- Select Deactivate at the bottom of the page.
Make a payment
To initiate an in-store Pay by Link payment, start a payment like you usually do. In a Terminal API integration, you can choose to launch the payment link QR code directly.
Any transaction conditions or
SaleToAcquirerData
in your payment request are applied when the shopper pays with a contactless card or mobile wallet, but ignored when the shopper pays with Pay by Link.
Depending on the online (ecommerce) payment method, you may receive payment responses with values that you normally do not see in your point-of-sale integration. Other than that, the payment response will contain the usual parameters.
If the payment fails, it will contain the applicable point-of-sale error condition and refusal reason.
If the shopper doesn't complete the payment in ten minutes after scanning the payment link QR code, the transaction times out and the terminal shows a red cross  . You can retry the transaction.
If the payment result shown on the online checkout page is not the same as the result shown on the terminal, the result on the terminal is leading.
For example, if the Pay by Link page indicates no payment took place but the terminal shows Approved, the transaction did succeed.
Launch the payment link QR code directly
In a Terminal API integration, you can launch the payment link QR code through your payment request.
-
Verify that the shopper wants to make the payment on an online checkout, using their mobile phone.
-
Make a payment request with a
PaymentTransactionobject that additionally contains:TransactionConditions.AllowedPaymentBrand: paybylink
The next example shows a Pay by Link payment request for 27.99 euros.
{
   "SaleToPOIRequest":{
      "MessageHeader":{
         "ProtocolVersion":"3.0",
         "MessageClass":"Service",
         "MessageCategory":"Payment",
         "MessageType":"Request",
         "ServiceID":"0918171608",
         "SaleID":"POSSystemID12345",
         "POIID":"V400m-324688179"
      },
      "PaymentRequest":{
         "SaleData":{
            "SaleTransactionID":{
               "TransactionID":"8954",
               "TimeStamp":"2019-09-18T15:16:08+00:00"
            },
         },
         "PaymentTransaction":{
            "AmountsReq":{
               "Currency":"EUR",
               "RequestedAmount":27.99
            },
            "TransactionConditions":{
               "AllowedPaymentBrand":[
                  "paybylink"
               ]
            }
         }
      }
   }
}
This launches the payment link QR code on the terminal.
-
The process continues as described for the default flow, from step 4.
Cancel a payment
You can cancel an in-progress Pay by Link transaction from the POS app or the terminal like you usually do. The terminal will show Cancelled. However, if the shopper has already selected the payment link, the online checkout page doesn't notify the shopper of the cancellation. In this situation, the result on the terminal is leading.
If the shopper cancels the transaction on the online checkout page, the terminal shows Cancelled. In a Terminal API integration you receive a payment response with the applicable point-of-sale error condition and refusal reason.
Refund a payment
There are various ways to refund an in-store Pay by Link payment:
-
Recommended: make a referenced refund, specifying the transaction ID and time stamp of the original transaction in a
ReversalRequest. Compared to unreferenced refunds, there is a lower risk of return fraud, and the reconciliation is simpler. -
If the shopper has a card they can present to the terminal, you can make an unreferenced refund, specifying a
PaymentRequestwith a payment type of Refund. -
Manually refund a payment from the Customer Area.