This page describes 3D Secure 2 integration steps for version 46 or earlier of the /payments endpoint. If you are using a later version, refer Native 3D Secure 2 authentication.
How it works
If you are using 3D Secure for PSD2 compliance, read our comprehensive PSD2 SCA guide.
A payment qualified for 3D Secure 2 can go through either a frictionless or a challenge authentication flow before it is authorised. To simplify your implementation, use our web, Android, or iOS 3D Secure 2 Component in addition to your existing API integration.
Components are our pre-built modules that you can use to perform specific functions such as 3D Secure 2 authentication. To implement, submit API requests from your backend and then use our 3D Secure 2 Component to:
- Handle the device fingerprinting and challenge flows, including the data exchange between your front end or client and the issuer's Access Control Server (ACS).
- Return the device fingerprinting and the challenge flow result.
If you do not want to use the 3D Secure 2 Component and want to build the web-based implementation on your own, see Build your own 3D Secure 2 implementation. You can also choose to prefetch 3D Secure 2 device fingerprinting keys to reduce the number of calls for each transaction.
For an app-based implementation, we recommend that you use our 3D Secure 2 Android or iOS Component. Both our Android and iOS 3D Secure 2 Component implementations are approved and certified by EMVCo. If you want to build your own 3D Secure 2 mobile implementation, you will need to get an EMVCo certification.
3D Secure 2 is supported from v41 and later of /payments and /payments/details endpoints.
If you only want to perform a 3D Secure 2 authentication and then authorise the payment later, see the Authentication-only integration page.
Here's a diagram for a 3D Secure 2 full implementation with the 3D Secure 2 Component:
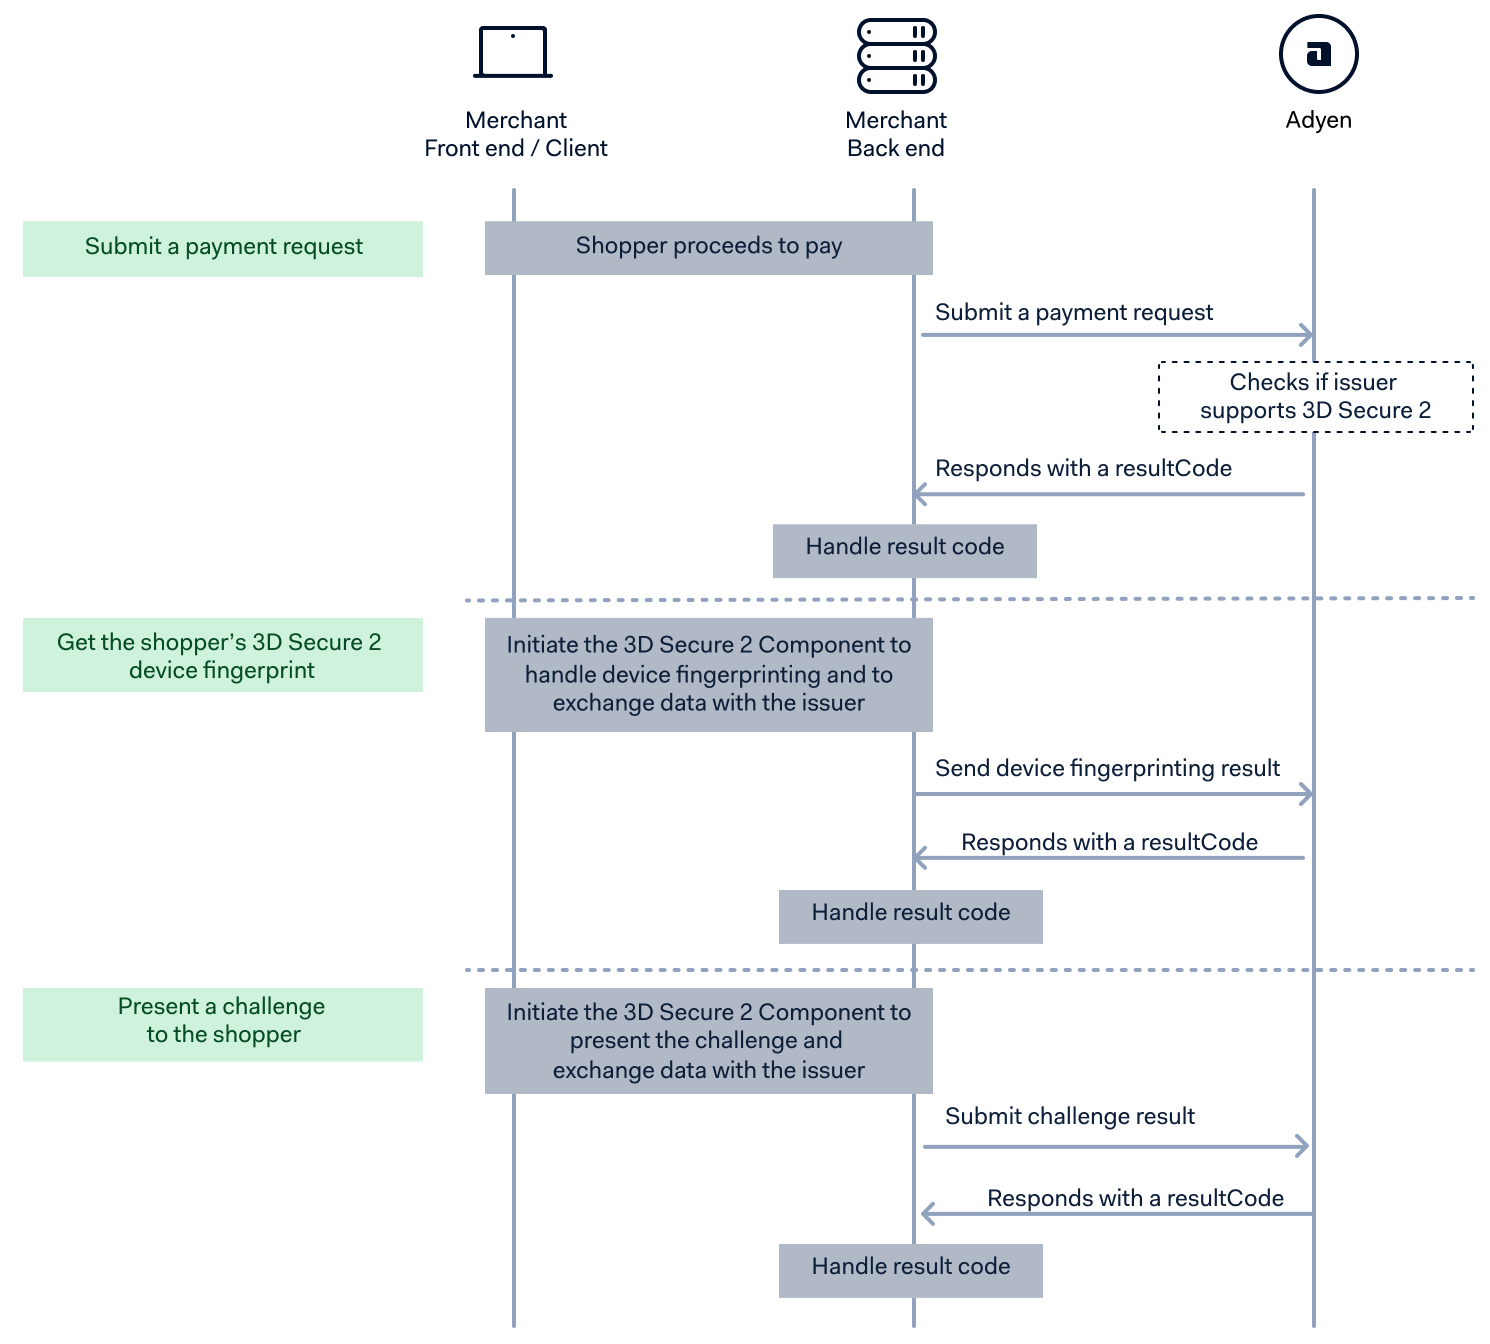
- Submit a payment request with the required 3D Secure 2 objects to start the authentication process. Build your implementation depending on the
resultCodereturned in the response. - Get the 3D Secure 2 device fingerprint. If you receive an IdentifyShopper
resultCode, you need to get the shopper's 3D Secure 2 device fingerprint. Initialize the 3D Secure 2 Component for device fingerprinting and submit the result to Adyen. If after submitting the result you get a response with an AuthorisedresultCode, this indicates that the transaction was authenticated in a frictionless flow, and the payment was successfully completed. - Present a challenge to the shopper. If you receive ChallengeShopper
resultCode, this means that the issuer requires further shopper interaction and is initiating a challenge flow. In a web-based integration, this result code can be returned after you submit a payment request or after you submit the device fingerprint result to Adyen, depending on the logic on the issuer's side. To handle a challenge flow, initialize the 3D Secure 2 Component for the challenge flow and submit the result to Adyen.
Based on issuer performance, Adyen's Authentication Engine might also route payments to the 3D Secure 2 redirect flow. This is indicated by a RedirectShopper resultCode response. For more information, refer to Payments routed to 3D Secure 1.
For a complete list of resultCode values and the actions that you need to take, see Result codes.
Before you begin
Before you begin to integrate, make sure you have followed the Get started with Adyen guide to:
- Get an overview of the steps needed to accept live payments.
- Create your test account.
After you have created your test account:
- Get your API Key. Save a copy as you'll need it for API calls you make to the Adyen payments platform.
- Read and understand the Components integration guide. You should already know how to collect shopper information, either with the Card component or with your own payment form implementation.
- Install the 3D Secure Component depending on your current integration:
Install 3D Secure 2 Component for Adyen iOS version 2.6.0 to 2.8.4
Import the iOS 3D Secure 2 Component to your project using either CocoaPods or Carthage:
CocoaPods
- Add
pod 'Adyen'to yourPodfile. - Run
pod install.
Carthage
- Add
github "adyen/adyen-ios"to yourCartfile. - Run
carthage update. - Link the framework with your target as described in Carthage Readme.
Install 3D Secure 2 Component for Adyen Android version 2.4.0 to 2.4.5
Import the Android 3D Secure 2 Component by adding this line to your build.gradle file.
implementation "com.adyen.checkout:threeds:<latest-version>"Integration steps
- Collect the shopper's card payment details with your existing Cards integration - whether through Drop-in, Card Component, or your own UI for the API-only integration.
- Proceed to submit a payment request.
- Use the
resultCodefrom the response to determine your next action. For example, to complete a 3D Secure 2 authentication flow, you might need to get the 3D Secure 2 device fingerprint, or present a challenge to the shopper, or both. Choose the integration steps for web, Android, or iOS. - Submit the 3D Secure device fingerprinting result and in case of a challenge flow, submit the challenge result.
To test your integration, see Testing 3D Secure 2.
Step 1: Submit a payment request
Submit a payment request with a POST /payments call containing the shopper's card details. Include the following parameters to indicate that you are ready to accept 3D Secure 2 authenticated payments:
| Parameter name | Required | Description |
|---|---|---|
| paymentMethod |  |
Object that contains the shopper's card details. Include the cardholder's name. If you are fully PCI compliant you can pass raw card data instead. |
| channel | |
Specify platform that you are using. Use Web, iOS, or Android. |
authenticationData.threeDSRequestData.nativeThreeDS |
|
Set to preferred. Indicates that your payment page can handle 3D Secure 2 transactions natively. |
| browserInfo | |
Object that contains information about the shopper's browser.
|
| returnUrl | |
In case of a 3D Secure 1 flow, this is the URL where the shopper will be redirected back to after completing 3D Secure 1 authentication. This URL can have a maximum of 1024 characters. See Return URL formats for each channel. |
| origin | Required for channel Web. The URL of the page where you are loading the 3D Secure 2 Component from. The origin should not include subdirectories and a trailing slash. You can also get this by opening the browser console and calling window.location.origin. |
|
| shopperIP | The shopper's IP address. | |
| billingAddress | The cardholder's billing address. | |
| shopperEmail | The cardholder's email address. |
Return URL formats
- For Web, the URL should include the protocol:
http://orhttps://. For example,https://your-company.com/checkout/. - For iOS, use the custom URL for your app. For example,
my-app://. For more information on setting custom URL schemes, refer to the Apple Developer documentation. -
For Android, if you are using the Android SDK, get the URL from
CheckoutSetupParameters.getReturnUrl(). Otherwise, use a custom URL handled by an Activity on your app. You can configure it with an intent filter. For example, configuremy-app://your.package.name, and then add that to yourmanifest.xmlfile.<activity android:name=".YourActivity"> <intent-filter> <action android:name="android.intent.action.VIEW"/> <category android:name="android.intent.category.DEFAULT"/> <category android:name="android.intent.category.BROWSABLE"/> <data android:host="${applicationId}" android:scheme="my-app"/> </intent-filter> </activity>
We recommend that you provide all available information to increase the likelihood of achieving a frictionless flow and a higher authorisation rate. In addition to the regular parameters you provide to Adyen, send additional parameters in this list.
Request
Response
You'll receive a response containing:
resultCode: IdentifyShopper or ChallengeShopper. Perform the corresponding 3D Secure device fingerprinting or present a challenge flows. If the transaction is exempted from 3D Secure 2, you might get an AuthorisedresultCode.threeds2.fingerprintTokenorthreeds2.challengeToken: Use this to initiate the 3D Secure 2 Component. If you want to know the contents of the encoded string, see payload structure.paymentData: Use this for your next POST /payments/details request.
For other possible resultCode values and the actions that you need to take, see Result codes.
Step 2: Get the 3D Secure 2 device fingerprint
If your server receives an IdentifyShopper resultCode, perform the 3D Secure 2 device fingerprinting. Follow the 3D Secure device fingerprinting procedure for web, iOS, or Android.
Collect the 3D Secure 2 device fingerprint with the Web Component
If you are using v49 of our APIs with Adyen JS version 3.1.0 and later, use createFromAction to load the 3D Secure 2 Component instead.
-
Make sure that you have already added the Components JavaScript file and the required configuration on your payments page.
-
Create a DOM element.
<div id="threeDS2"></div> -
Initiate the 3D Secure 2 Component with the
threeds2.fingerprintTokenyou received from the /payments response, assign a function to handle theonCompleteandonErrorevents, and mount the 3D Secure 2 Component.const threeDS2IdentifyShopper = checkout .create('threeDS2DeviceFingerprint', { fingerprintToken: resultObject.authentication['threeds2.fingerprintToken'], onComplete: function() {}, // Called whenever a result is available, regardless if the outcome is successful or not. onError: function() {} // Gets triggered on error. }) .mount('#threeDS2'); -
When the
onCompleteevent is triggered, get the result and proceed to submit the 3D Secure 2 device fingerprinting result.If the 3D Secure 2 device fingerprinting failed, both
onCompleteandonErrorwill be called.
Collect the 3D Secure 2 device fingerprint from an iOS app
If you are using v49 of our APIs with Adyen iOS version 3.0.0 and later, use the 3D Secure 2 Action Component instead.
-
Create a
Card3DS2Authenticatorinstance.let authenticator = Card3DS2Authenticator() -
Create a fingerprint with the
threeds2.fingerprintTokenyou received from the /payments response.authenticator.createFingerprint(usingToken: fingerprintToken) { result in switch result { case let .success(fingerprint): // Submit fingerprint case let .failure(error): // Handle error } } -
If the
successevent is triggered, proceed to submit the 3D Secure 2 device fingerprinting result with the value passed insuccess. Otherwise, handle thefailureevent. Thefailureevent will be triggered in case of a timeout, user cancellation, or system failures such as a certificate validation error or an invalid response from the issuer.
Collect the 3D Secure 2 device fingerprint from an Android app
If you are using v49 of our APIs with Adyen Android version 3.0.0 and later, use the 3D Secure 2 Action Component instead.
-
Create a
Card3DS2Authenticatorinstance and pass the current context.mCard3DS2Authenticator = new Card3DS2Authenticator(/* Activity */ this); -
Create a fingerprint with the
threeds2.fingerprintTokenyou received from the /payments response.mCard3DS2Authenticator.createFingerprint(fingerprintToken, new Card3DS2Authenticator.FingerprintListener() { @Override public void onSuccess(@NonNull String fingerprint) { // Submit fingerprint } @Override public void onFailure(@NonNull ThreeDS2Exception e) { mCard3DS2Authenticator.release(); // Handle error } }); -
If the
onSuccessevent is triggered, proceed to submit the 3D Secure 2 device fingerprinting result. Otherwise, handle theonFailureevent. TheonFailureevent will be triggered in case of a timeout, user cancellation, or system failures such as a certificate validation error or an invalid response from the issuer.
Step 3: Submit the 3D Secure 2 device fingerprinting result
Make a POST /payments/details request from your server with the details object and the paymentData as parameters.
threeds2.fingerprint: Pass thefingerprintResultfrom theonCompleteevent handler for web,successfrom iOS, oronSuccessfor Android event handler.paymentData: Pass thepaymentDatafrom the initial payment response.
Request
{
  "details": {
    "threeds2.fingerprint": "eyJ0aHJlZURTQ29tcEluZCI6ICJZIn0="
  },
  "paymentData": "YOUR_PAYMENT_DATA..."
}
Response
You'll receive a response containing any of the following resultCode:
- Authorised – This indicates that the transaction was authenticated in a frictionless flow, and the payment was successfully completed. This state serves as an indicator to proceed with the delivery of goods and services.
- ChallengeShopper – The issuer has requested further shopper interaction and is initiating a challenge flow. You will also get the
threeds2.challengeTokenand thepaymentDatawhich you will need in the challenge flow. If you want to know the contents of the encodedthreeds2.challengeTokenstring, see payload structure.
For other possible resultCode values and the actions that you need to take, see Result codes.
{
  "resultCode": "ChallengeShopper",
  "authentication": {
    "threeds2.challengeToken": "eyJ0aH..."
  },
  "details": [
    {
      "key": "threeds2.challengeResult",
      "type": "text"
    }
  ],
  "paymentData": "Ab02b4c0!..."
}
Step 4: Present a challenge
If your server receives a ChallengeShopper resultCode, this means that the issuer would like to perform additional checks in order to verify that the shopper is indeed the cardholder. Follow the challenge flow procedure for web, Android, or iOS.
Present a challenge with the Web Component
If you are using v49 of our APIs with Adyen JS version 3.1.0 and later, use createFromAction to load the 3D Secure 2 Component instead.
-
Make sure that you have already added the Components JavaScript file and the required configuration on your payments page.
-
Create a DOM element, or reuse the existing one if you are proceeding from the device fingerprinting flow.
<div id="threeDS2"></div> -
Initiate the 3D Secure 2 Component with the
threeds2.challengeTokenyou received from /payments response or from /payments/details if you are proceeding from the device fingerprinting flow. Assign a function to handle theonCompleteandonErrorevents, set the challenge window size, and then mount the 3D Secure 2 Component.const threeDS2Challenge = checkout .create('threeDS2Challenge', { challengeToken: resultObject.authentication['threeds2.challengeToken'], onComplete: function() {}, // Called whenever a result is available, regardless if the outcome is successful or not. onError: function() {}, // Gets triggered on error. challengeWindowSize: '05' // Defaults to '02' }) .mount('#threeDS2');Set the
challengeWindowSizeto any of the following identifiers:identifier size 01 250px x 400px 02 390px x 400px 03 500px x 600px 04 600px x 400px 05 100% x 100% -
When the
onCompleteevent is triggered, always get the result and proceed to submit the challenge result.If the challenge flow failed, both
onCompleteandonErrorwill be called.
Present a challenge in an iOS app
If you are using v49 of our APIs with Adyen iOS version 3.0.0 and later, use the 3D Secure 2 Action Component instead.
-
Use the same
Card3DS2Authenticatorinstance from the 3D Secure device fingerprinting flow. Pass thethreeds2.challengeTokenyou received from /payments/details to thepresentChallenge()function.authenticator.presentChallenge(usingToken: challengeToken) { result in switch result { case let .success(challengeResult): let payload = challengeResult.payload // Submit challenge result payload case let .failure(error): // Handle error } } -
If the
successevent is triggered, proceed to submit the challenge result with thepayloadvalue passed in thechallengeResultof thesuccessevent. Otherwise, handle thefailureevent. Thefailureevent will be triggered in case of a timeout, user cancellation, or system failures such as a certificate validation error or an invalid response from the issuer.
Present a challenge in an Android app
If you are using v49 of our APIs with Adyen Android version 3.0.0 and later, use the 3D Secure 2 Action Component instead.
-
Pass the
threeds2.challengeTokenyou received from the /payments/details to theCard3DS2Authenticator.mCard3DS2Authenticator.presentChallenge(challengeToken, new Card3DS2Authenticator.SimpleChallengeListener() { @Override public void onSuccess(@NonNull ChallengeResult challengeResult) { mCard3DS2Authenticator.release(); String payload = challengeResult.getPayload(); // Pass the challenge result payload } @Override public void onFailure(@NonNull ThreeDS2Exception e) { mCard3DS2Authenticator.release(); // Handle error } }); -
If the
onSuccessevent is triggered, proceed to submit the challenge result with thepayloadvalue passed in thechallengeResultof theonSuccessevent. Otherwise, handle theonFailureevent. TheonFailureevent will be triggered in case of a timeout, user cancellation, or system failures such as a certificate validation error or an invalid response from the issuer.
Step 5: Submit the challenge result
Make a POST /payments/details request from your server and include details and the paymentData as parameters.
threeds2.challengeResult: Pass the result from thechallengeResultfrom theonCompleteevent handler for web,onSuccessfor Android, or thepayloadvalue in thechallengeResultof thesuccessiOS event handler.paymentData: This is thepaymentDatafrom the latest API response, either from the /payments or from the /payments/details response if you are proceeding from the device fingerprinting flow.
Request
{
  "details": {
    "threeds2.challengeResult": "eyJ0cmFuc1N0YXR1cyI6IlkifQ=="
  },
  "paymentData": "YOUR_PAYMENT_DATA"
}
Response
You'll receive Authorised as the resultCode if the payment was successful.
{
    "pspReference": "V4HZ4RBFJGXXGN82",
    "resultCode": "Authorised"
}
UI customizations for apps
Customizing iOS UI
The 3D Secure 2 Component for Adyen iOS version 2.x.x inherits your app's theme to ensure the UI of the challenge flow fits your app's look and feel. If you require further UI customizations, the Component provides some customization options through the ADYAppearanceConfiguration class.
To customize your UI, create an instance of ADYAppearanceConfiguration, configure the desired properties, and pass it during initialization of the Card3DS2Authenticator.
let appearanceConfiguration = ADYAppearanceConfiguration()
// Customize properties of appearanceConfiguration.

let authenticator = Card3DS2Authenticator(appearanceConfiguration: appearanceConfiguration)
For a complete list of customizable properties, see the ADYAppearanceConfiguration class reference documentation.
Customizing Android UI
Customize the SDK theme
The 3D Secure 2 Component for Adyen Android version 2.x.x inherits your app's theme to ensure the UI of the challenge flow fits your app's look and feel. You can override the default SDK theme to inherit from one of AppCompat's theme variants. To do this, add the following XML snippet to your styles.xml file.
<style name="ThreeDS2Theme" parent="Theme.AppCompat.Light.DarkActionBar">
    <!-- Customize the SDK theme here. -->
    <item name="colorPrimary">@color/colorPrimary</item>
    <item name="colorPrimaryDark">@color/colorPrimaryDark</item>
    <item name="colorAccent">@color/colorAccent</item>
</style>
Using UiCustomization class
If you require further UI customizations, the 3D Secure 2 Component for Adyen Android version 2.x.x provides some customization options through the UiCustomization class.
To use the UiCustomization class, create an instance of UiCustomization, configure the desired properties, and pass it during initialization of the Card3DS2Authenticator.
mCard3DS2Authenticator = new Card3DS2Authenticator(/* Activity */ this, uiCustomization);For a complete list of customizable properties, see the UiCustomization class reference documentation.
Testing 3D Secure 2
To test how your integration handles different 3D Secure 2 authentication scenarios, you need to use a card number for the specific flow.
When prompted for 3D Secure 2 text challenges, use the following credentials to authenticate:
- For native mobile integrations, use password: 1234
- For web and mobile browser integrations, use password: password
Depending on the authentication option, you can receive the following result codes:
- RedirectShopper: you receive this result code if you are using the Redirect authentication flow.
- IdentifyShopper: you receive this result code if you are using the Native authentication flow.
- ChallengeShopper: you receive this result code after you submit the 3D Secure 2 device fingerprinting result in a Native authentication, unless you specify a frictionless flow.
Depending on your integration, use the following test cards to simulate different authentication flows.
| Card Type | Card Number | Expiry Date | Security Code (CVC/CVV/CID) |
|---|---|---|---|
| American Express | 3714 4963 5398 431 | 03/2030 | 7373 |
| Bancontact / Maestro | 6703 4444 4444 4449 | 03/2030 | |
| Bancontact / Visa | 4871 0499 9999 9910 | 03/2030 | 737 |
| Cartes Bancaires / Visa Debit | 4035 5014 2814 6300 | 03/2030 | 737 |
| Cartes Bancaires | 4360 0000 0100 0005 | 03/2030 | 737 |
| China UnionPay (Credit) | 6250 9470 0000 0014 | 03/2030 | 123 |
| China UnionPay (Debit) | 6250 9460 0000 0016 | 03/2030 | 123 |
| Diners | 3056 9309 0259 04 | 03/2030 | 737 |
| Discover | 6011 1111 1111 1117 | 03/2030 | 737 |
| Maestro | 5000 5500 0000 0029 | 03/2030 | n/a |
| Mastercard | 5454 5454 5454 5454 | 03/2030 | 737 |
| Mastercard Credit | 2222 4000 1000 0008 | 03/2030 | 737 |
| Visa | 4917 6100 0000 0000 | 03/2030 | 737 |
| Visa Classic | 4166 6766 6766 6746 | 03/2030 | 737 |
Challenge without fingerprint
To test the web-based flow where the device fingerprinting step is skipped (because the issuer's ACS has not configured a threeDSMethodURL), and you get a ChallengeShopper resultCode immediately after submitting the payment request, use the following card:
| Card Type | Card Number | Expiry Date | Security Code (CVC/CVV/CID) |
|---|---|---|---|
| Visa | 4212 3456 7891 0006 | 03/2030 | 737 |
Fingerprint without challenge
To test the frictionless flow, in which you perform a fingerprint but no challenge, use the following test card number:
| Card number | Expiry Date | Security Code (CVC/CVV/CID) | Authentication scenario |
|---|---|---|---|
| 5201 2815 0512 9736 | 03/2030 | 737 | Fingerprint but no challenge |
Native authentication
To test authentication scenarios for native mobile (app-based) integrations, use the following test cards:
| Card number | Expiry Date | Security Code (CVC/CVV/CID) | Authentication scenario |
|---|---|---|---|
| 5201 2855 6567 2311 | 03/2030 | 737 | Basic text authentication |
| 5201 2874 9905 2008 | 03/2030 | 737 | Basic single select |
| 5201 2815 9233 1633 | 03/2030 | 737 | Basic multi select |
| 5201 2888 2269 6974 | 03/2030 | 737 | Basic out-of-band (OOB) authentication |
| 5201 2895 0084 3268 | 03/2030 | 737 | HTML out-of-band (OOB) authentication |
| 5201 2861 5377 1465 | 03/2030 | 737 | App single select then text authentication |
| 4917 6100 0000 0042 | 03/2030 | 737 | Advanced: ACS sends an empty Challenge Response (CRes) |
| 4917 6100 0000 0067 | 03/2030 | 737 | Advanced: Invalid content in the acsSignedContent field in Authentication Response (ARes) |
| 4917 6100 0000 0059 | 03/2030 | 737 | Advanced: Challenge Response (CRes) timeout |
Technical error
To test simulate an error due to a timeout during the 3D Secure 2 authentication on the issuer side, use the following test card:
| Card number | Expiry Date | Security Code (CVC/CVV/CID) | Scenario |
|---|---|---|---|
| 5201 2829 9900 5515 | 03/2030 | 737 | Depending on your configuration, the transaction might still proceed to a successful authorization. |