The Client-Side Encryption (CSE) Web integrations are being phased out
This means we are:
- No longer developing the CSE integration.
- Not accepting new CSE integrations.
Switch to one of our latest Web integrations, to accept payments on your website.
Mobile integrations aren't affected.
Local payment methods
If you want to learn how to accept local payment methods, see Directory Lookup.
The Client-Side Encryption (CSE) integration lets you accept payments on your website and mobile application while encrypting card data in your shopper's browser using the Adyen encryption library.
To help you encrypt all sensitive card data on a client side, Adyen can host the JavaScript library and your key. In addition, you can decide to host the library by yourself, or use only the JavaScript in the HTML page.
Before you begin
Before you begin to integrate, make sure you have followed the Get started with Adyen guide to:
- Get an overview of the steps needed to accept live payments.
- Create your test account.
After you have created your test account:
- Get your API key or basic authentication credentials. Save a copy as you'll need it for API calls you make to the Adyen payments platform.
- Get the Library location from the Customer Area. This is a unique URL for you to retrieve the CSE library hosted by Adyen.
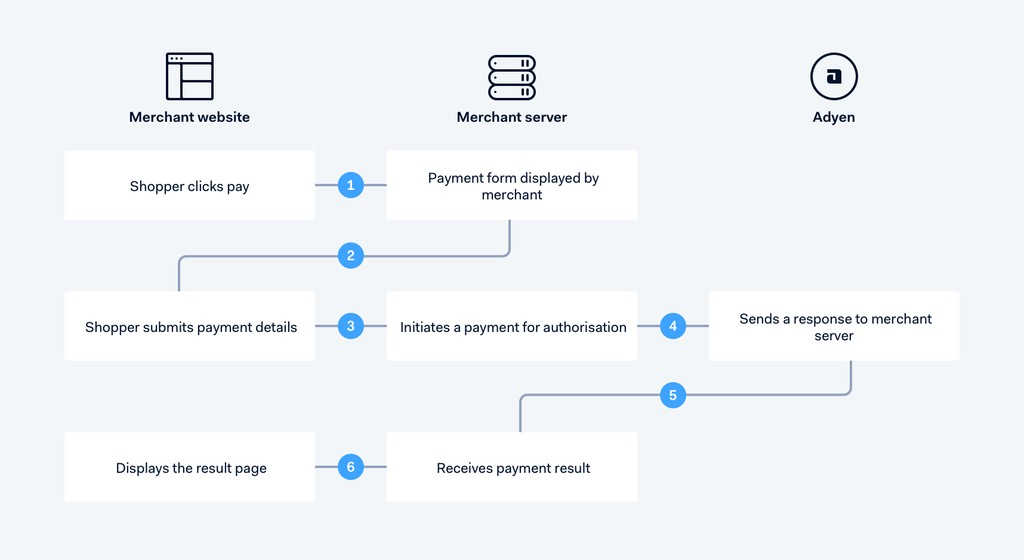
Overview
Your card payments go through many stages. The diagram below helps you understand the flow:
If you are integrating the Adyen payments platform with a third-party system, we strongly recommend you follow defensive programming best practices.
Client side
Start by creating a payment form integrated with the Client-Side Encryption (CSE) library, which you can retrieve using the unique URL provided to you by Adyen.
Ensure that your payment form includes the mandatory fields. To test the given code example, replace [payment request handler] with your payment handler URL of your server.
<script type="text/javascript" src="https://test.adyen.com/hpp/cse/js/[your unique generated library].shtml"></script>
<form method="POST" action="[payment request handler]" id="adyen-encrypted-form">
    <input type="text" size="20" data-encrypted-name="number"/>
    <input type="text" size="20" data-encrypted-name="holderName"/>
    <input type="text" size="2" data-encrypted-name="expiryMonth"/>
    <input type="text" size="4" data-encrypted-name="expiryYear"/>
    <input type="text" size="4" data-encrypted-name="cvc"/>
    <input type="hidden" value="[generate this server side]" data-encrypted-name="generationtime"/>
    <input type="submit" value="Pay"/>
</form>
<script>
// The form element to encrypt.
var form = document.getElementById('adyen-encrypted-form');
// See https://github.com/Adyen/CSE-JS/blob/master/Options.md for details on the options to use.
var options = {};
// Bind encryption options to the form.
adyen.createEncryptedForm(form, options);
</script>
You must encrypt card input fields by annotating them with the data-encrypted-name attribute. Do not use the name attribute.
This ensures that the call does not send unencrypted card data to your server.
The generationtime field is used to include a server-side timestamp in the data you submit the form. It determines whether a payment request is valid or not. Adyen refuses the transactions sent later than 24 hours from the timestamp. This value must be obtained on the server-side as the client's system clock may not be correctly synchronized which can cause the payment transaction to fail.
generationtime:
- Format: ISO 8601; YYYY-MM-DDThh:mm:ss.sssTZD
- Example: 2017-07-17T13:42:40.428+01:00
Prevent payment form reload
If you have implemented a single-page interface and do not want the form to reload the page when the payment gets submitted, implement the onsubmit option.
After including the JavaScript cryptographic library, you can use JavaScript or AJAX to customize the POST submission behaviour.
For example, you can:
- Pass an additional options parameter in the
createEncryptedFormmethod. - Change the name of the encrypted data container. Its default name is
adyen-encrypted-data. - Submit the form using AJAX instead of the default submit action, as shown in this example:
var encryptedBlobFieldName = "myFieldName";

options.name = encryptedBlobFieldName;
options.onsubmit = function(e) {
    var encryptedData = form.elements[encryptedBlobFieldName].value;
    // ... Your AJAX code here ....
    e.preventDefault();
};

adyen.createEncryptedForm(form, options);
Server side
From your server, make an HTTP POST request to the
/authorise
endpoint.
Authorise request
Test cards
To test the payment request, use one of our test credit cards.
In this request, include merchantAccount, reference, and the payment amount. The amount's value is in minor units, e.g. 20000 is 200 euros. You can find the number of decimal points per currency in Currency codes.
The additionalData object in the payment authorisation request needs to include card.encrypted.json, which you should set to the adyen.encrypted.data value. This value contains encrypted information about the shopper's credit card, as well as the timestamp:
- Card holder
- Card number
- CVC
- Expiry date
- Generation time
To know more about the required fields, see PaymentRequest.
Authorise response
If the message passes validation, Adyen performs a risk analysis. Depending on the outcome, we attempt authorisation, and you receive a payment response. The response includes a PSP reference that uniquely identifies each payment and can be used later for capture, cancel, or refund.
{
  "pspReference": "8814689190961342",
  "resultCode": "Authorised"
}
For other possible response codes and fields of the payment response, refer to PaymentResult.