For an extra layer of fraud protection, you may want to manually review a transaction before it is captured. Manual review is commonly used for:
-
High transaction values: If you have very high Average Transaction Values (ATVs), you may find that the monetary loss of even a single chargeback justifies the operational costs of manual review.
-
Expanding into high-risk markets: If you expand to a high-risk region, it is a good idea to manually review transactions to minimize fraudulent payments.
A transaction is sent to case management for manual review when it matches the criteria that you define. The case will contain the payment details, the available risk information like shopper DNA and risk results, and fraud control options. A reviewer then accesses the case in the Customer Area and accepts or rejects the transaction.
Requirements
Before you begin, take into account the following requirements and limitations.
| Requirement | Description |
|---|---|
| Integration type | Make sure that you have built an online payments integration, that risk is enabled, and that you have enabled premium features. |
| Customer Area roles | Make sure that you have one of the following role(s):
|
| Limitations | Case management is only available when you enable premium features. Zero-value auth transactions cannot be sent to case management. |
How it works
-
Configure case management:
- Set user roles.
- Set a trigger for manual review.
- Configure actions and webhooks that need to take place when a decision is made in case management.
- Include the
fraudResultTypefield within theadditionalDataobject in the API response and webhooks. Go to Developers > Additional data. Check the box under Risk > Fraud result.
-
Check whether the payment is in manual review. If the payment is in manual review, you will receive a
fraudResultType: AMBER in theadditionalDataof:- the payment response.
- the AUTHORISATION webhook.
For PayPal, you will only receive
fraudResultType: AMBER in the AUTHORISATION webhook, not in the payment response.
This means the payment was authorized but not auto-captured, and was set aside for manual review.
-
In your system, implement additional logic based on whether a transaction is in manual review. For example, you can delay shipment until the manual review has occurred.
-
Manually review the transaction in the Customer Area and decide whether to accept or reject the transaction. The actions and webhooks you configured, will now take place.
-
Use the asynchronous webhooks with
eventCodeMANUAL_REVIEW_ACCEPT or MANUAL_REVIEW_REJECT to update the status of the order in your system.
Set user roles
To add user roles in your Customer Area:
- Go to Settings > Users.
- Select the user that you want to add a role to.
- In the Roles list, enable the Merchant Manual Review role or the Risk Admin role.
- Select Save.
Set a trigger for manual review
Before you can set a trigger for manual review, determine which risk engine you are using; Protect or RevenueProtect.
To find out which risk engine you use:
- Log in to your Customer Area with your company account.
- Go to Revenue & risk > Risk profiles.
- Select a risk profile > Risk rules and check which tabs you see:
- If you see the tabs Allow, Block, Review, and Check for 3DS, you are using Protect. Go to set triggers for Protect.
- If you see the tabs Standard rules, Block and trust lists, and Custom rules, you are using RevenueProtect. Go to set triggers for RevenueProtect.
Set triggers for Protect
A transaction is sent to case management for manual review when it triggers a custom risk rule with the action Review.
Set triggers for RevenueProtect
A transaction is sent to case management for manual review when:
- The transaction reaches a specific risk score. You can set this Minimum score for manual review in the risk profile.
- The transaction triggers a risk rule that has Send to case management turned on.
In either of these events, if the risk score is 100 or greater, the transaction is refused and not sent to case management even if you set a minimum score for manual review.
For example, if the transaction amount consistency risk rule is set to flag transactions over EUR 1000, and Send to case management is turned on, the transaction is sent to case management.
If you have enabled capture delay for case management in your risk settings, you have up to seven calendar days to reject a transaction after it was sent to case management for manual review. If you do nothing, the transaction is automatically accepted, and the funds are captured based on your capture settings. The corresponding case is logged as expired.
To see how you can send transactions to manual review, you can also watch a video here:
Configure actions and webhooks
In your Customer Area, you can define the automatic action that needs take place and the webhook that you want to receive when a case is accepted or rejected during the manual review, or has expired.
In your Customer Area, on your company account:
- Go to Revenue & risk > Settings > Go to risk settings.
- Go to Global settings > Case management.
- Configure your preferred case management settings:
Capture delay
If you use automatic capture with or without a capture delay, but want to have more time to manually review payments, you can enable a separate capture delay for transactions that are sent to case management.
When you enable this setting, the default capture delay for transactions sent to case management is set to seven days, the day after the case expires.
If you use manual capture, you have to manually capture the payment if you accept the transaction.
Select modifications
At the time of manual review, the transaction has already been authorized by the issuing bank. From there, the Case Management behavior settings determine if the payment is automatically captured, refunded, or canceled when the case is accepted, rejected, or expired.
-
Accept - Select the modification when the case is accepted during manual review:
- Capture: The payment is captured.
-
None: The payment is not modified.
-
Reject - Select the modification when the case is rejected during manual review:
- Cancel: The payment is canceled or refunded, whichever is appropriate for the payment method.
-
None: The payment is not modified.
-
Expire - Select the modification when the case has expired:
- Capture: The payment is captured.
- Cancel: The payment is canceled or refunded, whichever is appropriate for the payment method.
-
None: The payment is not modified.
If the payment for an open case is captured, cancelled, or refunded outside of case management, the case will be closed.
Receive webhooks
You can configure the Case Management behavior settings to receive webhooks when a case is accepted, rejected, or expired.
-
Accept - Select the Send notification checkbox to receive a webhook with
eventCodeMANUAL_REVIEW_ACCEPT when the case is accepted during manual review. -
Reject - Select the Send notification checkbox to receive a webhook with
eventCodeMANUAL_REVIEW_REJECT when the case is rejected during manual review. -
Expire - Select a Notification option:
- Accept: Receive a webhook with
eventCodeMANUAL_REVIEW_ACCEPT when the case has expired and the account is configured to capture upon expiration. - Reject: Receive a webhook with
eventCodeMANUAL_REVIEW_REJECT when the case has expired and the account is configured to cancel upon expiration. -
None: No webhook is sent when the case has expired.
- Accept: Receive a webhook with
It is important to implement additional logic to process rejections. For example, you can notify the warehouse to not ship the goods in question. In the case of digital goods, you can choose to have the user's account disabled.
Here is an example webhook indicating the result of the manual review in the eventCode field.
{
   "live" : "true",
   "notificationItems" : [
      {
         "NotificationRequestItem" : {
            "amount" : {
               "currency" : "EUR",
               "value" : 52000
            },
            "eventCode" : "MANUAL_REVIEW_ACCEPT",
            "eventDate" : "2020-07-15T11:06:15+02:00",
            "merchantAccountCode" : "YOUR_MERCHANT_ACCOUNT",
            "merchantReference" : "YOUR_REFERENCE_FOR_THIS_PAYMENT",
            "originalReference" : "JDD6LKT8MBLZNN84",
            "paymentMethod" : "mc",
            "pspReference" : "MKR8T9CRT65ZGN15",
            "reason" : "accept",
            "success" : "true"
         }
      }
   ]
}
Review cases
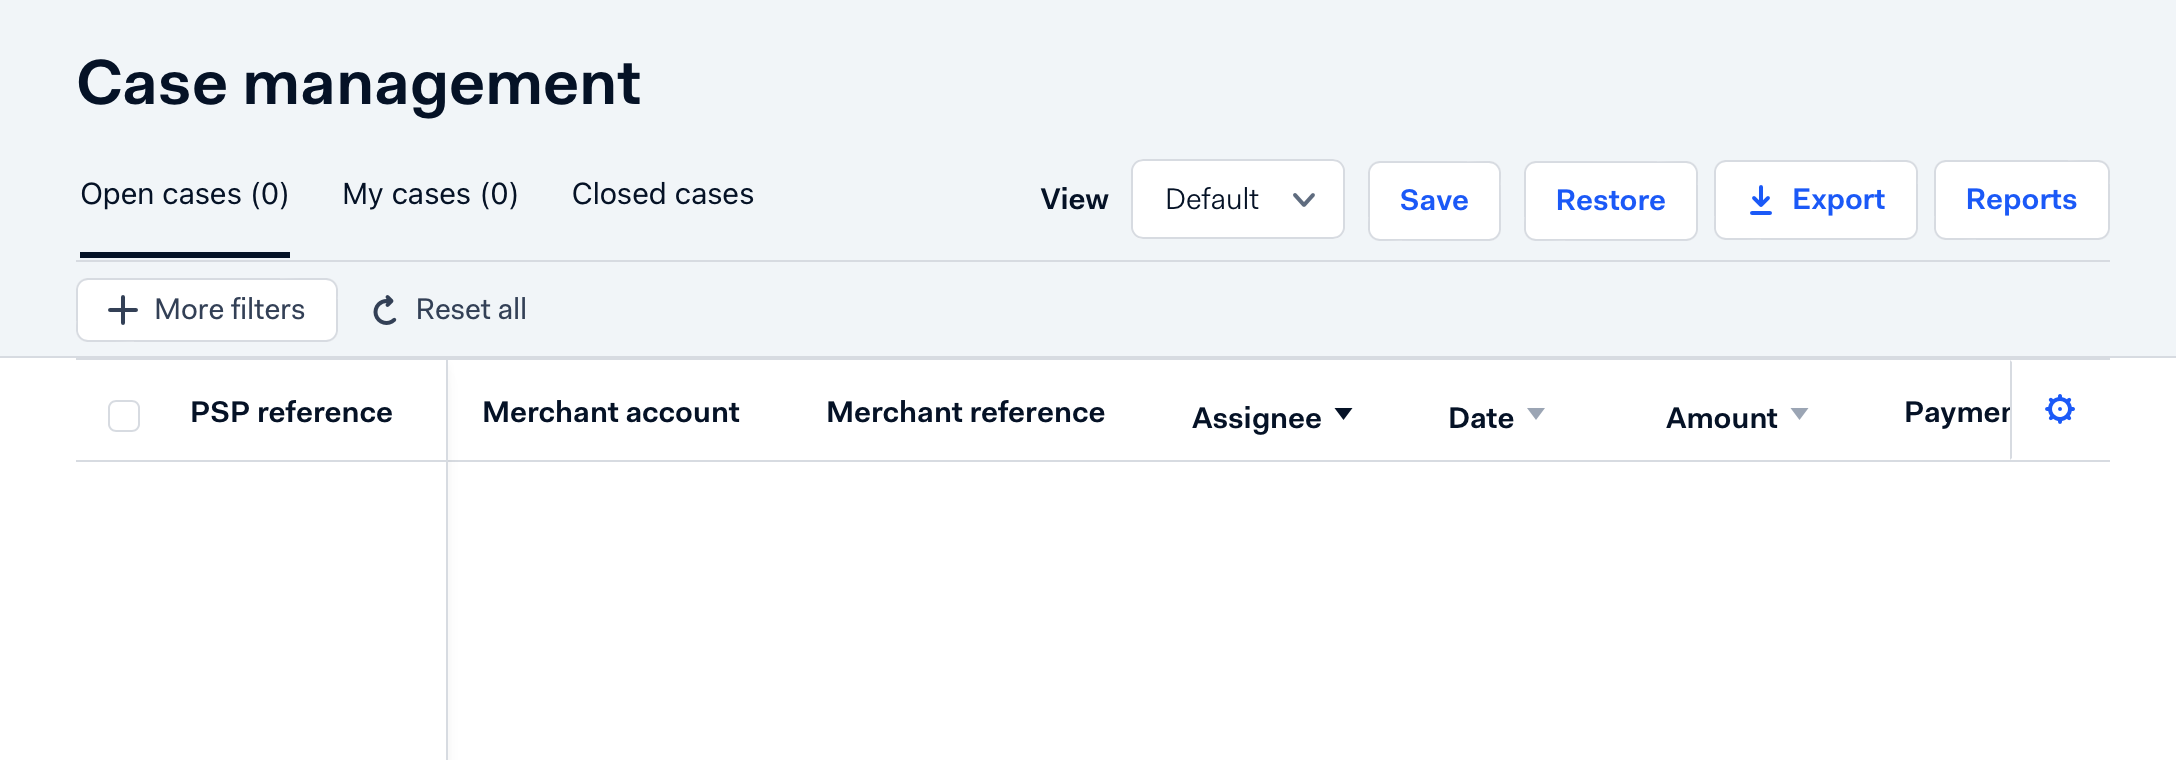
The case management queue lets you manually review cases, assign cases to reviewers, and accept or reject cases.
Access the case management queue
In your Customer Area:
- Go to Revenue & risk > Case Management.
- Select a list of cases:
- Open cases: A list of assigned or unassigned cases that are not closed (not yet accepted or rejected).
- My cases: Cases assigned to you.
- Closed cases: Cases that are accepted or rejected, or that have expired.
Assign reviews
Assign reviews to specific reviewers to avoid duplication or overlap of effort:
- Access the case management queue.
- Select the checkbox to the left of the PSP references of cases you want to assign.
At the bottom of the list of cases, options become available to assign, accept, and reject. - In the Assign to drop-down list, select the merchant account that you want to assign the selected cases to. Your own account is always listed first.
- Select Confirm.
The page refreshes, and the name of the assignee is listed in the Assigned to column. If a case is assigned to you, it is now listed under My cases.
Use case details to review a case
When you select a case for review, the Case details page opens. On this page, you can view details to help determine if you should accept or reject the transaction, such as:
- Risk results and other risk details. For example, you can see which risk rule triggered case management if the payment was sent to manual review because it triggered a risk rule.
- Shopper details such as shopper DNA. Looking at shopper DNA visualizations can be useful for manual review.
To see all available shopper DNA visualizations, select Shopper details > See shopper DNA. The oil splash is also displayed on the bottom of the Case details page.
There are three types of visualizations:
Shopper DNA oil splash
The oil splash contains shopper DNA data from shoppers for all merchant accounts within your company.
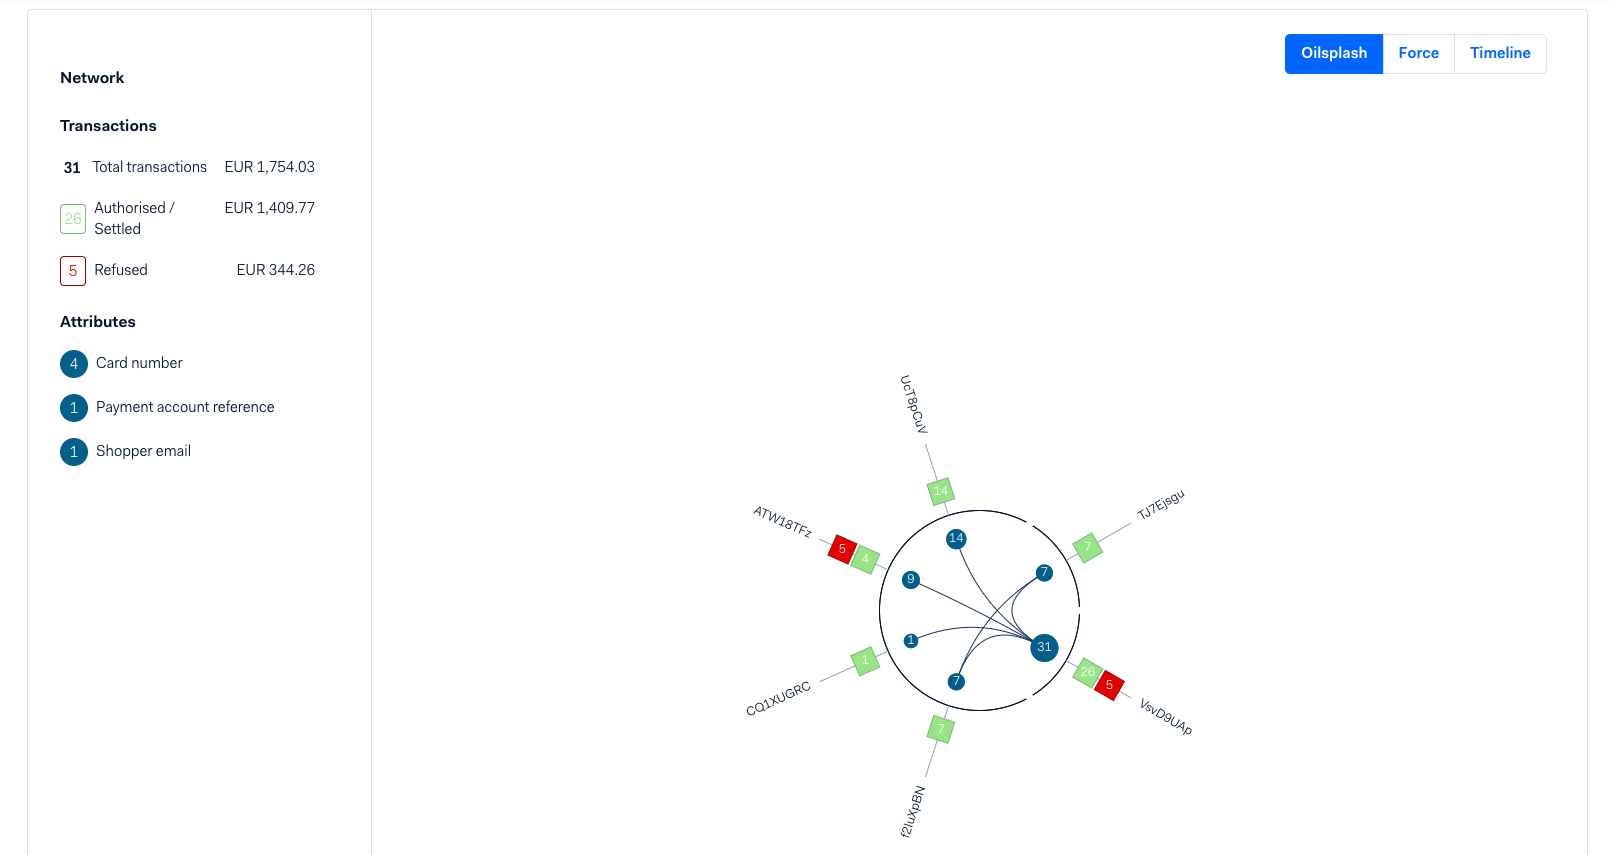
This visualization provides:
- A breakdown of the transactions in the oil splash, such as the total number of transactions, the value of transactions, and the payment statuses - refused, disputed, or authorized - for each attribute type.
- A breakdown of distinct attributes for a shopper, and how these attributes are linked together. Examples of attributes are email addresses, credit card numbers, or IP addresses.
- The ability to trace an attribute to the various transactions that used it. Select an attribute to view the transactions.
Shopper DNA force layout
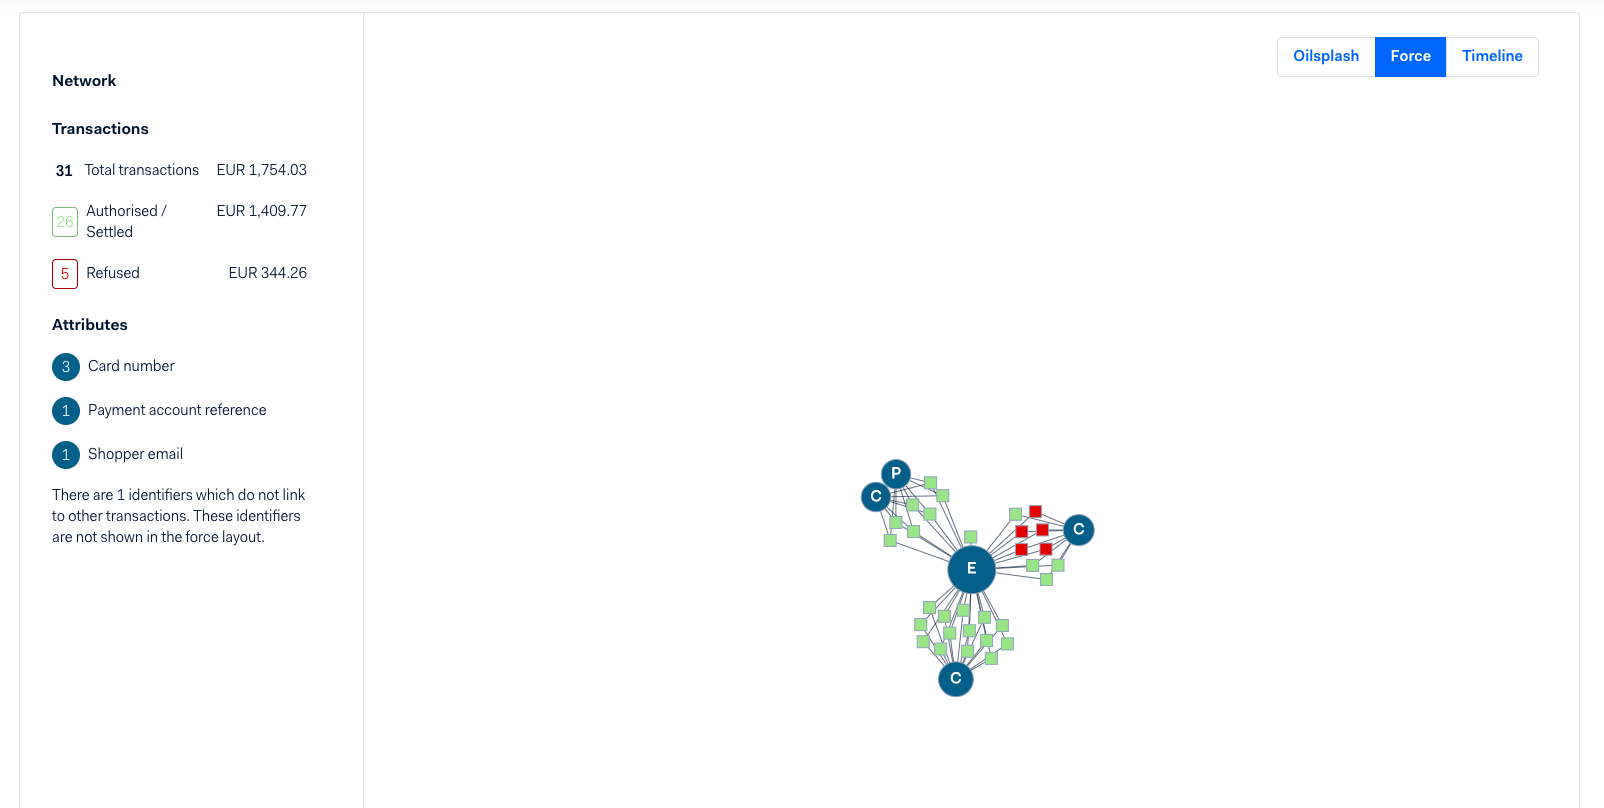
This visualization shows a network of transactions generated by the same shopper. Transactions are shown as squares and attributes are shown as circles. The letter in the circle represents the attribute identifier, often the first letter of the attribute.
If an identifier is linked to a single transaction, we do not show it in the visualization.
This visualization only appears if there are enough transactions available for this shopper.
Shopper DNA timeline
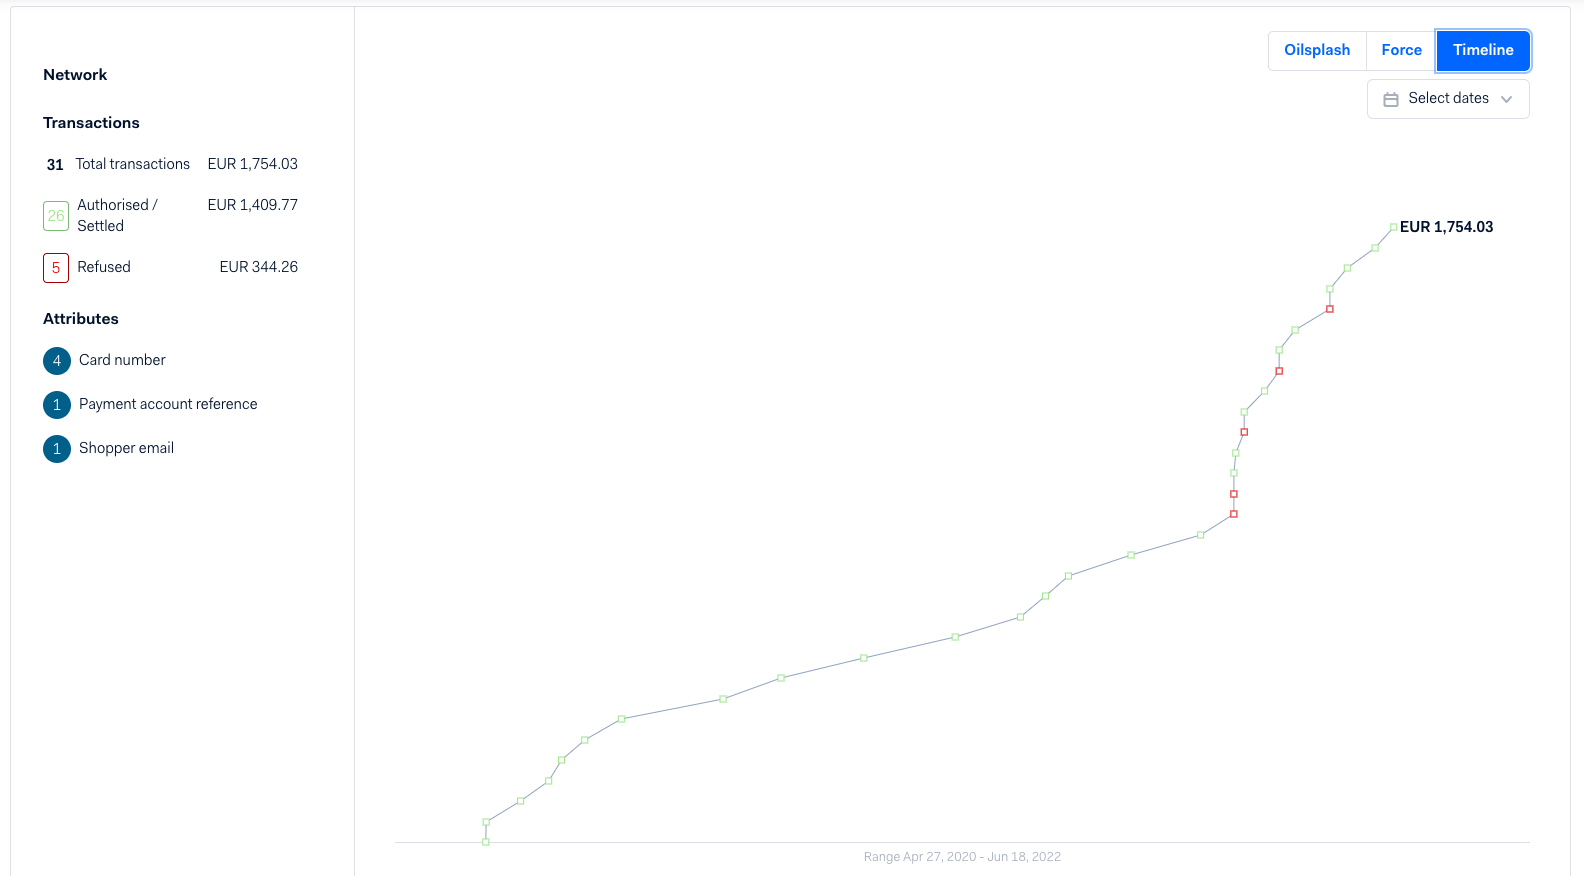
This visualization shows a historic timeline of this shoppers' transactions. Large clusters of transactions could indicate fraudulent activity.
This visualization only appears if there are enough transactions available for this shopper.
Accept or reject payments
You can accept or reject payments either from the opened case, or from the list of cases.
-
In the list, either click on the case to open it and see all details, or select the checkbox next to the PSP reference of the case.
To accept or reject several payments at once, select multiple checkboxes.
-
Select Accept to accept the payment(s) or Reject to reject the payment(s).
Update status on past reviews
After a decision is made in a case, the payment moves from the Open cases list to the Closed cases list.
To update the status of a closed case:
- Access the case management queue.
- Select Closed cases.
- Select the case from the list.
- Under Case Details, select the Manual status drop down.
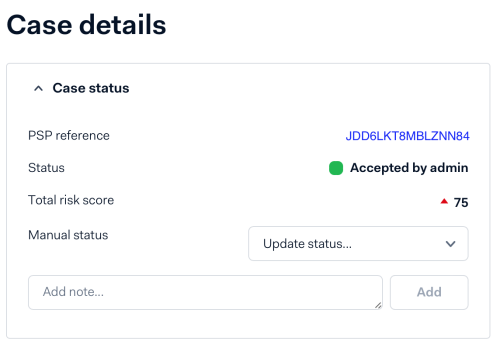
- Select either Fraud or Genuine.
If the transaction was cancelled because the case was rejected during manual review, this is a permanent decision that cannot be reversed. However, it is still important to document the proper status for a manual review, because it enables reviewers to take this into account in future decisions to accept or reject payments.