Flutter Drop-in
Render a list of available payment methods anywhere in your app.
Supported payment methods
Cards, buy now pay later, wallets, and many more.
See all supported payment methods
Features
- Low development time to integrate payment methods
- UI styling customization for the list of payment methods
- Adding payment methods to the list requires no extra development time
- 3D Secure 2 support built in
Start integrating with Flutter Drop-in
Choose your version
Adyen Flutter on GitHub
View the Adyen Flutter repository
View our example integrations
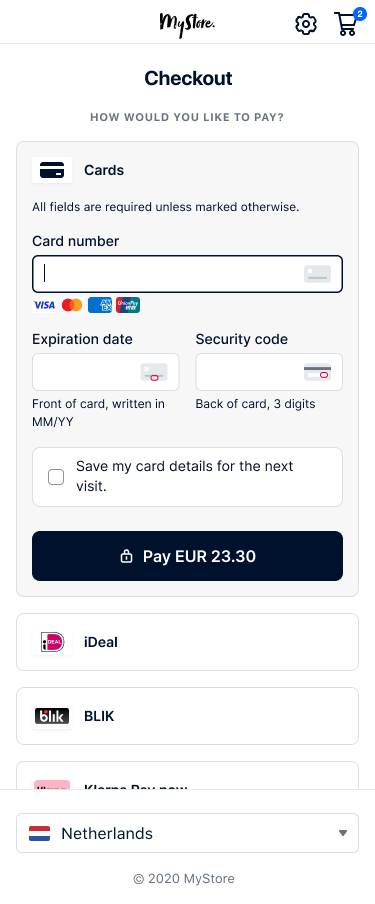
Drop-in is our pre-built UI solution for accepting payments in your app. Drop-in shows all payment methods as a list, in the same block. Your server makes API requests to the /paymentMethods, /payments, and /payments/details endpoints.
Requirements
Before you begin to integrate, make sure you have followed the Get started with Adyen guide to:
- Get an overview of the steps needed to accept live payments.
- Create your test account.
After you have created your test account:
- Get your API key.
- Get your client key.
- Set up webhooks to know the payment outcome.
Required versions:
- iOS 12 or later.
- Android 5.0 or later.
- Kotlin 1.8 or later.
- Gradle v8 or later.
How it works
For a Drop-in integration, you must implement the following parts:
The parts of your integration work together to complete the payment flow:
- The shopper goes to the checkout screen.
- Your server uses the shopper's country and currency information from your client to get available payment methods.
- Drop-in shows the available payment methods, collects the shopper's payment details, handles the additional action, and shows the payment result to the shopper.
- Your webhook server receives the notification containing the payment outcome.

If you are integrating these parts separately, you can start at the corresponding part of this integration guide:


Install an API library
We provide server-side API libraries for several programming languages, available through common package managers, like Gradle and npm, for easier installation and version management. Our API libraries will save you development time, because they:
- Use an API version that is up to date.
- Have generated models to help you construct requests.
- Send the request to Adyen using their built-in HTTP client, so you do not have to create your own.
Try our example integration
Requirements
- Java 11 or later.
Installation
You can use Maven, adding this dependency to your project's POM.
<dependency> <groupId>com.adyen</groupId> <artifactId>adyen-java-api-library</artifactId> <version>LATEST_VERSION</version> </dependency>
You can find the latest version on GitHub. Alternatively, you can download the release on GitHub.
Setting up the client
Create a singleton resource that you use for the API requests to Adyen:
// Import the required classes. package com.adyen.service; import com.adyen.Client; import com.adyen.service.checkout.PaymentsApi; import com.adyen.model.checkout.Amount; import com.adyen.enums.Environment; import com.adyen.service.exception.ApiException; import java.io.IOException; public class Snippet { public Snippet() throws IOException, ApiException { // Set up the client and service. Client client = new Client("ADYEN_API_KEY", Environment.TEST); } }
Get available payment methods
When your shopper is ready to pay, get a list of the available payment methods based on their country, device, and the payment amount.
From your server, make a POST /paymentMethods request, providing the following parameters. While most parameters are optional, we recommend that you include them because Adyen uses these to tailor the list of payment methods for your shopper.
We use the optional parameters to tailor the list of available payment methods to your shopper.
| Parameter name | Required | Description |
|---|---|---|
merchantAccount |
 |
Your merchant account name. |
amount |
The currency of the payment and its value in minor units. |
|
channel |
The platform where the payment is taking place. For example, when you set this to iOS, Adyen returns only the payment methods available for iOS. | |
countryCode |
The shopper's country/region. Adyen returns only the payment methods available in this country. Format: the two-letter ISO-3166-1 alpha-2 country code. Exception: QZ (Kosovo). |
|
shopperLocale |
By default, the shopperlocale is set to en-US. To change the language, set this to the shopper's language and country code. Your client app also uses this locale. |
For example, to get the available payment methods for a shopper in the Netherlands, for a payment of EUR 10:
curl https://checkout-test.adyen.com/checkout/v70/paymentMethods \ -H 'x-api-key: ADYEN_API_KEY' \ -H 'content-type: application/json' \ -d '{ "merchantAccount": "ADYEN_MERCHANT_ACCOUNT", "countryCode": "NL", "amount": { "currency": "EUR", "value": 1000 }, "channel": "Android", "shopperLocale": "nl-NL" }'
The response includes the list of available paymentMethods:
{ "paymentMethods":[ { "details":[...], "name":"Cards", "type":"scheme" ... }, { "details":[...], "name":"SEPA Direct Debit", "type":"sepadirectdebit" }, ... ] }
Pass the response to your client app. Use this in the next step to show available payment methods to the shopper.
Add Drop-in to your app
1. Add platform-specific configurations
-
Add the return URL handler to your
AppDelegate.swiftfile:Add return URL handlerExpand viewCopy link to code blockCopy codeoverride func application(_: UIApplication, open url: URL, options _: [UIApplication.OpenURLOptionsKey: Any] = [:]) -> Bool { RedirectComponent.applicationDidOpen(from: url) return true } -
In your app, add a custom URL scheme that matches the
returnUrlyou use when making a payment. -
For voucher payment methods, add photo library usage descriptions to the
Info.plistfile. -
For Apple Pay, do the following
- Complete the steps to enable Apple Pay.
- In your Runner target, add Apple Pay as a capability.
- In your Runner target, enter your merchant ID.
2. Create a configuration object
Create a configuration object with the following properties:
| Parameter | Required | Description |
|---|---|---|
environment |
|
Use test. When you are ready to accept live payments, change the value to one of our live environments. |
clientKey |
|
A public key linked to your API credential, used for client-side authentication. |
countryCode |
|
The shopper's country/region. This is used to filter the list of available payment methods to your shopper. Format: the two-letter ISO-3166-1 alpha-2 country code. Exception: QZ (Kosovo). |
shopperLocale |
By default, this is set to en-US. To change the language, set this to the shopper's language and country code. If you included shopperLocale in your /sessions request, Drop-in uses that one. |
|
amount |
The currency and value of the payment, in minor units. This is used to filter the list of available payment methods to your shopper. |
For example:
final DropInConfiguration dropInConfiguration = DropInConfiguration( // Change the environment to live to accept live payments. environment: Environment.test, clientKey: CLIENT_KEY, countryCode: COUNTRY_CODE, shopperLocale: SHOPPER_LOCALE, // Optional. amount: AMOUNT, // Optional. // Configuration for specific payment methods. For example, Apple Pay. applePayConfiguration: applePayConfiguration );
To add configuration for specific payment methods, create an additional configuration object. For example, for Apple Pay:
final ApplePayConfiguration applePayConfiguration = ApplePayConfiguration( merchantId: MERCHANT_ID, merchantName: MERCHANT_NAME, );
Optional configuration
| Parameter name | Description |
|---|---|
preselectedPaymentMethodTitle Only for iOS. |
When you have a preselected payment method, sets the title of the Drop-in overlay. |
paymentMethodNames |
If you want to use custom names when displaying payment methods, set the name to use for each payment method. |
final DropInConfiguration dropInConfiguration = DropInConfiguration( // Change the environment to live to accept live payments. environment: Environment.test, clientKey: CLIENT_KEY, countryCode: COUNTRY_CODE, shopperLocale: SHOPPER_LOCALE, // Optional. amount: AMOUNT, // Optional. // Configuration for specific payment methods. For example, Apple Pay. applePayConfiguration: applePayConfiguration // Optional Drop-in configuration. paymentMethodNames: { "scheme": "Credit Card", }, );
3. Add required callbacks
In an instance of AdvancedCheckout, add the following callbacks:
| Callback | Description |
|---|---|
onSubmit |
From your server, make a /payments request. The callback returns: - data: payment data that you must pass to your server. - extra: additional information, like the shopper's shipping address, for some payment methods. This can be null if no additional information is provided. |
onAdditionalDetails |
From your server, make a /payments/details request, passing the data object from the onSubmit callback. |
final AdvancedCheckout advancedCheckout = AdvancedCheckout( onSubmit: YOUR_ON_SUBMIT_CALL, onAdditionalDetails: YOUR_ON_ADDITIONAL_DETAILS_CALL, );
4. Show Drop-in in your app
Call startDropin to show the Drop-in, passing the following:
| Parameter | Required | Description |
|---|---|---|
dropInConfiguration |
|
The configuration object you created. |
paymentMethodsResponse |
|
The full /paymentMethods response. |
checkout |
|
The advancedCheckout that you created. |
final PaymentResult paymentResult = await AdyenCheckout.advanced.startDropIn( dropInConfiguration: dropInConfiguration, checkout: advancedCheckout, );
Drop-in handles the payment flow.
Make a payment
When the shopper selects the Pay button or chooses to pay with a payment method that requires a redirection, Drop-in calls onSubmit.
-
From your server, make a POST /payments request specifying:
Parameter name Required Description merchantAccountYour merchant account name. amountThe currencyof the payment and itsvaluein minor units.referenceYour unique reference for this payment. paymentMethodThe payment method from the payloadof theonSubmitevent from your client app.returnUrlFor iOS, this is the URL to your app, where the shopper should return, after a redirection. Maximum of 1024 characters. For more information on setting a custom URL scheme for your app, read the Apple Developer documentation.
For Android, include your package name in the URL, for example,adyencheckout://your.package.name.
If the URL to return to includes non-ASCII characters, like spaces or special letters, URL encode the value.
The URL must not include personally identifiable information (PII), for example name or email address.applicationInfoIf you are building an Adyen solution for multiple merchants, include some basic identifying information, so that we can offer you better support. For more information, refer to Building Adyen solutions. Include additional parameters in your payment request to:
- Integrate some payment methods. For more information, refer to our payment method integration guides.
- Make use of our risk management features. For more information, see Required risk fields.
- Use native 3D Secure 2 authentication.
- Tokenize your shopper's payment details or make recurring payments.The following example shows how to make a payment request for EUR 10:
Expand viewCopy link to code blockCopy codecurl https://checkout-test.adyen.com/checkout/v70/payments \ -H 'x-api-key: ADYEN_API_KEY' \ -H 'content-type: application/json' \ -d '{ "amount":{ "currency":"EUR", "value":1000 }, "reference":"YOUR_ORDER_NUMBER", "paymentMethod":STATE_DATApaymentMethod field of an object passed from your client app, "returnUrl":"my-app://adyen", "merchantAccount":"ADYEN_MERCHANT_ACCOUNT" }' The following example shows the /payments response for iDEAL, a redirect payment method.
/payments responseExpand viewCopy link to code blockCopy code{ "resultCode": "RedirectShopper", "action": { "paymentMethodType": "ideal", "url": "https://checkoutshopper-test.adyen.com/checkoutshopper/checkoutPaymentRedirect?redirectData=X6Xtf...", "method": "GET", "type": "redirect" } } -
Map the response to one of the following
PaymentEventobjects:Type Description FinishedThe payment is finished. ActionAn additional action is required. Drop-in automatically handles the additional action. ErrorAn error has occured. -
Pass the object to your client. The
onSubmitcallback expects it.
Errors
If an error occurs, you get one of the following error codes:
| Error code | Description | Action to take |
|---|---|---|
| canceledByShopper | The shopper canceled the payment. | Take the shopper back to the checkout page. |
| notSupported | The payment method isn't supported by the shopper's device. | Tell the shopper that the payment method isn't supported by their device. |
| noClientKey | No clientKey configured. |
Tell the shopper that an error occurred. |
| noPayment | No payment information configured. |
Tell the shopper that an error occurred. |
| invalidPaymentMethods | Can't parse the paymentMethods list, or the list is empty. |
Tell the shopper that an error occurred. |
| noPaymentMethod | Can't find the selected payment method. | Tell the shopper that their selected payment method is currently unavailable. |
Send additional payment details
If the shopper performed additional actions to complete the payment, Drop-in calls onAdditionalDetails to make a POST /payments/details request from your server:
curl https://checkout-test.adyen.com/checkout/v70/payments/details \ -H 'x-api-key: ADYEN_API_KEY' \ -H 'content-type: application/json' \ -d 'STATE_DATAobject passed from your client app'
Example responses:
{ "pspReference": "NC6HT9CRT65ZGN82", "resultCode": "Authorised" }
- Map the response to a
PaymentEventobject. - Pass the object to your client. The
onAdditionalDetailcallback expects it.
If another additional action is required, Drop-in handles it. If no additional action is required, Drop-in completes the payment flow.
Handle the result
When Drop-in completes the payment flow, you get one of the following objects:
| Object | Description |
|---|---|
PaymentAdvancedFinished |
The payment was successfully submitted. Contains a resultCode with the status of the payment. |
PaymentCancelledByUser |
The payment was canceled by the user. |
PaymentError |
The payment encountered an error. |
Handle the object and inform the shopper.
Get the payment outcome
After Drop-in finishes the payment flow, you can show the shopper the current payment status. Adyen sends a webhook with the outcome of the payment.
Inform the shopper
Use the
resultCode
to show the shopper the current payment status. This synchronous response doesn't give you the final outcome of the payment. You get the final payment status in a webhook that you use to update your order management system.
Update your order management system
You get the outcome of each payment asynchronously, in an AUTHORISATION webhook. Use the merchantReference from the webhook to match it to your order reference.
For a successful payment, the event contains success: true.
{ "live": "false", "notificationItems":[ { "NotificationRequestItem":{ "eventCode":"AUTHORISATION", "merchantAccountCode":"YOUR_MERCHANT_ACCOUNT", "reason":"033899:1111:03/2030", "amount":{ "currency":"EUR", "value":2500 }, "operations":["CANCEL","CAPTURE","REFUND"], "success":"true", "paymentMethod":"mc", "additionalData":{ "expiryDate":"03/2030", "authCode":"033899", "cardBin":"411111", "cardSummary":"1111" }, "merchantReference":"YOUR_REFERENCE", "pspReference":"NC6HT9CRT65ZGN82", "eventDate":"2021-09-13T14:10:22+02:00" } } ] }
For an unsuccessful payment, you get success: false, and the reason field has details about why the payment was unsuccessful.
{ "live": "false", "notificationItems":[ { "NotificationRequestItem":{ "eventCode":"AUTHORISATION", "merchantAccountCode":"YOUR_MERCHANT_ACCOUNT", "reason":"validation 101 Invalid card number", "amount":{ "currency":"EUR", "value":2500 }, "success":"false", "paymentMethod":"unknowncard", "additionalData":{ "expiryDate":"03/2030", "cardBin":"411111", "cardSummary":"1112" }, "merchantReference":"YOUR_REFERENCE", "pspReference":"KHQC5N7G84BLNK43", "eventDate":"2021-09-13T14:14:05+02:00" } } ] }
Test and go live
Before going live, use our list of test cards and other payment methods to test your integration. We recommend testing each payment method that you intend to offer to your shoppers.
You can check the status of a test payment in your Customer Area, under Transactions > Payments.
To debug or troubleshoot test payments, you can also use API logs in your test environment.
When you are ready to go live, you need to:
- Apply for a live account. Review the process to start accepting payments on Get started with Adyen.
- Assess your PCI DSS compliance by submitting the Self-Assessment Questionnaire-A.
- Configure your live account.
- Submit a request to add payment methods in your live Customer Area .
- Switch from test to our live endpoints.
-
Load Drop-in from one of our live environments and set the
environmentto match your live endpoints:Endpoint region Value Europe (EU) live europe United States (US) live unitedStates Australia (AU) live australia Asia Pacific & Southeast (APSE) live apse India (IN) live india