For an extra layer of fraud protection, you may want to manually review a transaction before it is captured. Manual review is commonly used for:
-
High transaction values: If you have very high Average Transaction Values (ATVs), you may find that the monetary loss of even a single chargeback justifies the operational costs of manual review.
-
Expanding into high-risk markets: If you expand to a high-risk region, it is a good idea to manually review transactions to minimize fraudulent payments.
A transaction is sent to case management for manual review when it matches the criteria that you define. The case will contain the payment details, the available risk information like shopper DNA and risk results, and fraud control options. A reviewer then accesses the case in the Customer Area and accepts or rejects the transaction.
Requirements
Before you begin, take into account the following requirements and limitations.
| Requirement | Description |
|---|---|
| Integration type | Make sure that you have built an online payments integration, that risk is enabled, and that you have enabled premium features. |
| Customer Area roles | Make sure that you have one of the following role(s):
|
| Limitations | Case management is only available when you enable premium features. Zero-value auth transactions cannot be sent to case management. |
| Setup steps | Before you begin:
|
How case management works
-
Prepare for manual review. Configure case management settings, configure custom risk rules, and enable risk results in the API response and webhooks:
- Set user roles.
- Set a trigger for manual review.
- Configure actions and webhooks that need to take place when a decision is made in case management.
- Include the
fraudResultTypefield within theadditionalDataobject in the API response and webhooks.
-
Check whether the payment is in manual review. If the payment is in manual review, you will receive a
fraudResultType: AMBER in theadditionalDataof:- the payment response.
- the AUTHORISATION webhook.
For PayPal, you will only receive
fraudResultType: AMBER in the AUTHORISATION webhook, not in the payment response.
This means the payment was authorized but not auto-captured, and was set aside for manual review.
-
In your system, implement additional logic based on whether a transaction is in manual review. For example, you can delay shipment until the manual review has occurred.
-
Manually review the transaction in the Customer Area and decide whether to accept or reject the transaction. The actions and webhooks you configured, will now take place.
-
Use the asynchronous webhooks with
eventCodeMANUAL_REVIEW_ACCEPT or MANUAL_REVIEW_REJECT to update the status of the order in your system.
Set user roles
To add user roles in your Customer Area:
- Go to Account > Users.
- Select the user that you want to add a role to.
- In the Roles list, enable the Merchant Manual Review role or the Risk Admin role.
- Select Save.
Set a trigger for manual review
You create one or more custom risk rules with the Review action to send transactions to case management.
For example, you can create a review rule that triggers if the transaction amount is over EUR 1000.
If the transaction is blocked by risk, for example because another custom risk rule triggered, the transaction is refused and does not get sent to case management.
If you have enabled capture delay for case management in your risk settings, you have up to seven calendar days to reject a transaction after it was sent to case management for manual review. If you do nothing, the transaction is automatically accepted, and the funds are captured based on your capture settings. The corresponding case is logged as expired.
Configure actions and webhooks
In your Customer Area, you can define the automatic action that needs take place and the webhook that you want to receive when a case is accepted or rejected during the manual review, or has expired.
In your Customer Area, on your company account:
- Go to Risk & disputes > Risk settings
- Select the Risk settings tab and go to Case management.
- Configure your preferred case management settings:
Capture delay
If you use automatic capture with or without a capture delay, but want to have more time to manually review payments, you can enable a separate capture delay for transactions that are sent to case management.
When you enable this setting, the default capture delay for transactions sent to case management is set to seven days, the day after the case expires.
If you use manual capture, you have to manually capture the payment if you accept the transaction.
Select modifications
At the time of manual review, the transaction has already been authorized by the issuing bank. From there, the Case Management behavior settings determine if the payment is automatically captured, refunded, or canceled when the case is accepted, rejected, or expired.
-
Accept - Select the modification when the case is accepted during manual review:
- Capture: The payment is captured.
-
None: The payment is not modified.
-
Reject - Select the modification when the case is rejected during manual review:
- Cancel: The payment is canceled or refunded, whichever is appropriate for the payment method.
-
None: The payment is not modified.
-
Expire - Select the modification when the case has expired:
- Capture: The payment is captured.
- Cancel: The payment is canceled or refunded, whichever is appropriate for the payment method.
-
None: The payment is not modified.
If the payment for an open case is captured, canceled, or refunded outside of case management, the case will be closed.
Receive webhooks
You can configure the Case Management behavior settings to receive webhooks when a case is accepted, rejected, or expired.
-
Accept - Select the Send notification checkbox to receive a webhook with
eventCodeMANUAL_REVIEW_ACCEPT when the case is accepted during manual review. -
Reject - Select the Send notification checkbox to receive a webhook with
eventCodeMANUAL_REVIEW_REJECT when the case is rejected during manual review. -
Expire - Select a Notification option:
- Accept: Receive a webhook with
eventCodeMANUAL_REVIEW_ACCEPT when the case has expired and the account is configured to capture upon expiration. - Reject: Receive a webhook with
eventCodeMANUAL_REVIEW_REJECT when the case has expired and the account is configured to cancel upon expiration. -
None: No webhook is sent when the case has expired.
- Accept: Receive a webhook with
It is important to implement additional logic to process rejections. For example, you can notify the warehouse to not ship the goods in question. In the case of digital goods, you can choose to have the user's account disabled.
Here is an example webhook indicating the result of the manual review in the eventCode field.
{
   "live" : "true",
   "notificationItems" : [
      {
         "NotificationRequestItem" : {
            "amount" : {
               "currency" : "EUR",
               "value" : 52000
            },
            "eventCode" : "MANUAL_REVIEW_ACCEPT",
            "eventDate" : "2020-07-15T11:06:15+02:00",
            "merchantAccountCode" : "YOUR_MERCHANT_ACCOUNT",
            "merchantReference" : "YOUR_REFERENCE_FOR_THIS_PAYMENT",
            "originalReference" : "JDD6LKT8MBLZNN84",
            "paymentMethod" : "mc",
            "pspReference" : "MKR8T9CRT65ZGN15",
            "reason" : "accept",
            "success" : "true"
         }
      }
   ]
}
Review cases
The case management queue lets you manually review cases, assign cases to reviewers, and accept or reject cases.
Access the case management queue
In your Customer Area:
- Go to Risk & disputes > Case management.
- Select a list of cases:
- Open cases: A list of assigned or unassigned cases that are not closed (not yet accepted or rejected).
- My cases: Cases assigned to you.
- Closed cases: Cases that are accepted or rejected, or that have expired.
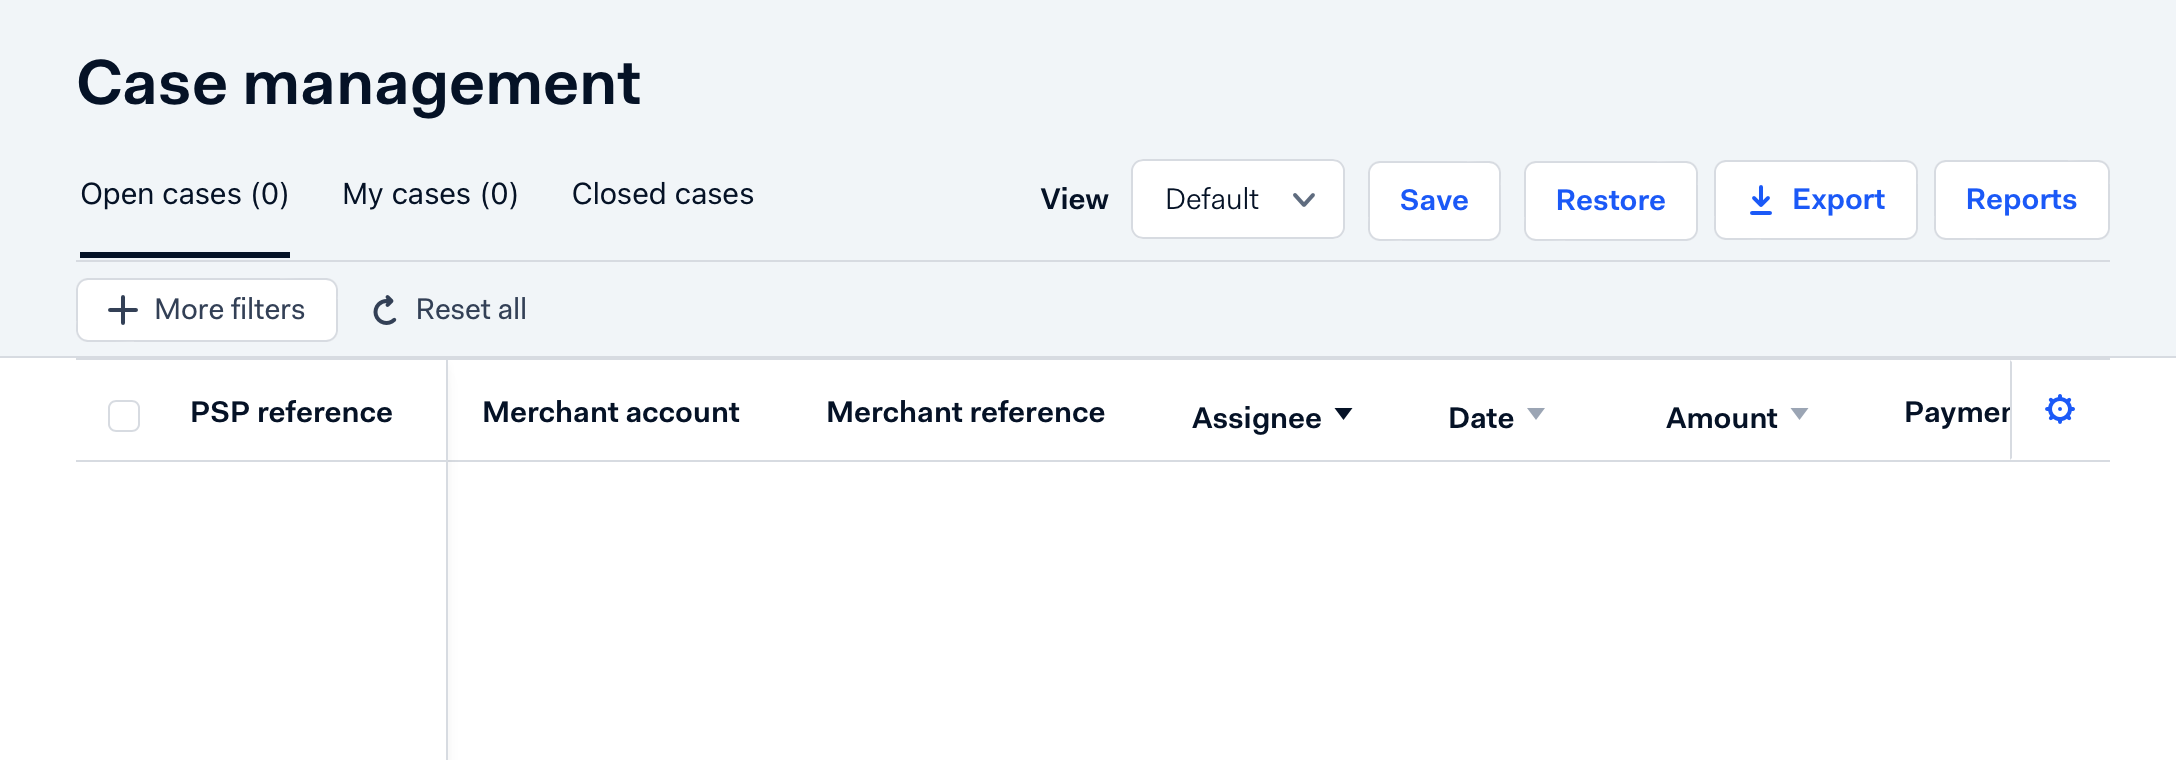
You can then:
- Assign reviews
- Use case details to review a case
- Accept or reject payments
- Update the status on past reviews
Assign reviews
Assign reviews to specific reviewers to avoid duplication or overlap of effort:
- Access the case management queue.
- Select the checkbox to the left of the PSP references of cases you want to assign.
At the bottom of the list of cases, options become available to assign, accept, and reject. - In the Assign to drop-down list, select the user who you want to assign the selected cases to.
- Select Confirm.
The page refreshes, and the name of the assignee is listed in the Assigned to column. If a case is assigned to you, it is now listed under My cases.
Use case details to review a case
When you select a case for review, the Case details page opens. On this page, you can view details to help determine if you should accept or reject the transaction, such as:
- Risk results and other risk details. For example, you can see which custom risk rule triggered case management.
- Shopper details such as shopper DNA. Looking at the shopper DNA visualization can be useful for manual review.
Review shopper DNA
To see the shopper DNA visualization, select Shopper details > See shopper DNA in the Payment details or in the Case details page. The visualization is also displayed on the bottom of the Case details page.
The visualization contains shopper DNA data from shoppers for all merchant accounts within your company.
Shopper attributes such as email addresses and IP addresses are masked by default. To view unmasked shopper details, your user must have the Merchant view PII user role.
The visualization contains:
The shopper DNA force graph
The visualization on the main canvas provides a live, expanded visualization of the shopper's network nodes and data attributes.
You can:
- Inspect nodes: hover over any node to increase its size, show the detailed tooltip, and highlight all its direct connections.
- Isolate networks: double-click a node to lock the visual highlight onto that specific attribute chain and automatically filter the payment list.
- Organize layouts: select and drag individual nodes around the canvas to re-arrange complex networks during deep-dive investigations.
To keep the canvas clean, the system automatically collapses non-linking attributes that contain more than 50 transactions of the same payment status into a single large node. For example, if there are 50 refused authorizations, these all collapse into a single node.
The Payments sidebar
The Payments sidebar tracks real-time transaction counts across the payment lifecycle. Statuses include Authorized / Settled, Refused by Issuer, Refused by Risk, Notification of Chargeback (NoF), Fraud Chargeback, Refunded, and Canceled.
To filter the graph and the payment list, select one or more of these categories.
The Attributes sidebar
The Attributes sidebar lists all verified identifiers associated with the shopper.
Accept or reject payments
You can accept or reject payments either from the opened case, or from the list of cases.
-
In the list, either click on the case to open it and see all details, or select the checkbox next to the PSP reference of the case.
To accept or reject several payments at once, select multiple checkboxes.
-
Select Accept to accept the payment(s) or Reject to reject the payment(s).
Update status on past reviews
After a decision is made in a case, the payment moves from the Open cases list to the Closed cases list.
To update the status of a closed case:
- Access the case management queue.
- Select Closed cases.
- Select the case from the list.
- Under Case Details, select the Manual status drop down.
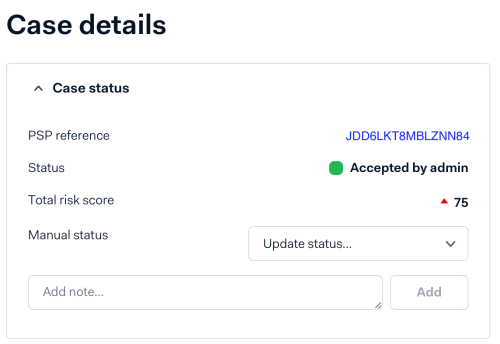
- Select either Fraud or Genuine.
If the transaction was canceled because the case was rejected during manual review, this is a permanent decision that cannot be reversed. However, it is still important to document the proper status for a manual review, because it enables reviewers to take this into account in future decisions to accept or reject payments.