Android Drop-in
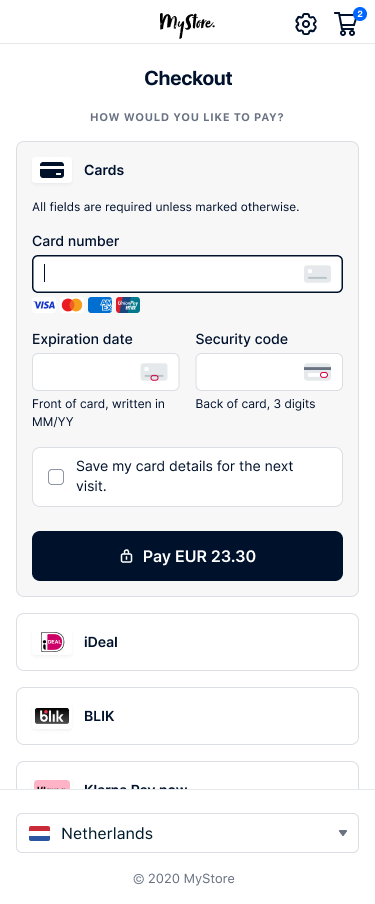
Render a list of available payment methods anywhere in your app.
Supported payment methods
Cards, buy now pay later, wallets, and many more.
See all supported payment methods
Features
- Lowest development time to integrate payment methods
- UI styling customization for the list of payment methods
- Adding payment methods to the list requires no extra development time
- 3D Secure 2 support built in
Start integrating with Android Drop-in
Choose your version
Adyen Android on GitHub
View the Adyen Android repository
View our example integration
Requirements
Before you begin to integrate, make sure you have followed the Get started with Adyen guide to:
- Get an overview of the steps needed to accept live payments.
- Create your test account.
After you have created your test account:
- Get your API key.
- Get your client key.
- Set up webhooks to know the payment outcome.
How it works
Our Android Drop-in renders the available cards in your payment form, and securely collects any sensitive card information, so it doesn't touch your server. Drop-in also handles the 3D Secure 2 device fingerprinting and challenge flows, including the data exchange between your front end and the issuer's Access Control Server (ACS).
When adding 3D Secure 2 authentication to your integration, you also need to:
- Configure Drop-in to collect the cardholder name.
- Provide additional parameters when making a payment request.
- Submit authentication results if you receive an
actionobject in response to your API request. - If the payment was routed to the 3D Secure 2 redirect flow, handle the redirect.
Install an API library
We provide server-side API libraries for several programming languages, available through common package managers, like Gradle and npm, for easier installation and version management. Our API libraries will save you development time, because they:
- Use an API version that is up to date.
- Have generated models to help you construct requests.
- Send the request to Adyen using their built-in HTTP client, so you do not have to create your own.
Try our example integration
Requirements
- Java 11 or later.
Installation
You can use Maven, adding this dependency to your project's POM.
<dependency> <groupId>com.adyen</groupId> <artifactId>adyen-java-api-library</artifactId> <version>LATEST_VERSION</version> </dependency>
You can find the latest version on GitHub. Alternatively, you can download the release on GitHub.
Setting up the client
Create a singleton resource that you use for the API requests to Adyen:
// Import the required classes. package com.adyen.service; import com.adyen.Client; import com.adyen.service.checkout.PaymentsApi; import com.adyen.model.checkout.Amount; import com.adyen.model.checkout.CreateCheckoutSessionRequest; import com.adyen.model.checkout.CreateCheckoutSessionResponse; import com.adyen.enums.Environment; import com.adyen.service.exception.ApiException; import java.io.IOException; public class Snippet { public Snippet() throws IOException, ApiException { // Set up the client and service. Client client = new Client("ADYEN_API_KEY", Environment.TEST); } }
Get available payment methods
When the shopper is ready to pay, get a list of the available payment methods based on their country, device, and the payment amount.
-
From your server, make a POST /paymentMethods request, including:
We recommend that you include all the optional parameters to get the most accurate list of available payment methods.
Parameter name Required Description merchantAccount
Your merchant account name. amountThe currencyandvalueof the payment, in minor units.channelUse Android. Adyen returns only the payment methods available for Android. countryCodeThe shopper's country/region. Adyen returns only the payment methods available in this country.
Format: the two-letter ISO-3166-1 alpha-2 country code. Exception: QZ (Kosovo).shopperLocaleBy default, the shopperlocaleis set to en-US. To change the language, set this to the shopper's language and country code. You also need to set the sameShopperLocalewithin your Drop-in configuration.For example, to get available payment methods for a shopper in the Netherlands, for a payment of 10 EUR:
Expand viewCopy link to code blockCopy codecurl https://checkout-test.adyen.com/checkout/v70/paymentMethods \ -H 'x-api-key: ADYEN_API_KEY' \ -H 'content-type: application/json' \ -d '{ "merchantAccount": "ADYEN_MERCHANT_ACCOUNT", "countryCode": "NL", "amount": { "currency": "EUR", "value": 1000 }, "channel": "Android", "shopperLocale": "nl-NL" }' The response includes the list of available
paymentMethods:/paymentMethods responseExpand viewCopy link to code blockCopy code{ "paymentMethods":[ { "details":[...], "name":"Cards", "type":"scheme" ... }, { "details":[...], "name":"SEPA Direct Debit", "type":"sepadirectdebit" }, ... ] } -
Deserialize the response to a
PaymentMethodsApiResponse:
val paymentMethodsApiResponse = PaymentMethodsApiResponse.SERIALIZER.deserialize(paymentMethodsResponse)- Pass the
PaymentMethodsApiResponseobject to your client app to launch and show Drop-in.
Set up Drop-in
1: Import the library
The default implementation is with Jetpack Compose, but you can import the library without Jetpack Compose instead.
Import the compatibility module in your build.gradle file:
implementation "com.adyen.checkout:drop-in-compose:YOUR_VERSION"2: Create the configuration object
Create the configuration object to pass when you launch and show Drop-in.
-
Set the following properties in the configuration object:
Property Required Description amountIf you want to show the amount on the Pay button. The currency and value of the payment amount shown on the Pay button. environmentUse Environment.TESTfor testing. When going live, use one of our live environments.clientKeyYour client key. shopperLocaleThe shopper's locale. By default, this is the device's locale. -
Add additional configuration to this object. Some payment methods require additional configuration, and you can add optional configuration for Drop-in.
For example, to configure for a payment of 10 EUR:
Example configurationExpand viewCopy link to code blockCopy code// Create the amount object. val amount = Amount( currency = "EUR", value = 1000, // Value in minor units. ) // Create a configuration object val checkoutConfiguration = CheckoutConfiguration( environment = environment, clientKey = clientKey, shopperLocale = shopperLocale, // Optional amount = amount, // Optional: set this to show the amount on the Pay button. ) { // Optional: add Drop-in configuration. dropIn { setEnableRemovingStoredPaymentMethods(true) } // Optional: add or change default configuration for the card payment method. card { setHolderNameRequired(true) setShopperReference("...") } // Optional: add or change default configuration for 3D Secure 2. adyen3DS2 { setThreeDSRequestorAppURL("...") } } -
Extend the
DropInServiceclass so that you can interact with Drop-in. -
Implement methods to pass data between your client app and your server. You must also handle the
DropInServiceResultwhich includes the result of the API requests from your server.For example:
Example DropInService implementationExpand viewCopy link to code blockCopy codeclass YourDropInService : DropInService() { // The handler to make a /payments request. override fun onSubmit(state: PaymentComponentState<*>) { val paymentComponentJson = PaymentComponentData.SERIALIZER.serialize(state.data) // Your server makes a /payments request, including `paymentComponentJson`. // This is used in 4: Make a payment. // Create the `DropInServiceResult` based on the /payments response. // You must switch to a background thread before making an API request. For example, `launch(Dispatchers.IO)` if using coroutines. // If the payment finished, handle the result. sendResult(DropInServiceResult.Finished("YOUR_RESULT")) // If additional action is needed, handle the action. val action = Action.SERIALIZER.deserialize(actionJSONObject) sendResult(DropInServiceResult.Action(action)) } // Handler to make a /payments/details request to send additional payment details. override fun onAdditionalDetails(actionComponentData: ActionComponentData) { val actionComponentJson = ActionComponentData.SERIALIZER.serialize(actionComponentData) // Your server makes a /payments/details request, including `actionComponentJson`. // This is used in Step 5: Submit additional payment details. // Create the `DropInServiceResult` based on the /payments/details response. sendResult(DropInServiceResult.Finished("YOUR_RESULT")) } } Drop-in uses the
DropInServiceResultto complete or dismiss the payment and determine if you need to handle additional actions. Additional actions include redirecting the shopper to another app or performing 3D Secure 2 authentication. -
Add your
DropInServiceto your manifest file.For example:
<service android:name=".YourDropInService" android:exported="false" />
Launch and show Drop-in
-
Implement
DropInCallbackto get the final result.Implement DropInCallbackExpand viewCopy link to code blockCopy codeoverride fun onDropInResult(dropInResult: DropInResult?) { when (dropInResult) { // The payment finishes with a result. is DropInResult.Finished -> handleResult(dropInResult.result) // The shopper dismisses Drop-in. is DropInResult.CancelledByUser -> // Drop-in encounters an error. is DropInResult.Error -> handleError(dropInResult.reason) // Drop-in encounters an unexpected state. null -> } } -
Create the Drop-in launcher and call
DropIn.startPayment, passing:Parameter Description dropInLauncherThe Drop-in launcher you created. paymentMethodsApiResponseThe /paymentMethods response that you deserialized. checkoutConfigurationThe Drop-in configuration that you created. YourDropInService::class.java(Example)The DropInServicethat you created.For example:
Start Drop-inExpand viewCopy link to code blockCopy codeimport com.adyen.checkout.dropin.compose.startPayment import com.adyen.checkout.dropin.compose.rememberLauncherForDropInResult @Composable private fun ComposableDropIn() { val dropInLauncher = rememberLauncherForDropInResult(dropInCallback) DropIn.startPayment(dropInLauncher, paymentMethodsApiResponse, checkoutConfiguration, YourDropInService::class.java) }
Your app shows Drop-in, and your shopper can choose a payment method.
Make a payment
When the shopper enters their payment details and selects the Pay button, the onSubmit method in your DropInService class is called, passing the paymentComponentJson object.
-
Pass the
paymentComponentJsonobject to your server. -
From your server, make a POST /payments request, including:
| Parameter name | Required | Description |
|---|---|---|
merchantAccount |
|
Your merchant account name. |
amount |
|
The currency and value of the payment, in minor units. |
reference |
|
Your unique reference for this payment. |
paymentMethod |
|
The paymentComponentData.paymentMethod from your client app. |
returnUrl |
|
In case of a redirection, this is the URL to where your shopper is redirected after they complete the payment. Maximum length: 1024 characters. Get this URL from Drop-in in the RedirectComponent.getReturnUrl(context). |
applicationInfo
|
If you are building an Adyen solution for multiple merchants, include some basic identifying information, so that we can offer you better support. |
You must include additional parameters in your payment request to:
- Integrate some payment methods. For more information, refer to our payment method integration guides.
- Make use of our risk management features. For more information, see Required risk fields.
- Use native 3D Secure 2 authentication.
- Tokenize your shopper's payment details or make recurring payments.
For example, to make a payment request for EUR 10:
curl https://checkout-test.adyen.com/checkout/v70/payments \ -H 'x-api-key: ADYEN_API_KEY' \ -H 'content-type: application/json' \ -d '{ "amount":{ "currency":"EUR", "value":1000 }, "reference":"YOUR_ORDER_NUMBER", "paymentMethod":STATE_DATApaymentMethod field of an object passed from your client app, "returnUrl":"adyencheckout://your.package.name", "merchantAccount":"ADYEN_MERCHANT_ACCOUNT" }'
- Your next steps depend on if the /payments response contains an
actionobject:
| Description | Next steps | |
|---|---|---|
No action object |
No additional steps are needed to complete the payment. | 1. Return DropInServiceResult.Finished to your client app, including the resultCode from the response. 2. Get the payment outcome. |
With action object |
The shopper needs to do additional actions to complete the payment. | 1. Return DropInServiceResult.Action to your client app, including the action object. 2. Send additional payment details. |
The following example shows a /payments response with action.type: threeDS2 that you need to handle:
{ "resultCode" : "IdentifyShopper", "action" : { "token" : "eyJkaXJl...", "paymentMethodType" : "scheme", "paymentData" : "Ab02b4c0...", "type" : "threeDS2", "authorisationToken" : "BQABAQ...", "subtype" : "fingerprint" } }
Error handling
If the /payments request fails, return DropInServiceResult.Error to your client app, including the action object.
Handle the additional action
Some payment methods require you to handle an additional action in your client app. For example, you must handle the action to authenticate a payment with 3D Secure 2 or to redirect the shopper to another app.
Implement your server logic to handle all of the following action types, so that you can add payment methods that require additional actions.
You can receive different action types in the /payments response:
action.type |
Description |
|---|---|
| voucher | Drop-in shows the voucher that the shopper uses to complete the payment. |
| qrCode | Drop-in shows the QR code that the shopper uses to complete the payment. |
| await | Drop-in shows the waiting screen while the shopper completes the payment. |
| sdk | Drop-in presents the specific payment method's UI as an overlay. |
| threeDS2 | The payment qualifies for 3D Secure 2, and goes through either frictionless or challenge flow. |
| redirect | Drop-in redirects the shopper to another website or app to complete the payment. |
To handle an action:
- Pass the complete
actionobject from your server to Drop-in. - Use
ActionResponse.SERIALIZERto deserialize theactionobject. - Return it as
DropInServiceResult.Actionto Drop-in. - Drop-in calls the
onAdditionalDetailsmethod in yourDropInServiceclass. - From
onAdditionalDetails, get theactionComponentJsonobject. - Pass the
actionComponentJsonobject from your client app to your server. - Send additional payment details.
Send additional payment details
If you handled an additional action, you must send additional payment details (actionComponentJson) to Adyen.
-
From your server, make a POST /payments/details request, including
actionComponentJsonobject:Expand viewCopy link to code blockCopy codecurl https://checkout-test.adyen.com/checkout/v70/payments/details \ -H 'x-api-key: ADYEN_API_KEY' \ -H 'content-type: application/json' \ -d 'STATE_DATAobject passed from your client app' -
Pass the /payments/details response from your server to your client app.
Get the payment outcome
After Drop-in finishes the payment flow, you can show the shopper the current payment status. Adyen sends a webhook with the outcome of the payment.
Inform the shopper
Use the
resultCode
to show the shopper the current payment status. This synchronous response doesn't give you the final outcome of the payment. You get the final payment status in a webhook that you use to update your order management system.
Update your order management system
You get the outcome of each payment asynchronously, in a webhook with eventCode: AUTHORISATION. Use this to update your order management system.
For a successful payment, the event contains success: true.
{ "live": "false", "notificationItems":[ { "NotificationRequestItem":{ "eventCode":"AUTHORISATION", "merchantAccountCode":"YOUR_MERCHANT_ACCOUNT", "reason":"033899:1111:03/2030", "amount":{ "currency":"EUR", "value":2500 }, "operations":["CANCEL","CAPTURE","REFUND"], "success":"true", "paymentMethod":"mc", "additionalData":{ "expiryDate":"03/2030", "authCode":"033899", "cardBin":"411111", "cardSummary":"1111" }, "merchantReference":"YOUR_REFERENCE", "pspReference":"NC6HT9CRT65ZGN82", "eventDate":"2021-09-13T14:10:22+02:00" } } ] }
For an unsuccessful payment, you get success: false, and the reason field has details about why the payment was unsuccessful.
{ "live": "false", "notificationItems":[ { "NotificationRequestItem":{ "eventCode":"AUTHORISATION", "merchantAccountCode":"YOUR_MERCHANT_ACCOUNT", "reason":"validation 101 Invalid card number", "amount":{ "currency":"EUR", "value":2500 }, "success":"false", "paymentMethod":"unknowncard", "additionalData":{ "expiryDate":"03/2030", "cardBin":"411111", "cardSummary":"1112" }, "merchantReference":"YOUR_REFERENCE", "pspReference":"KHQC5N7G84BLNK43", "eventDate":"2021-09-13T14:14:05+02:00" } } ] }
Test and go live
Before going live, use our list of test cards and other payment methods to test your integration. Use the Adyen Android test cards app to access, copy, and autofill card details from within your Android device. We recommend testing each payment method that you intend to offer to your shoppers.
You can check the status of a test payment in your Customer Area, under Transactions > Payments.
To debug or troubleshoot test payments, you can also use API logs in your test environment.
When you are ready to go live, you need to:
- Apply for a live account. Review the process to start accepting payments on Get started with Adyen.
- Assess your PCI DSS compliance by submitting the Self-Assessment Questionnaire-A.
- Configure your live account.
- Submit a request to add payment methods in your live Customer Area .
- Switch from test to our live endpoints.
-
Load from one of our live environments and set the
environmentto match your live endpoints:Endpoint region Value Europe (EU) live EUROPE United States (US) live UNITED_STATES Australia (AU) live AUSTRALIA Asia Pacific & Southeast (APSE) live APSE India (IN) live INDIA