This page explains various concepts that our Mobile solutions are based on, and provides information to help you choose which Mobile solution to build. You can choose to:
- Integrate our Mobile SDK into your POS app, to accept Tap to Pay and/or card reader payments.
- Let your POS app communicate with an Adyen Payments app that already includes the Mobile SDK, to accept Tap to Pay payments.
SDK or Payments app
Both when integrating the Mobile SDK and when using the Payments app, your POS app must be integrated with Terminal API. And in both cases you have to work on the backend as well as on the frontend.
It depends on your use case and development capacity which solution is the most suitable. You may prefer a low-code integration without PCI Mobile Payments on COTS (MPoC) compliance requirements, or a more involved integration that allows more control of the app experience.
Also note that the same Mobile SDK is used for Tap to Pay and card reader payments. If your POS app allows selecting the payment interface, both solutions can be used alongside each other. The Payments app on the other hand only supports Tap to Pay.
The following table shows the pros and cons of each solution.
| Mobile SDK | Payments app |
|---|---|
| Pros | Pros |
| Full control of the in-app experience | Lower integration effort (Links & API) |
| Better UX: no app switching | Adyen handles updates |
| Better payment performance | No PCI MPoC compliance requirements |
| Supports Tap to Pay and card reader | |
| Cons | Cons |
| Update SDK version every six months | Payments app must be boarded on each device |
| PCI MPoC compliance requirements | App switching during the payment flow |
| Only supports Tap to Pay |
Communication session
When you integrate the Mobile SDK into your POS app, the SDK has to communicate in a secure way with the plataforma de pagamentos da Adyen. To enable this, you must integrate a server-to-server POST /checkout/possdk/v68/sessions request to create a session. Your POS app needs to call your backend to trigger this request and get the session data.
The SDK uses the session data from the response to authenticate with our payments platform. Because the session expires after some time, the SDK checks regularly if it needs to establish a new session.

SDK transaction flow
If you use or build a Mobile solution where our Mobile SDK for Android is integrated into your POS app, transactions take place as follows:
-
Optional but recommended: your POS app calls a warm-up function to speed up initiating transactions.
-
Your POS app creates a Terminal API request that is serialized to JSON, or receives the Terminal API payment request from your backend.
-
The POS app passes the Terminal API request to the Mobile SDK.
-
The SDK checks if the communication session is still valid, and if necessary establishes a new session.
-
The transaction starts on the mobile device.
-
The SDK passes the Terminal API response to your POS app.

Payments app transaction flow
If you use or build a Mobile solution where your POS app communicates with the Adyen Payments app, transactions take place as follows:
- Your POS app creates a Terminal API payment request, or receives a Terminal API payment request from your backend.
- Your POS app sends an encrypted, Base64URL-encoded Terminal API payment request to the Payments app as an App Link with your return URL.
- On the mobile device, a Tap to Pay screen appears, and the shopper presents their contactless payment method to the NFC reader of the device.
- The Payments app routes the payment request through our POS Mobile SDK to the Adyen backend.
- The Adyen backend returns an encrypted, Base64URL-encoded Terminal API payment response to the Payments app.
- On the mobile device, the screen shows the outcome, and switches to your POS app using the return URL you specified.
- Your POS app receives the encrypted, Base64URL-encoded Terminal API payment response.
PIN transactions
It is possible to make PIN transactions in your Tap to Pay and card reader solution. Unlike traditional payment terminals with physical keypads, PIN entry on a mobile device requires specialized security measures to protect the shopper's data. To comply with PCI MPoC compliance requirements, the PIN entry pad is not always centered on the mobile device screen. Instead, it appears in a random position as shown in the following examples.
Bottom-left 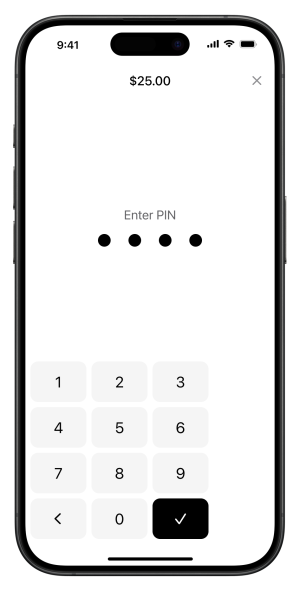 |
Top-right 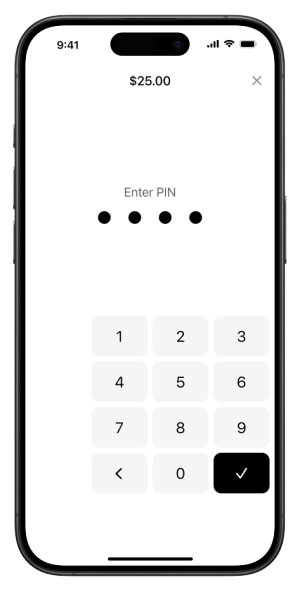 |
PIN transaction with a card reader in the US
You need an NYC1 card reader with PIN support for secure PIN transactions.
NYC1 card readers with PIN support require Mobile SDK version 2.4.0 or later.
In the US, not all NYC1 card readers support PIN. You can check if your card reader supports PIN transactions in the following ways:
- By checking the [
connectedDevice.model] . Returns the model of the card reader. The result can be:- SCRP (card reader supports PIN).
- SCR (card reader does not support PIN).
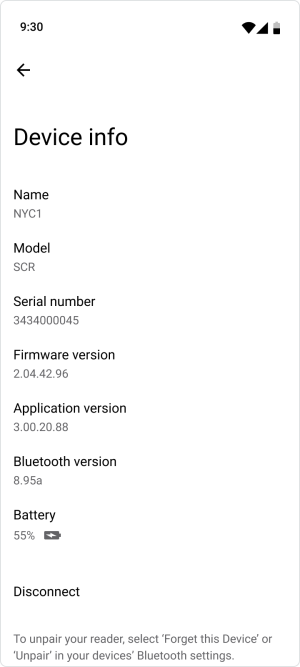
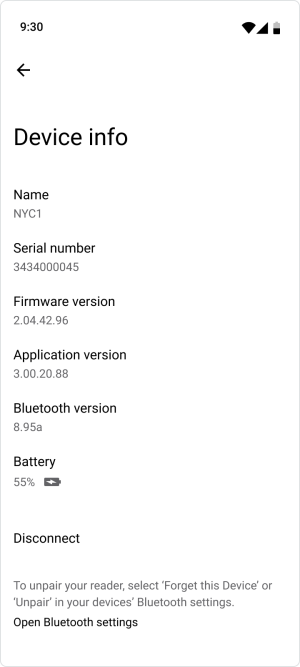
-
In the built-in UI: If under Device Info the field Model is present, you have an NYC1-SCR card reader that does not support PIN. If the field Model is not present, you have an NYC1 that supports PIN.
Device info for NYC1-SCR Device info for NYC1 Card reader not suitable for PIN
Card reader suitable for PIN
If you want to disable PIN support on your NYC1 card reader, refer to card reader requirements
UI for card reader operations
If your Mobile SDK solution uses NYC1 card readers as the payment interface, the people operating the readers need to:
- Connect their mobile device with the card reader through Bluetooth pairing or direct USB (if the Android device supports USB host mode).
- View an overview of card readers. For example, to switch to a different card reader.
- View details of the card reader they are using. For example, to check the battery charge level.
- Update the firmware of the card reader they are using.
The SDK allows you to build your own UI for those tasks, but also provides a built-in UI as shown in the following examples.
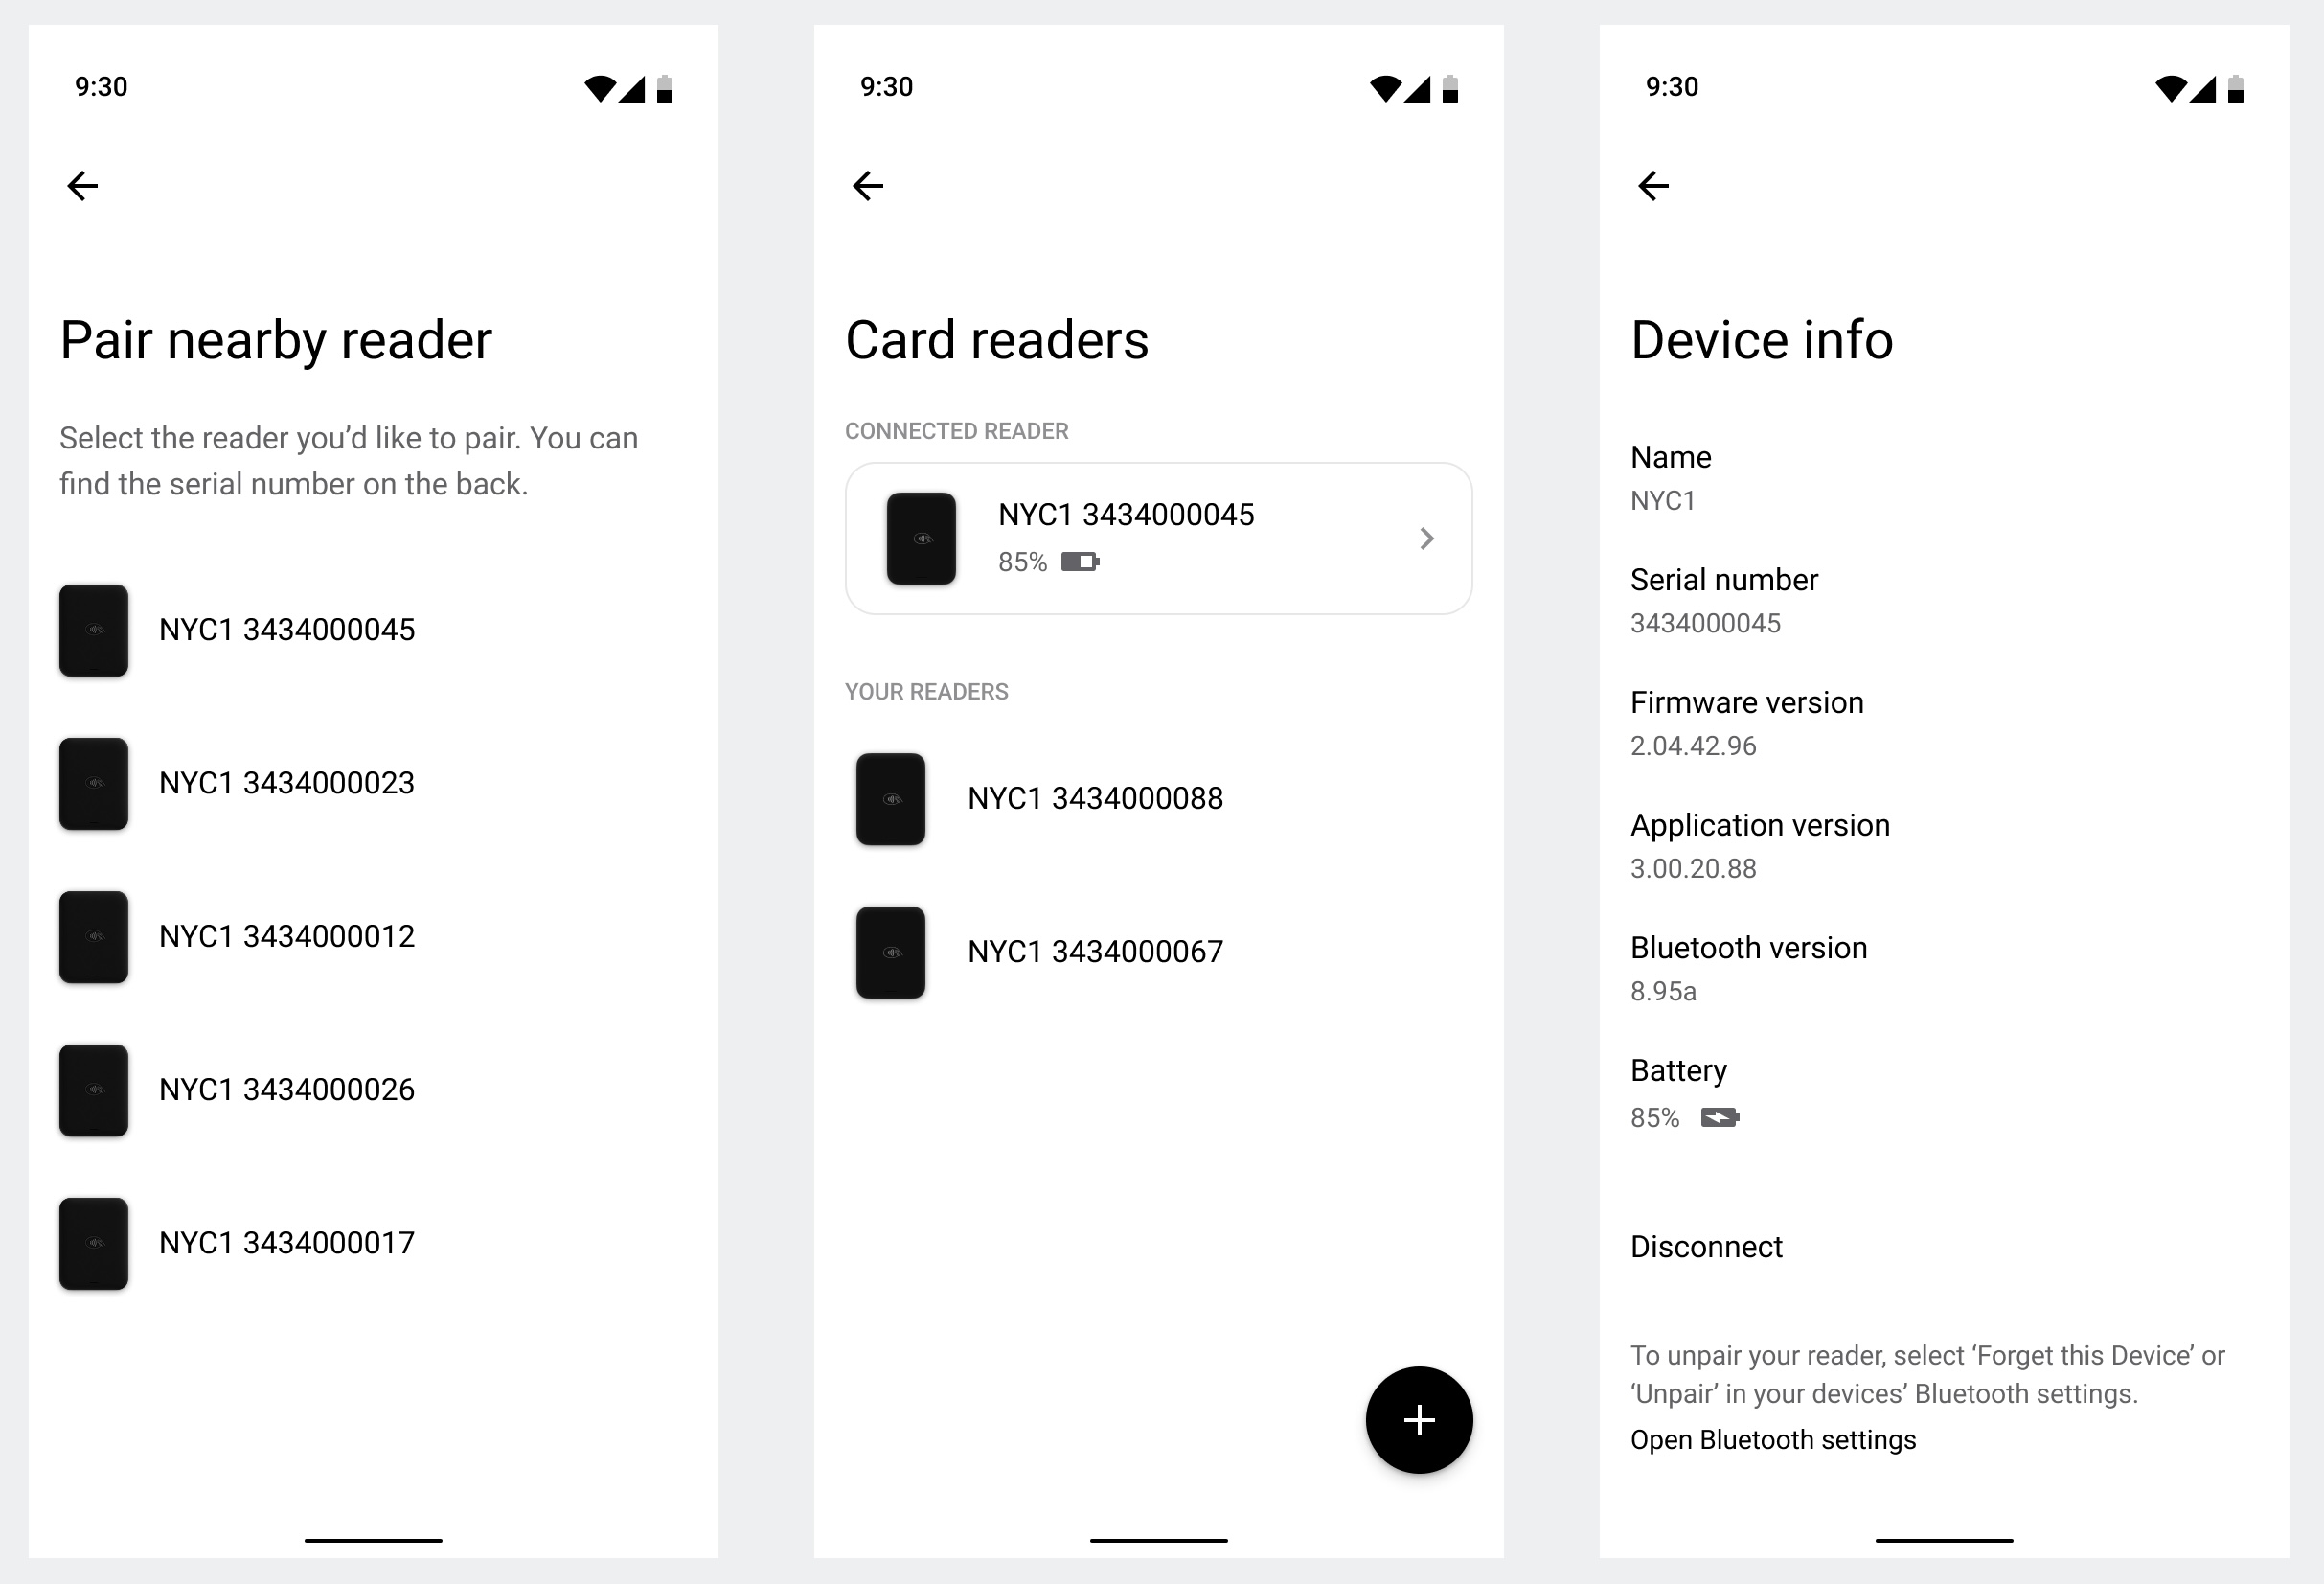
The following sections provide some example built-in screens for specific tasks:
If your solution uses the NYC1 card reader in combination with the NYC1 dock, users also need to be able to connect to the card reader through USB and update the dock firmware. See UI for dock operations.
Bluetooth pairing
The built-in UI screens guide the reader through the process of connecting their mobile device to a card reader through Bluetooth.
Updating the card reader firmware
The firmware of the card reader must be updated from time to time, to ensure secure transaction processing.
You must check for new firmware updates regularly, and update your card readers to the latest version.
Our built-in UI shows a red indicator when a new firmware version is available for the connected card reader, and has an Update button to start the firmware update. A firmware update can fail when the card reader does not have an active Bluetooth connection when the update requires it. In this case the built-in UI shows instructions on how to reset the reader before retrying the update.

If you use your own custom UI, it is required that you build logic into your POS app to check for new card reader firmware updates and handle the firmware update flow correctly within your POS app.
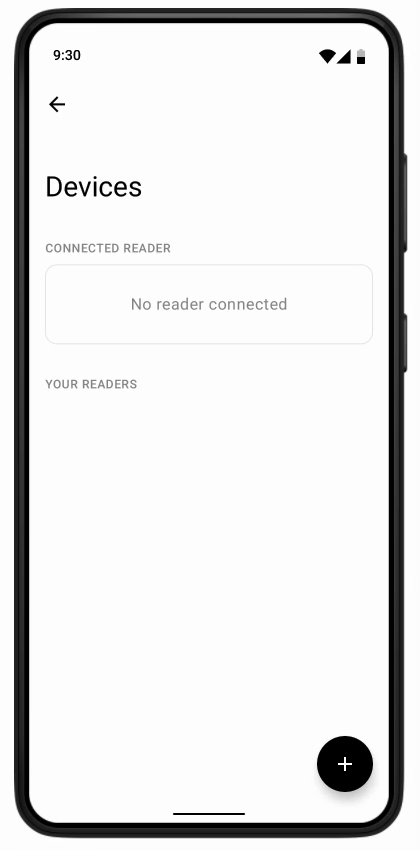
UI for dock operations
If your Mobile SDK solution uses card readers as the payment interface in combination with docks, the people operating the readers need to:
- Connect their mobile device with the card reader through the dock.
- Update the firmware of the dock they are using.
The SDK allows you to build your own UI for those tasks, but also provides a built-in UI.
The following sections provide some example built-in screens for specific tasks:
Connecting to a dock
In addition to Bluetooth, card readers can be connected through USB. The user's mobile device is connected to a dock using a USB-C cable, and the card reader is placed in the dock. The SDK recognizes the situation, and presents built-in UI screens to inform the reader about the USB connection.
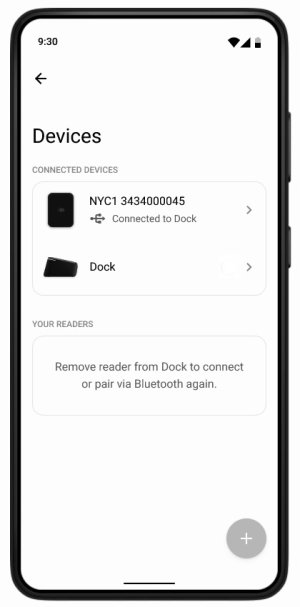
Note that it is also possible to place the card reader in the dock but connect the mobile device to the reader through Bluetooth. In that case the dock and the user's mobile device are not connected with a USB-C cable. This is a way to charge the card reader through the dock in a countertop setup.
Updating the dock firmware
The firmware of the dock must be updated from time to time, to ensure secure transaction processing.
Our built-in UI shows a red indicator when a new firmware version is available for the connected dock, and has an Update button to start the firmware update.
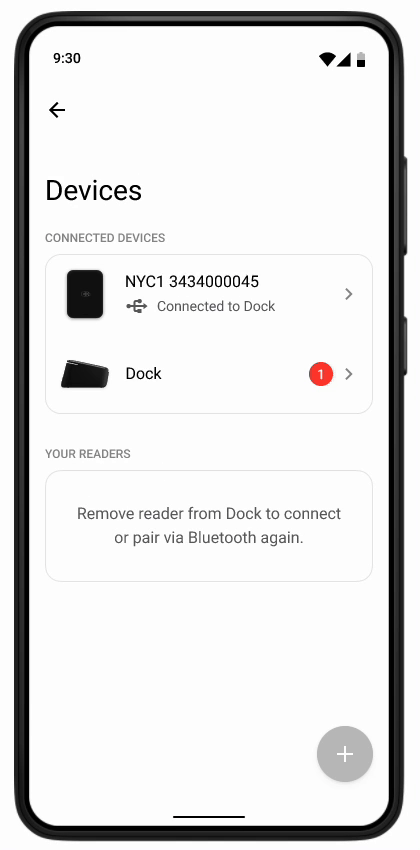
If you use your own custom UI, it is required that you build logic into your POS app to check for new card reader firmware updates and handle the firmware update flow correctly within your POS app.
Kiosk mode
Kiosk mode is intended to optimize the UI for Tap to Pay transactions on larger screens, for example on Android tablets.
Kiosk mode includes the following UI adjustments for usability and security:
- Increased text and icon size: Text elements and icons shown during the transaction are enlarged for improved readability on larger screens.
- Compact PIN keypad: The on-screen keypad used for PIN entry is reduced in size. This minimizes the risk of bystanders observing the customer's PIN entry.
According to the PCI MPoC compliance requirements, your Tap to Pay on Android solution must not use Kiosk mode in an unattended environment.
Kiosk mode activates automatically at the start of the transaction process if the SDK detects a mobile device with a screen width greater than or equal to 9 inches. It is possible to enable Kiosk mode on devices with a screen width smaller than 9 inches. You can also customize the placement of the NFC tap indicator in kiosk mode. The indicator can either be a static image of an NFC logo or an animated chevron-type arrow.


