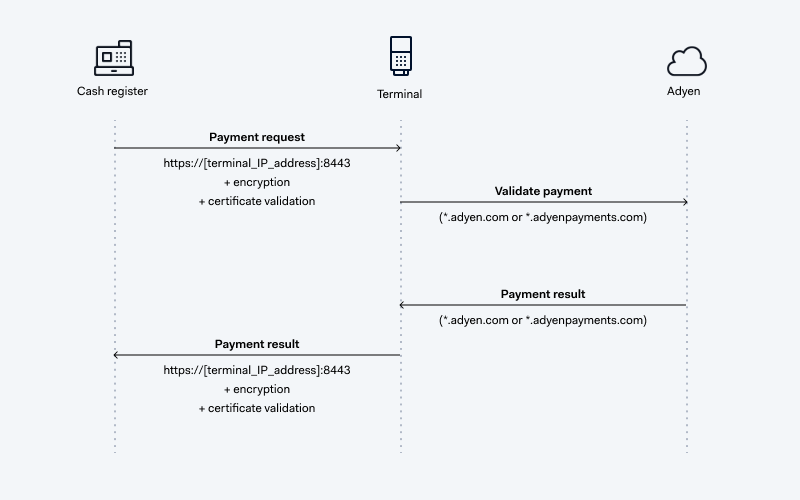
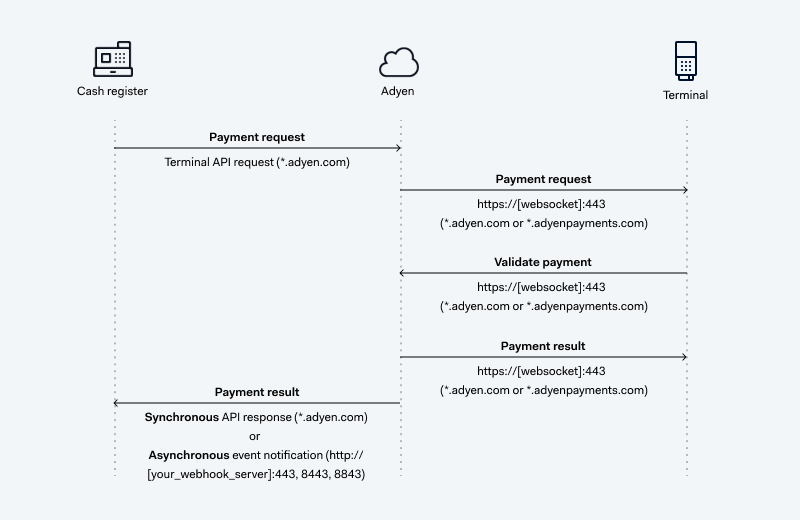
When you make a point-of-sale transaction, your POS app, terminal, and Adyen need to be able to communicate with one another. The flow of this communication depends on whether your integration uses local or cloud communications. To enable this communication, you need to configure your network to allow access to specific ports and addresses.
Requirements
| Requirement | Description |
|---|---|
| Integration type | A Terminal API integration with payment terminals. |
| Limitations | Take into account the following limitations:
|
| Setup steps | Before you begin:
|
Network communications flow
When you make a transaction, your integration uses one of the following communications flows:
Local communications
Cloud communications
Communications security
In accordance with PCI-DSS requirements, we use Transport Layer Security (TLS) 1.2 for secure data transmission over the internet.
TLS 1.0 and 1.1 deprecation
In September 2022, with terminal software version 1.81, we deprecated TLS 1.0 and 1.1. This means that if you are still using TLS 1.0 or 1.1 for local communications, terminals on software versions v1.81 and later will not be able to process transactions.
If you are using cloud communications, nothing changes because our cloud endpoints do not accept TLS versions below 1.2.
Check your current TLS library version and cipher suite
If you are using the latest version of your operating system, you are probably already using TLS 1.2 or 1.3 protocols. For non-Android terminals on software version 1.80 and later, you can check the current TLS version, cipher, and URL by running the Local communications TLS test.
You can also check the TLS library version and cipher suites of your operating system:
- Windows: to list the supported cipher suites, open the PowerShell terminal and use the command
Get-TlsCipherSuite. For TLS versions supported on your Windows OS, refer to TLS protocol version support. - OS X / iOS: for supported TLS protocol versions and cipher suites, refer to Apple Platform Security documentation.
- Linux / Unix: to list the cipher suites with the supported TLS protocol version, open a shell terminal and use the command
openssl ciphers -v | column -t.
You can use websites like ciphersuite.info to learn more about ciphers suites. For example, you can filter the list of cipher suites by TLS Version.
Supported ciphers
When you upgrade to TLS protocol version 1.2, make sure you use one of the following ciphers:
- TLS 1.2 AES256-GCM-SHA384
- TLS 1.2 AES256-SHA256
- TLS 1.2 AES128-GCM-SHA256
- TLS 1.2 AES128-SHA256
Configuring your network
To configure your network for point of sale communications:
-
If you need to allowlist IP addresses, add Adyen's in-person payments URLs to your firewall's allowlist.
-
In your test Customer Area or live Customer Area, go to In-person payments > Terminal settings > Connectivity > Network configuration.
-
Copy the in-person payments URLs listed for your regions.
For more information about Terminal API endpoint URLs, see Use the correct endpoints.
-
Add the URLs to your firewall's allowlist to allow outgoing HTTPS traffic from the IP addresses of your POS apps and terminals to them.
-
Configure your firewall to dynamically check for IP address updates at least every 60 seconds.
Do not hard-code Adyen's IP addresses, because these can change over time. We do not share a list of our IP addresses publicly.
-
-
Open the ports:
- tcp/443 to the internet.
-
tcp/8443 on your LAN.
-
If your integration uses local communications:
- Make sure that your terminal and POS app are connected to the same local network.
- Protect the communications between your POS app and the terminal.
-
If you are using a legacy setup where the cash register and the terminal communicate over a serial connection, use hardware flow control.
Configuring the terminal IP address
To send payments for online authorization, the terminal must have a valid IP address. There are several ways to assign an IP address to a terminal:
- Dynamic IP: your DHCP server issues an IP address to the terminal on the fly.
- DHCP reservation: on the DHCP server, you bind an IP address to the terminal's MAC address. The DHCP server then assigns the exact same IP address to the terminal each time. This is an alternative to using static IP addresses, especially if you are dealing with a large number of terminals.
- Static IP: you enter the IP address and other network configuration details manually on the terminal.
It is not possible to configure an IP address from the Customer Area.
You cannot use a mix of dynamic and static IPs. The IP address of the terminal and the IP addresses of the DNS server and router must be either all dynamic, or all static.
By default, DHCP is enabled on the payment terminal. With this setting, your DHCP server issues an IP address to the terminal, either dynamically or through DHCP reservation (if you have set that up). If you are using a V400m with a Bluetooth base station, the base station too has DHCP enabled and receives an IP address from your DHCP server.
Recommendations
-
If it is possible to set the DHCP lease time on the DHCP server, set this to 24 hours or more. The lease time is the time that the terminal keeps an IP address before the DHCP server renews the terminal's lease on the IP address.
-
In an integration with cloud communications, you should use dynamic IP addresses without DHCP reservation.
-
In an integration with local communications, you should either use DHCP reservation, or manually configure static IP addresses.
Get notified about IP address changes
When a terminal's IP address changes in a local communication because of an issue or because it connected to a different access point, there is a risk of losing connection to your POS app. When this happens, you can configure your terminal to automatically send you the new IP address when it is back online.
To configure this, you need to contact our Support Team and provide them with:
- The URL to an endpoint where you want to receive the new IP address of a terminal.
- The access credentials of the endpoint.
When this feature is enabled, the terminal sends a webhook to that endpoint with the uniqueTerminalId and the new_ip address of the terminal.
You can then use the terminals ID and the new IP address to reestablish the connection to the terminal from your POS app.
Defining a static IP address
If you have an integration with local communications and cannot use a DHCP server with DHCP reservation, you need to disable DHCP and define a static IP address for the terminal.
- On the connected terminal, open the Admin menu.
- Select Network and enter the Admin & Settings passcode.
- Open the settings for the network you are connected to.
The terminal UI for network settings depends on the operating system version. You may need to long-press the network name or select the gear icon to access advanced settings.
- Under IP Settings, turn off DHCP or select Static.
- Enter your network details:
- IP address of the terminal - this must be unique in the network
- Subnet mask of the network
- IP address of the router
- IP addresses of the preferred DNS server (DNS1) and the alternate DNS server (DNS2)
- Select Save or Apply to confirm.
General networking recommendations
To prevent network issues from interfering with your point of sale transactions, we recommend that you:
-
Use a segmented network, dedicated to point of sale communications.
-
Make a DNS server accessible from your local network. This should be able to resolve
*.adyen.comand*.adyenpayments.com.If you use a caching name-server, the Time to live (TTL) set by Adyen must be honored (60 seconds for Disaster Recovery).
-
Follow our guidelines for IP address configuration.
-
If you use intrusion detection (IDS) and prevention systems (IPS), ensure they are using up-to-date firmware and signatures. If these are out of date, the encrypted communications used by your integration may be disrupted.
-
Connect the whole POS system, including the terminals, to an uninterrupted power supply (UPS).
-
Use a cellular backup connection by:
- Having an automatic cellular failover on your main router.
-
Using terminals that have a built-in cellular connection, such as a portable or mobile terminal.
-
If the network connection is fine but you are noticing issues with terminals and payments that seem to point to network connection problems, see Dropped network packets when the internet connection is available.
Wi-Fi recommendations
To connect your payment terminals over Wi-Fi, your access point needs to support:
- WPA/WPA2-Enterprise encryption, or WPA/WPA2-Personal encryption.
- 2.4Ghz or 5Ghz frequencies.
In addition, we recommend that you:
- Configure a remote Wi-Fi profile.
To use Enterprise encryption, using a remote Wi-Fi profile is mandatory.
- Use a dedicated private wireless network.
- If your integration uses local communications, disable the Wireless Isolation, AP Isolation, Client Isolation, or other similar features on your access point.
- Check what Wi-Fi frequencies and channels your payment terminal supports in your region.
Note that when the terminal indicates it is connected to your Wi-Fi network, this doesn't necessarily mean that it is connected to the internet. There can be issues with the connection from your Wi-Fi network to the internet.
Handling loss of internet connectivity
When a transaction is declined because of a network connection issue, the error condition you receive for the transaction is UnreachableHost.
There are several ways you can continue making transactions when your primary internet connection is unavailable. These are:
- Use a cellular failover connection. When your primary internet connection fails, transactions are processed using the cellular connection of either a 3G/4G payment terminal or a cellular router.
-
Enable offline transactions. This will allow you to continue processing transactions when your store has no internet connection.
Offline payments are only available for integrations that use local communications.
You are fully liable for the risk of failed captures, chargebacks, and disputes related to offline payments.
Using a proxy
Adyen-supplied payment terminals do not support proxy connections. If your network uses a proxy, allow your terminals to bypass the proxy and connect directly to the Adyen payments platform.

