With our Tap to Pay on iPhone solution you can accept contactless in-person payments using an iPhone as the payment interface, and process these payments on the Adyen payments platform.
Requirements
Before you begin, take into account the following requirements, limitations, and preparations.
| Requirement | Description |
|---|---|
| Integration type | Your POS app must be integrated with Terminal API. |
| API credentials | You need the following API credentials:
|
| Webhooks | To learn the outcome of refunds, set up Standard webhooks (if this hasn't been done already). |
| Hardware | An iPhone. See iOS system requirements for the full hardware and software requirements. |
| Limitations | Check the countries/regions, payment methods, and functionality that we support for Tap to Pay on iPhone. |
| Setup steps | Before you begin:
|
How it works
Tutorial and app
Hit the ground running with our integration tutorial and iOS sample app.
To build a Tap to Pay on iPhone solution:
-
Get an entitlement from Apple for Tap to Pay on iPhone and configure your Xcode project accordingly.
-
Add the iOS Mobile SDK to your project, using basic authentication.
Note that for compatibility with Objective C, you need to prefix the public symbols with
ADY. -
Implement a server-to-server API request to establish a secure communication session.
-
In your POS app, enable the transaction functionality of the SDK.
-
Make sure that the Apple Terms of Conditions are accepted.
-
From your POS app, call the warmup function to speed up initiating transactions.
-
In your POS app, implement handling payments using the SDK.
This creates the following flow:
- Your iOS POS app creates a Terminal API payment request, or receives a Terminal API payment request from your backend.
- The POS app passes the payment request to the iOS Mobile SDK.
- The SDK passes the request to the Tap to Pay on iPhone component.
-
When the customer completes the payment by tapping their card or mobile device on the iPhone, the SDK passes the Terminal API payment response to the POS app.
-
In your POS app, implement handling refunds and diagnosing the state of the SDK.
-
If the same device will be used at multiple locations, implement clearing the communication session.
1. Get an entitlement from Apple
To add Tap to Pay functionality to your iOS POS app through the iOS Mobile SDK, you need to apply for a specific entitlement and then configure your Xcode project to use the entitlement.
You need to apply separately for a TEST and a LIVE entitlement. The approval process for the LIVE environment can take up to several weeks.
-
Make sure that you meet the requirements for submitting an entitlement request:
- An Organization level Apple Developer account.
-
The Account Holder role for that Apple Developer account.
-
Fill out the form to get the entitlement.
-
After you receive the entitlement to support Tap to Pay on iPhone, follow Apple's instructions to configure your Xcode project to use it.
2. Add the SDK to your project
You can add the iOS Mobile SDK to your POS app using a Swift Package Manager remote package. To get access you need to have a basic authentication credential. You can share the basic authentication password with anybody in your team who needs to get the SDK or create multiple passwords for internal use.
Do not share this password in any publicly accessible code or area where unauthorized users can find it.
To add the iOS Mobile SDK to your project:
-
In your Customer Area create a basic authentication credential with a password:
- Go to Developers > API credentials, and select Create new credential.
- Under Payments > Credential type select Web service user and then select Create credential.
- Under Server settings > Authentication select the Basic auth tab and then select Generate password.
- Select the copy icon and save your basic authentication password in a secure location.
- Go to Permissions > Roles > POS, select Allow SDK download for POS developers, and deselect any other permissions and roles.
Contact Support Team if you don't see the Allow SDK download for POS developers role.
- Select Save changes.
-
Save the basic authentication password in a .netrc file:
-
Check if you already have a
.netrcfile in your home directory. If you do not have it, create a plain text file with that name in your home directory (~/.netrc). -
Add the following content to your
.netrcfile, whereloginis the API credential username, for example ws_12345@Company.[YourCompanyAccount], andpasswordis the basic authentication password.
- Make sure that the
.netrcfile has the following file system permission: 0600.
-
-
Add the POS Mobile SDK as a package dependency to your Xcode project:
It is not possible to use TEST and LIVE environments from a single app target. You need to setup your Xcode project to have separate app targets for Test and for Live. Each target needs to link to the respective AdyenPOS SDK version for its environment:
AdyenPOSTestandAdyenPOSLive.-
In your Xcode project or workspace, go to File > Add Package Dependencies.
-
Enter the URL
https://github.com/Adyen/adyen-pos-mobile-ios-testand select your preferred Dependency Rule. -
Select Add Package, and after the SDK is loaded add
AdyenPOSTESTto your app target that connects to the Adyen test environment. -
Select Add Package.
-
-
In your code, add
import AdyenPOS, or for Objective-C compatibility add#import "ADYPOS/ADYPOS.h".
Compatibility with Objective-C
If your POS app requires the iOS Mobile SDK to be compatible with Objective-C:
- Link the
ADYPOSTESTpackage product to your app target instead ofAdyenPOSTEST. - Link the
ADYPOSLIVEpackage product to your app target instead ofAdyenPOSLIVE.It is not possible to use TEST and LIVE environments from a single app target. Each app target must connect to a specific environment.
The integration process is the same. The only difference is that the public symbols are prefixed with ADY. For example, PaymentService is called ADYPaymentService.
3. Establish a session
To ensure the Mobile SDK and the Adyen payments platform can collaborate in a secure way, you need to implement a server-to-server API request for establishing a communication session.

To authenticate this API request, you need to have an Adyen API credential in your test Customer Area. This credential must have an API key with the following role:
- Checkout webservice role. This role is assigned by default when the API key is created.
The credential also needs to have a client key.
Create a client key
If you want to use an existing API credential that does not have a client key yet, create a client key as follows:
- Log in to your Customer Area.
- Go to Developers > API credentials, and select the credential username for your integration, for example ws@Company.[YourCompanyAccount].
- Under Client settings > Authentication select the Client key tab.
- Select Generate client key.
-
Select Save changes.
The client key is part of the setup but is not used later on. Therefore, you do not need to specify allowed origins, and you do not need to save the client key in your system.
Implement the request
To establish a communication session:
-
From your backend, make a POST request to the applicable test or regional /auth/certificate endpoint, specifying:
Parameter Required Description merchantAccount 
The unique identifier of your merchant account. setupToken The setup token provided by the Mobile SDK through the PaymentServiceDelegate.register(with:)callback ofPaymentServiceDelegate.store Not a payment facilitator The reference of the store that you want to process payments for. Do not include this parameter if your account structure uses merchant accounts as stores, or if you are a registered payment facilitator. subMerchantData Payment facilitator An object with the details of the sub-merchant. See the next table for the parameters. This object is required if you are a registered payment facilitator. If you are not a payment facilitator, do not include this object. The
subMerchantDataobject includes the following parameters:Parameter Required Description idYour unique identifier of the sub-merchant. nameThe name of the sub-merchant. displayNameThe name of the sub-merchant as it should appear on the display of the mobile device during transactions. mccThe sub-merchant's four-digit Merchant Category Code (MCC). This parameter is used to correctly route the transaction. streetThe street name and house number of the sub-merchant's address. cityThe city of the sub-merchant's address. postalCodeThe postal code of the sub-merchant's address, without dashes. countryThe country/region of the sub-merchant's address, specified as the three-letter country code in ISO 3166-1 alpha-3 format. stateThe state code of the sub-merchant's address, if applicable for the country or region. taxIdThe tax ID of the sub-merchant. Required only in Brazil and for Cartes Bancaires in France.
For Brazil, this is the 11-digit CPF or 14-digit CNPJ.
For France, this is the SIRET, with a maximum of 14 digits.emailThe email address of the sub-merchant. Required for American Express. phoneNumberThe phone number of the sub-merchant. Required for American Express. -
When you receive the response:
- Check that you get a 201 Created HTTP status code.
- Return the sdkData to your POS app.
-
If you create the Terminal API request on your backend, save the installationId and use this as the
POIIDin theMessageHeaderof the payment request.
If you receive a response with an error message similar to the following, ask our Support Team to configure the MCC that you specified in the request.
Endpoints to use
- Test endpoint:
https://softposconfig-test.adyen.com/softposconfig/v3/auth/certificate - Regional live endpoints:
- Australia:
https://softposconfig-live-au.adyen.com/softposconfig/v3/auth/certificate - Northeast Asia:
https://softposconfig-live-nea.adyen.com/softposconfig/v3/auth/certificate - Europe:
https://softposconfig-live.adyen.com/softposconfig/v3/auth/certificate - North East Asia:
https://softposconfig-live-nea.adyen.com/softposconfig/v3/auth/certificate - United States:
https://softposconfig-live-us.adyen.com/softposconfig/v3/auth/certificate
- Australia:
If you are using old /checkout/possdk/v68/sessions test and live endpoints, we recommend you migrate to the latest endpoints mentioned above. You can still use the /checkout/possdk/v68/sessions endpoints, but we are deprecating them.
4. Enable transactions
To enable the payments functionality of the Mobile SDK:
-
In your POS app, implement the
PaymentServiceDelegateprotocol. Below is an example of how you could do that.struct SessionsResponse: Decodable { let sdkData: String } class MyPaymentServiceDelegate: PaymentServiceDelegate { internal func register( with setupToken: String ) async throws -> String { /// Make a call to your backend to trigger a `/softposconfig/v{version}/auth/certificate` request, specifying the `setupToken` provided by the SDK. let request = URLRequest(url: URL(string: "{ADDRESS_OF_YOUR_BACKEND_API}")!) let (data, _) = try await URLSession.shared.data(for: request) let response = try JSONDecoder().decode(SessionsResponse.self, from: data) return response.sdkData } }The actual structure of the
SessionsResponsedepends on your backend implementation. -
Create an instance of
PaymentServicewith thePaymentService(delegate:)initializer and pass the delegate object. Make sure that you keep a strong reference to the payment service instance so that it is retained for the duration of the transaction. Also make sure yourdelegateis strongly referenced, because thePaymentServicekeeps a weak reference to thedelegate.let paymentService = PaymentService(delegate: myPaymentServiceDelegate) -
Make sure that the
PaymentServiceDelegatecan provide newsdkDataat any time.
If there is no session or the session has expired, the delegate is called using thePaymentServiceDelegate.register(with:)callback. Using the providedsetupTokenyou need to get thesdkDatathrough your backend and return it. For instructions, see Establish a session. -
Optional. Verify that the callback works, by calling the warm-up function.
The warm-up function checks for a session and any configuration changes, and prepares the proximity reader on the iPhone. If you haven't accepted Apple's Terms and Conditions for Tap to Pay, calling the warm-up function will return an error.
try await paymentService.warmUp()
5. Accept Apple Terms and Conditions
You can accept the Apple Terms and Conditions for Tap to Pay in the Customer Area for your LIVE integration. This won't work in your TEST environment.
Before making your first payment, you need to make sure that you have accepted the Apple Terms and Conditions for Tap to Pay for the merchant account or store that uses the Mobile SDK:
- Call
paymentService.isAccountLinkedForTapToPay()to check if you have already accepted the Terms and Conditions. If the return value istrue, the terms have already been accepted, and you can move on to use the warm-up function. If the return value isfalse, continue with the next step. - Call
paymentService.linkAccountForTapToPay()to show a prompt on the iPhone to accept the Apple Terms of Condition before starting the first Tap to Pay transaction on that phone.
6. Use the warm-up function
To speed up initiating transactions, you can use the warm-up function. This function checks for a session and any configuration changes, and prepares the proximity reader on the iPhone.
As a best practice, call the warm-up function:
- When the POS app starts. In other words, as soon as the app has the active state.
- When the POS app returns to the active state after running in the background.
To call the warm-up function:
try await paymentService.warmUp()(Optional) Observe the warm-up progress
The first warm-up can take a while and may leave users wondering what is happening. To visualize the progress, implement the WarmUpDelegate protocol. This protocol allows you to receive progress updates through paymentService(didUpdateWarmUpProgress:). You can then show a progress bar or other visual indicator in your POS app.
The observer currently reports only the completion percentage of Tap to Pay on iPhone configuration changes. This requires iOS SDK version 3.18 or later.
To use this method:
-
First, conform to the
WarmUpDelegateprotocol. This protocol allows you to receive progress updates throughpaymentService(didUpdateWarmUpProgress:).This callback is not invoked on the main thread. If you are performing UI updates from this callback, you are responsible for ensuring that any UI-related work is done on the main thread in your application.
-
Set
warmUpDelegateonpaymentServiceto an instance conforming to the protocol. -
Call the warm-up function.
-
Make sure you keep a strong reference to the observer instance elsewhere in the code. The SDK holds
warmUpDelegateweakly, and does not retain the observer for you.
7. Handle a payment
In this step you add code to start a transaction with:
-
A Terminal API payment request.
Tip
To help you create Terminal API requests, we provide a TerminalAPIKit for iOS on GitHub. Installation and usage instructions are in the repository's README. - The iPhone as the payment interface to use.
-
The presentation mode you want to use.
To enable the iOS Mobile SDK to handle transactions:
-
In your POS app, create a Terminal API payment request with:
-
MessageHeader.POIID: the installation ID of the SDK.- If you create the Terminal API diagnosis request in your POS app, use
PaymentService.installationIdas thePOIIDin the MessageHeader of the request. - If you create the Terminal API diagnosis request in the backend, this uses the installationId from the
/auth/certificateresponse.
- If you create the Terminal API diagnosis request in your POS app, use
-
The remaining
MessageHeaderparameters and the request body.For details, see Make a payment and PaymentRequest.
-
Create an instance of
Payment.RequestusingPayment.Request(data:), and pass the Terminal API payment request from your POS app or backend.let transaction = try Payment.Request(data: requestData) -
Get a
PaymentInterfacefrom an instance ofPaymentService, usingPaymentService.getPaymentInterface(with: .tapToPay).let paymentService = PaymentService(...) let paymentInterface = try paymentService .getPaymentInterface(with: .tapToPay) -
Specify a
TransactionPresentationModevalue that matches the UI framework, SwiftUI or UIKit, of the POS app.Value Description viewModifierFor use with a SwiftUI application. The UI is embedded in a Viewas aViewModifier.presentingViewControllerFor use with a UIKit application. The UI is presented on top of the provided UIViewController.Optionally use parameters to customize the user interface.
Parameter Description logoA bitmap image to show on your mobile device during the transaction flow. To ensure visibility in both dark mode and light mode, the bitmap image must have a transparent background. The logo is placed in a frame with a vertical height of 40 points and scaled to aspect ratio to fit in that frame. successScreenTimeoutIndicates how long the SDK shows the screen that indicates the transaction succeeded. If not specified, this success screen is dismissed after four seconds. You can set a time in seconds as a Double with a minimum of 0.5 seconds and a maximum of 4 seconds. Using
viewModifier(SwiftUI)If you use
TransactionPresentationModewithviewModifier:-
Set
presentationModeas follows.let presentationMode: TransactionPresentationMode = .viewModifier -
Apply the presentation mode on your SwiftUI view.
Button(...) {
   // code to start the transaction
})
.transactionModal(
   with: {YOUR_INSTANCE_OF_PAYMENT_SERVICE}
   logo: logo,
   parameters: .init(successScreenTimeout: 2)
)
Using
presentingViewController(UIKit)If you use
TransactionPresentationModewithpresentingViewController(_:logo:parameters:), setpresentationModeas follows.let presentationMode: TransactionPresentationMode = .presentingViewController( rootViewController, logo: logo, parameters: .init(successScreenTimeout: 2) ) -
-
Invoke
PaymentService.performTransaction(with:paymentInterface:presentationMode:)on your instance ofPaymentService.let transactionResponse = await paymentService.performTransaction( with: transaction, paymentInterface: paymentInterface, presentationMode: presentationMode )The Mobile SDK checks for a session and shows the transaction screen on your iPhone.
-
Check the
paymentResponse. This is the Terminal API response with the transaction result and the data you can use to generate a receipt, or with any errors. -
Pass the
paymentResponseto your POS app.
-
8. Handle a refund
There are two types of refund: referenced and unreferenced. The main difference is that a referenced refund is connected to the original payment, and an unreferenced refund isn't. That makes unreferenced refunds a bit riskier. For an overview of the differences, see Refund a payment.
Refunds are usually not processed synchronously. When you send a request for a referenced or unreferenced refund, the Terminal API response only confirms we received the request.
We inform you about the outcome of the refund asynchronously, through a webhook.
- For a referenced refund, we return a CANCEL_OR_REFUND webhook.
- For an unreferenced refund, we return a REFUND_WITH_DATA webhook.
Depending on the card scheme and country/region where the card is used, unreferenced refunds are sometimes processed synchronously. In that case the Terminal API response includes an acquirerResponseCode to indicate the outcome.
To learn the outcome of a refund, you need to set up webhooks.
Handle a referenced refund
The Terminal API request for a referenced refund is a reversal request. The SDK contains a dedicated function for this.
In your iOS POS app, add code for the following steps:
-
Create a Terminal API reversal request with:
-
MessageHeader.POIID: the installation ID of the SDK.- If you create the Terminal API diagnosis request in your POS app, use
PaymentService.installationIdas thePOIIDin the MessageHeader of the request. - If you create the Terminal API diagnosis request in the backend, this uses the installationId from the
/auth/certificateresponse.
- If you create the Terminal API diagnosis request in your POS app, use
-
The remaining
MessageHeaderparameters and the request body.For details, see Referenced refund and ReversalRequest.
-
-
Create an instance of
Reversal.RequestusingReversal.Request(data:), and pass the Terminal API reversal request from your POS app or backend.let request = try Reversal.Request(data: requestData) -
Invoke
PaymentService.performReversal(with:)on your instance ofPaymentService.let reversalResponse = await paymentService.performReversal(with: request)The Mobile SDK now checks for a session, and starts the transaction.
-
Check the
reversalResponse. This is the Terminal API response with the transaction result and the data you can use to generate a receipt, or with any errors. -
Pass the
reversalResponseto your POS app.
Handle an unreferenced refund
The Terminal API request for an unreferenced refund is a payment request with an additional parameter:
PaymentData.PaymentType: Refund
This means you can use the same code as for handling a payment. The only difference is the structure of the Terminal API payment request that you pass as the requestData to the Payment.Request.
For the structure of the Terminal API request, see Unreferenced refund.
9. Diagnose the device
We recommend implementing the Terminal API diagnosis request. This enables you to do the following:
-
Check if there are stored offline payments that have not been forwarded to Adyen yet. The SDK will try to go online and forward these transactions. Note that you do not need to send a diagnosis request to forward offline transactions, because forwarding happens automatically whenever the internet connection is restored after it had dropped.
-
Check for security threats that would block transactions. If threats are detected that an operator can solve, the response includes information about the cause and solution of the problem.
-
Check the expiry date of the SDK that is used on the mobile device. Transactions will be blocked if mandatory updates are not carried out.
Be aware that the diagnosis can take a while if the SDK succeeds in going online and there is a large number of stored offline payments that are forwarded.
In your iOS POS app, add code for the following steps:
-
Create a Terminal API diagnosis request with:
-
MessageHeader.POIID: the installation ID of the SDK.- If you create the Terminal API diagnosis request in your POS app, use
PaymentService.installationIdas thePOIIDin the MessageHeader of the request. - If you create the Terminal API diagnosis request in the backend, this uses the installationId from the
/auth/certificateresponse.
- If you create the Terminal API diagnosis request in your POS app, use
-
The remaining
MessageHeaderparameters. -
The request body consisting of
DiagnosisRequest.HostDiagnosisFlag: set to true, so that the SDK will try to forward any stored offline transactions and perform a security scan.
For details, see Diagnose a Mobile SDK solution and DiagnosisRequest.
-
-
Call the
performDiagnosisfunction, using therequestparameter to pass the Terminal API diagnosis request.public func performDiagnosis( with request: Diagnosis.Request ) async -> Diagnosis.Response { await diagnosisPerformer.performDiagnosis(with: request) } -
When you get the Terminal API
DiagnosisResponse, check theResponse.AdditionalResponse:-
See the
unconfirmedBatchCountfor the number of stored offline transactions that have not been forwarded to theAdyen payments platform yet. -
Base64-decode the
storeAndForwardStatusvalue for more information about offline transactions. -
Base64-decode the
attestationStatusvalue for information about any security issues. If issues are detected that can be resolved by the end user, the resulting JSON object includes messages with the details. These are the same error messages that we show automatically on the end user's mobile device when these issues are detected during a transaction. -
See the
sdkExpiryfor the date when the installed SDK version expires.
For a detailed explanation of the response, see Diagnose a Mobile SDK solution.
-
10. (Optional) Clear the session token
There are several situations when you need to clear the existing session to remove all session information from your mobile device. When you have cleared the session, configuration updates are fetched and a new session is established when you start a new transaction or call the warm-up function.
As a best practice, clear the session to:
- Re-establish a session after switching between merchant accounts or stores in your POS app and your Customer Area. If the device is reassigned from store A to store B and a transaction is started there, on the Adyen side the transaction will continue to appear to belong to store A instead of store B. Clearing the session prevents this issue.
- Force a refresh of the configuration. After clearing the session, the latest configuration is fetched and stored on your mobile device the next time the iOS Mobile SDK connects to the Adyen backend.
- Test the session establishment flow in your POS app, specifically how it interacts with your and Adyen's backend to securely establish a session with the iOS Mobile SDK.
To clear the session:
- Explicitly clear the communication session using
PaymentService.resetSession(). - Establish a new communication session.
Other supported features
In addition to payments, refunds, and diagnosis, the Mobile solutions support other (payment) features. These are the same features that are supported in Terminal API integrations using Adyen-provided payment terminals.
For some features you need to add parameters to your Terminal API payment request, similar to unreferenced refunds described above. Other features only require enabling the feature for your Adyen account. You can find the details on the pages dedicated to those features. Where the details differ between an integration using payment terminals and a mobile solution, this is clearly indicated.
| Feature | Supported with Tap to Pay on iPhone |
|---|---|
| Diagnosis | |
| Partial authorization | |
| Payment | |
| Pre-authorization | |
| Refund, referenced | |
| Refund, unreferenced | |
| Store and forward offline payments | |
| Surcharge | |
| Tax-free shopping | |
Follow UI guidelines
When using Tap to Pay on iPhone, the users of your POS app as well as the customers will interact with your app. There are some recommendations to follow for these interactions.
POS app user screens
It needs to be clear to users operating your POS app (like store staff) how they can activate Tap to Pay on iPhone.
- Make users aware that they need to set up a device passcode to unlock the iPhone they use for Tap to Pay on iPhone.
- Make sure that the user interface for Tap to Pay on iPhone is in accordance with Apple's best practices and presentation guidelines.
For example:- For a button, use the label Tap to Pay on iPhone, or Tap to Pay if there is little space.
- Apple Pay and Tap to Pay on iPhone are two different things. So if you use an icon, use the Tap to Pay icon, not the Apple Pay icon.
-
Add education screens that instruct users on how to user Tap to Pay on iPhone. From iOS Mobile SDK version 3.9.0 and later you can call
showTapToPayEducationScreen()to show education screens on devices on iOS version 18 or later.@available(iOS 18.4, *) func showTapToPayEducationScreen() async { do { try await myPaymentService.presentEducationForTapToPay(for: .tapContactless) } catch { print("Failed to display Tap to Pay Education: \(String(describing: error))") } }
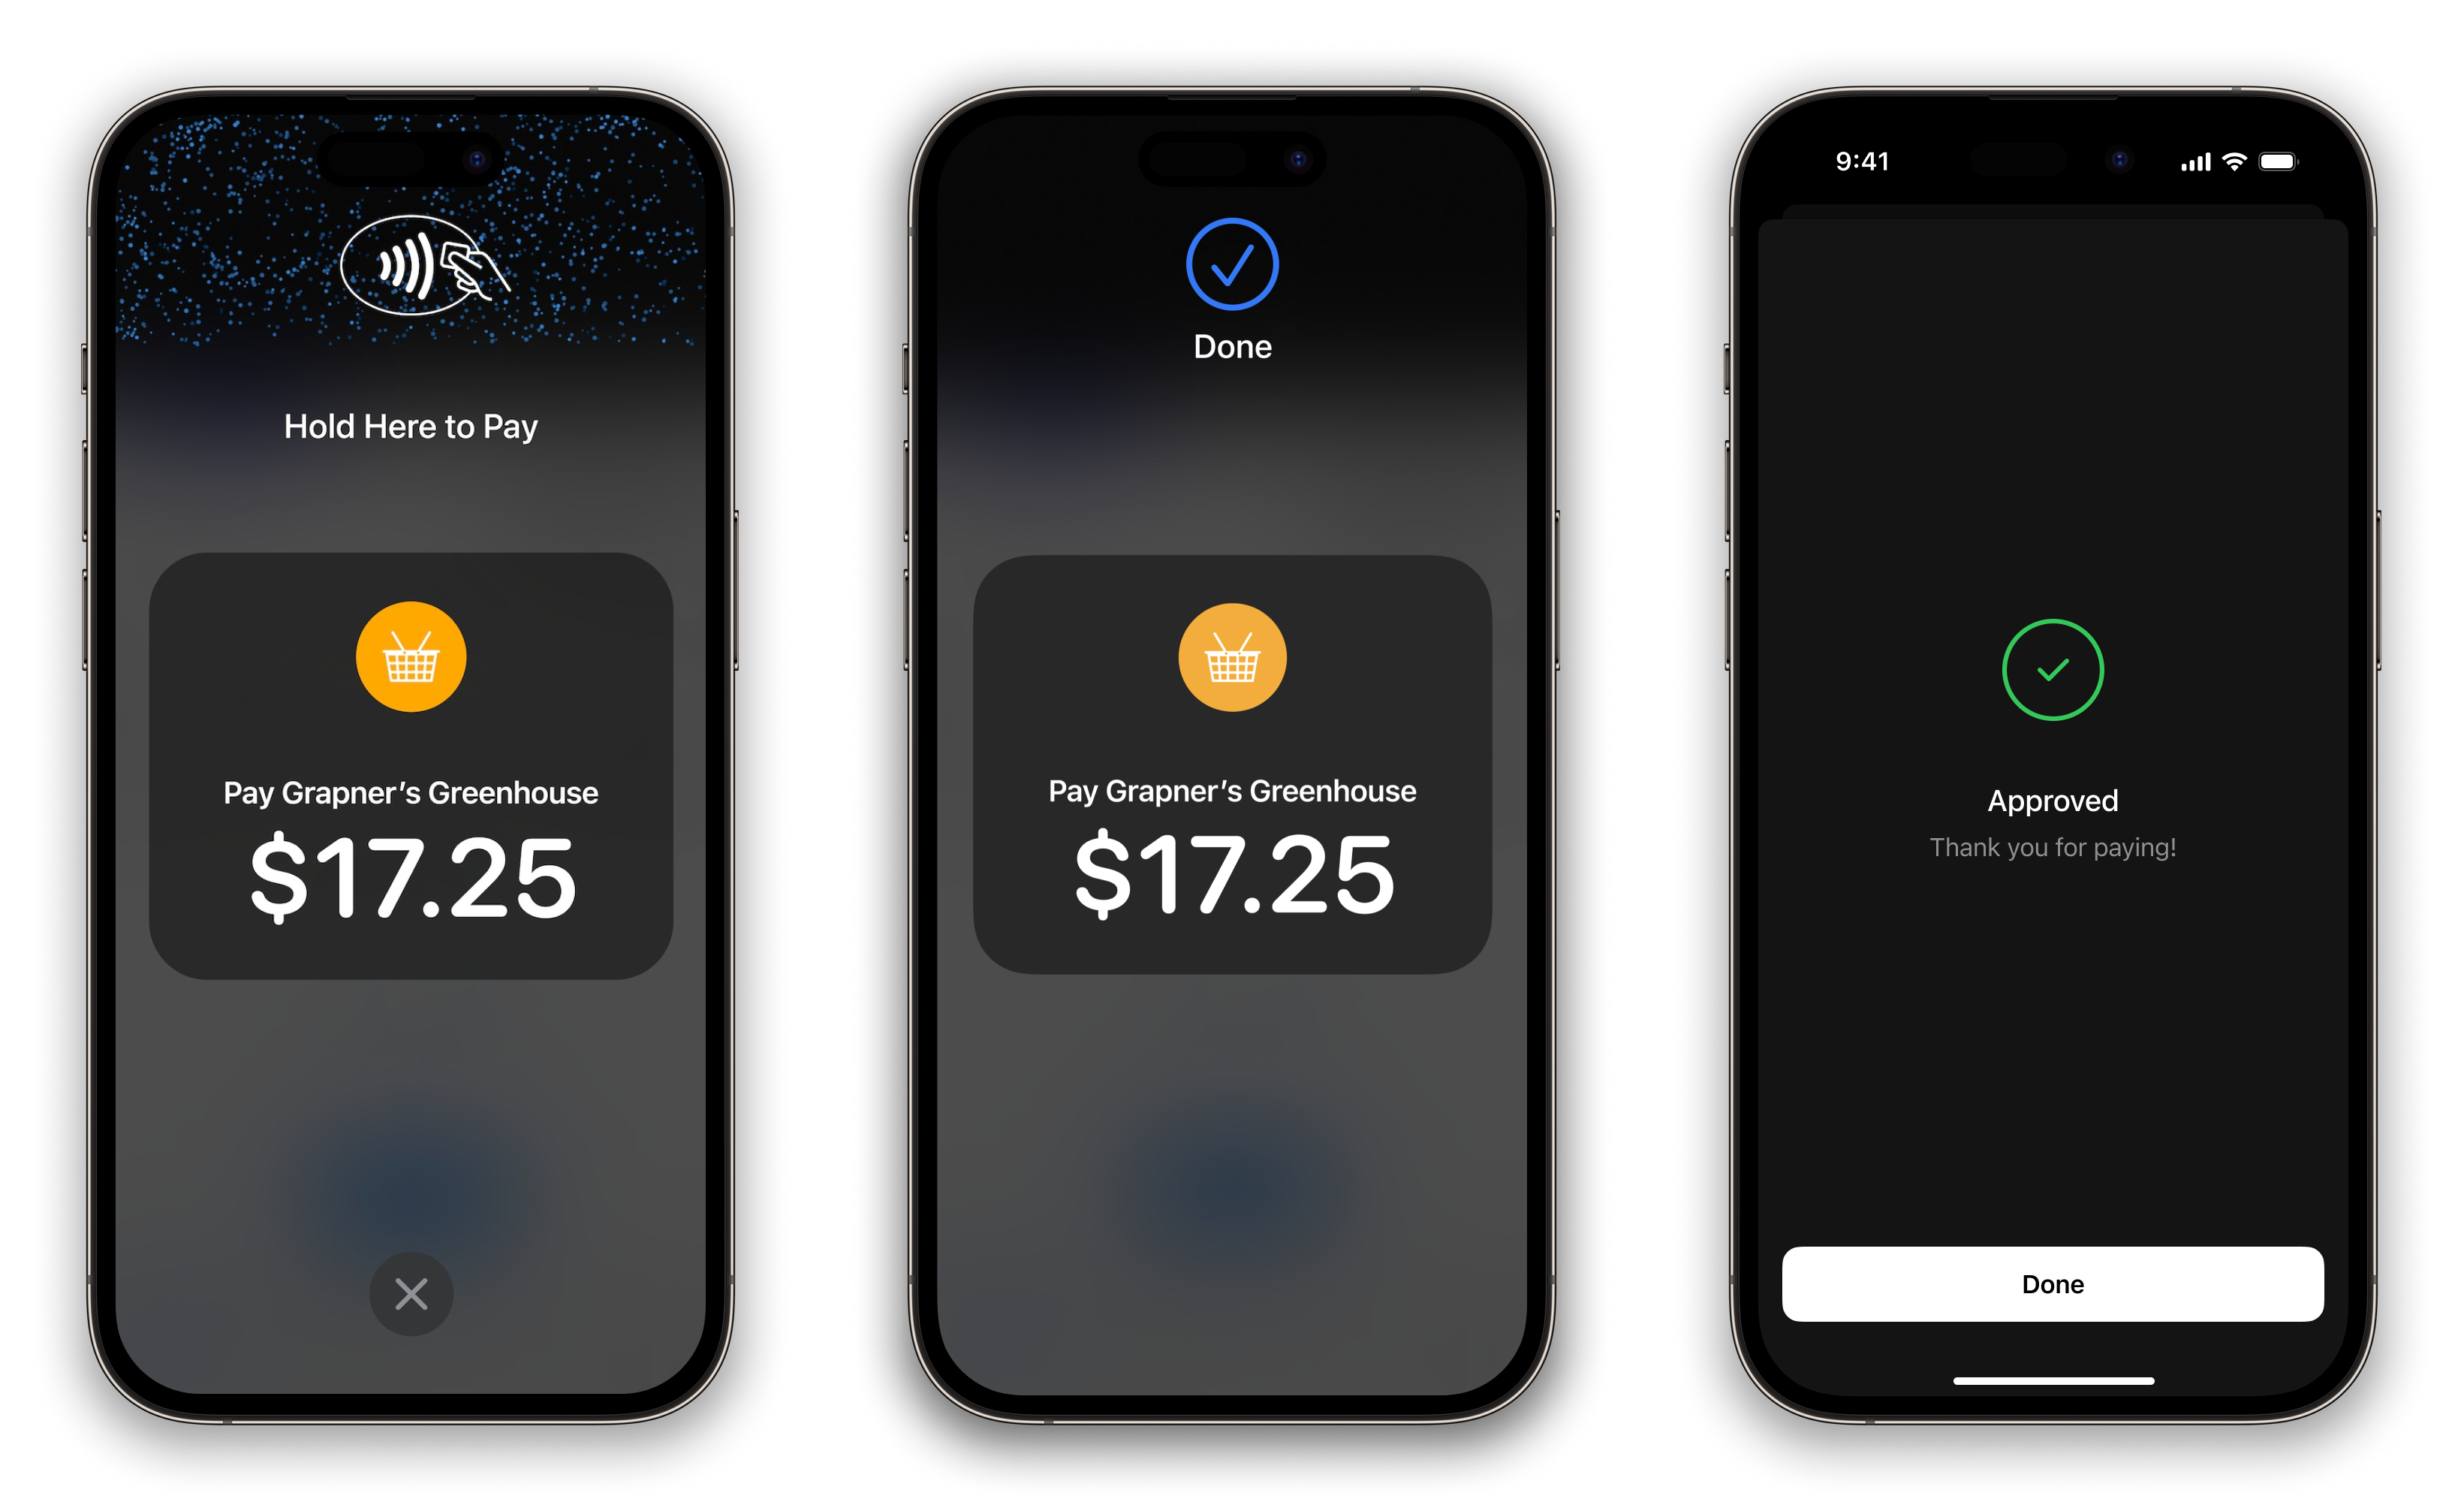
Approval screen
After reading a card, the iPhone automatically shows a Done screen first. This does not mean that the transaction is authorized yet. Only when the transaction is authorized and an Approved screen with a green check mark automatically appears, can you move on to the next step in the flow, which would be to get the receipt.
Test your solution
To make test transactions:
-
Make sure you are using the test version of the Mobile SDK.
-
Create a Sandbox Apple ID. This is needed to test Tap to Pay on iPhone in our test environment.
-
Initiate a test transaction using the following Adyen point-of-sale test cards to complete the payment:
- White-green test card
- Blue-green test card version 2.4 or later
The instructions are the same for both cards; see either of the pages mentioned above.
Go live
When you have finished testing your integration and are ready to go live:
-
If new to Adyen, get a live account. You need to have access to your organization's live Customer Area to generate API credentials for the live environment.
-
Ensure that you have a LIVE entitlement from Apple. The approval process for a LIVE entitlement can take up to several weeks.
-
Get the live SDK. You need to generate a new, live basic authentication credential exclusively for downloading the SDK.
-
Use the live endpoint for establishing a session. To access the live endpoint, you need to generate a new, live API key that is different from the API key used for downloading the SDK.
-
For Tap to Pay on iPhone, accept the Apple Terms of Use.
-
Optionally set a custom transaction screen text.
Get the live SDK
To pull in the live version of the SDK:
- Generate a new basic authentication credential in your live Customer Area and add it to your
.netrcfile. - In your
.netrcfile, change the value formachinetopos-mobile.cdn.adyen.com. - In your Xcode project or workspace, remove the TEST dependency and add the LIVE dependency using the URL
https://github.com/Adyen/adyen-pos-mobile-ios. - Add
AdyenPOSLIVEto your app target that connects to the Adyen Live environment.
If your POS app requires the iOS Mobile SDK to be compatible with Objective-C:
- Link the
ADYPOSLIVEpackage product to your app target instead ofAdyenPOSLIVE.
Establish a live session
When going live, you must change the /auth/certificate endpoint where you send requests to establish a secure communication session, as well as the API key that you use to authenticate those requests.
- To access the live endpoint, generate a new API key from your live Customer Area.
-
The live endpoint URL to use depends on the region:
- Australia:
https://softposconfig-live-au.adyen.com/softposconfig/v{version}/auth/certificate - Northeast Asia:
https://softposconfig-live-nea.adyen.com/softposconfig/v{version}/auth/certificate - Europe:
https://softposconfig-live.adyen.com/softposconfig/v{version}/auth/certificate - North East Asia:
https://softposconfig-live-nea.adyen.com/softposconfig/v{version}/auth/certificate - United States:
https://softposconfig-live-us.adyen.com/softposconfig/v{version}/auth/certificate
- Australia:


