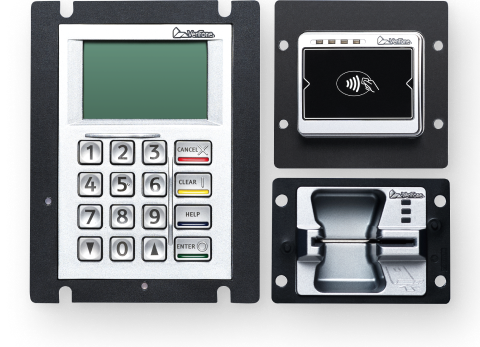
A UX300 unattended payment terminal consists of three separate devices:
- UX300 card reader
- UX100 PIN pad with a display
- UX400 NFC-reader
These devices are intended for mounting in your kiosk, vending machine, ticket machine, or other type of self-service machine.
To order a UX300 unattended terminal, select UX300 in your Customer Area. All three devices will be included in the delivery.
Supplied components
| Component | Device dimensions | Cutout dimensions |
|---|---|---|
| UX300 card reader | Height 71mm x Width 96 mm x Depth 150mm | Height 61,2mm x Width 73,2mm |
| UX100 PIN pad | Height 142mm x Width 108mm x Depth 26mm | Height 120mm x Width 82mm |
| UX400 NFC-reader | Height 92mm x Width 100mm x Depth 27mm | Height 61,2mm x Width 73,2mm |
Get started
Get your new unattended terminal up and running:
- Assign the terminal to your store.
- Ask your Adyen contact or our Support Team for the ARS password. You'll need this during the setup.
- Inspect the terminal.
- Set up the UX300 terminal:
- Mount the UX devices in the front panel of the self-service machine.
- Connect the cables.
- Reset the anti-removal switches.
- (Optional) If you cannot use a DHCP server, assign a static IP address.
- Board the terminal.
- Update the terminal software.
- Do any remaining steps related to mounting the UX devices.
When you have completed these steps, you are ready to process payments!
Assign the terminal
During the installation, the UX300 terminal obtains its configuration by boarding itself to your store. Contrary to most other terminals, you always need to assign an unattended terminal to a store before boarding the terminal.
-
Assign the terminal to your store using your Customer Area or using API calls.
In the procedure, use the serial number of the UX300 card reader. You can view the serial number in your Customer Area, under Devices > Orders & returns, in the order for your terminal.
Inspect the terminal
Because payment terminals process sensitive card data, you must verify that the terminal you received is the correct one, supplied by Adyen, and has not been tampered with.
-
Verify that the shipping box containing the terminal has not been opened and that the tamper-evident security packing tape is intact.
-
If you have access to the Adyen Customer Area, log in and under Devices > Orders & returns find the order for your terminal. Then:
- Verify that the serial number (S/N) on the box is the same as in the Customer Area. This refers to the serial number of the UX300 card reader.
- Using the track & trace link, track the order with the carrier to verify that they confirm having delivered the payment terminal.
-
Open the box, take the terminal out of the box, and verify that the serial number (S/N) on the terminal is the same as the serial number on the box.
-
Inspect the terminal for tampering. Check for missing screws, additional wires or labels, holes in the device, and anything inserted in or attached to any part of the terminal.
If any of the above checks fails, contact our Support Team immediately.
Mount the UX devices
You need to mount the UX300 card reader, UX100 PIN pad, and UX400 NFC-reader in the front panel of your self-service machine. You may also need to install a drain tube and connect grounding cables or a ground harness. To learn how to mount the UX devices, see:
- The installation instructions from the manufacturer of your self-service machine.
- The installation instructions from Verifone, the manufacturer of the UX devices.
Connect the cables
-
Connect an Ethernet cable between the ETH (LAN) port of the UX300 card reader and your network.
Only connect a regular Ethernet cable to the ETH (LAN) port. Using any other type of cable or another port, such as the RS232 port, might severely damage the device.
-
Connect the card reader to the UX400 NFC-reader:
- Connect an antenna cable between the UX400 RF port on the card reader and the NFC-reader.
-
Connect an RJ-45 communication cable between the COMM port on the card reader and the NFC-reader.
-
Connect the card reader to the UX100 PIN pad with a USB Type A-B cable, using the powered USB-1 port on the card reader.
-
Connect the card reader to a power supply unit in the self-service machine or to an external power source, using the DC-in port on the card reader.
The UX terminal now starts up.
Reset the anti-removal switches
The UX terminal has a number of anti-removal switches (ARS) that put the terminal out of service when someone tries to physically tamper with the device. Mounting the terminal also triggers these switches.
To continue setting up the terminal, you need to reset the ARS switches:
- When the display of the UX100 PIN pad shows Out of Service, press OK to confirm you want to Reset the ARS.
- When the display asks for the Switch 1 password, enter the ARS password you received from Adyen and press OK.
- When the display asks for the Switch 2 password, enter the same ARS password and press OK.
The display should now show the Adyen logo, and then "Terminal is not boarded".
Resetting anti-removal switches after boarding
Sometimes the ARS switches are triggered later on in the process of getting the terminal up and running, after the terminal is boarded. When this happens, the display doesn't indicate the terminal is out of service. You can start a transaction, but the transaction cannot be completed because PIN entry is prevented.
To ensure the terminal will function properly, you need to reset the ARS switches again:
- On the back of the UX300 card reader, press the service switch.
- On the UX100 PIN pad, press OK to confirm you want to Reset the ARS.
- When the display asks for the Switch 1 password, enter the ARS password you received from Adyen and press OK.
- When the display asks for the Switch 2 password, enter the same ARS password and press OK.
The display should now show your logo.
(Optional) Use a static IP address
By default, DHCP is enabled on the UX300 unattended payment terminal. With this setting, your DHCP server assigns an IP address to the terminal.
- To let your DHCP server assign an IP address, skip this step and go to the next step: Board the terminal.
- If you cannot use a DHCP server, define a static IP address.
Define a static IP address
If you are not able to use a DHCP server, you need to disable DHCP and define a static IP address for the terminal.
-
On the UX100 PIN pad, press 9 and then press OK.
-
Enter the PIN code for the Admin menu and press OK. If you do not know this code, see our POS Troubleshooting section.
-
Select 1 Network and press OK.
-
Select 2 Ethernet and press OK. The IP settings page opens with the pointer in the IP address field.
-
Disable DHCP: press the Up arrow key to go to the Use DHCP checkbox at the top of the page, and then press OK to clear the checkbox.
-
Enter your network information in the remaining fields.
- To go from field to field, use the Up and Down arrow keys.
- To remove characters, press CORR.
-
To type a dot (.) press 0 two times.
-
To apply the changes and close the menu, press STOP.
Board the terminal
Remember that the terminal can only board if it is assigned to your store.
- When the display shows Board the terminal, on the UX100 PIN pad press OK.
- When the display shows the store that the terminal is assigned to, press OK to confirm.
Update the terminal software
- On the UX100 PIN pad, press 9 and then press OK.
- Enter the PIN code for the Admin menu and press OK. If you do not know this code, see our POS Troubleshooting section.
- Select 2 Software and press OK.
- Press OK to confirm you want Update the software.
When the terminal finishes downloading and installing the software, it reboots. After that, you are ready to accept payments.
Settings and transactions
With the Admin menu on the UX300 unattended payment terminal you can view and change various settings, update the software, and view the transactions made with the terminal.
-
On the UX100 PIN pad, press 9 and then press OK.
-
Enter the PIN code for the Admin menu and press OK. If you do not know this code, see our POS Troubleshooting section.
-
Select the option you want to use and press OK.
Option Description 1 Network View and change network settings.
Select Test PSP connection to verify whether the terminal is able to establish a connection with the Adyen payments platform.
2 Software Update the terminal software. 3 Config Update, view, and remove the configuration of the terminal. 4 Transactions View transactions. -
To view configuration information:
- In the Admin menu, select 3 Config and press OK.
- Select 2 View and press OK.
-
Select the option you want to use and press OK.
Option Description Settings Customer Area settings for the terminal. Firmware Release and version number of the terminal software. Hardware Terminal ID, serial port, and other hardware characteristics.