In Brazil, shoppers commonly use a combo card that has both a debit and a credit functionality, and most credit cards accept installment payments. Consequently, when paying by card, shoppers are asked to make some choices:
- Do they want to pay by credit, debit, or voucher?
- If credit, do they want to make a one-off payment of the total amount or do they want to pay in installments?
- If installments, how many installments?
Here we explain how to flag in-store card payments as credit or debit and make credit card installment payments using one of the following flows:
- Adyen UI: with this flow enabled, the terminal automatically shows screens that let the shopper make their choices, and then processes the payment request according to those choices. This flow works for integrated and standalone payment terminals.
- Your own UI: you create your own UI or use some other process to get the shopper's choices, and then pass this information in your payment request.
Requirements
Before you begin, take into account the following requirements, limitations, and preparations.
| Requirement | Description |
|---|---|
| Integration type | A Terminal API integration with payment terminals or a standalone solution. |
| Limitations | Note the following:
|
| Setup steps | To use the Adyen UI flow, ask our Support Team to enable that flow. Let them know whether you want this to be configured for a company account, a merchant account, a store, or a terminal. |
Adyen UI
To use the Adyen UI flow, you must contact our Support Team and let them know whether you want this to be enabled for a company or merchant account, a store, or a terminal. The Adyen UI flow works for integrated and standalone payment terminals.
When enabled, the flow is as follows:
-
You initiate a payment like you usually do.
-
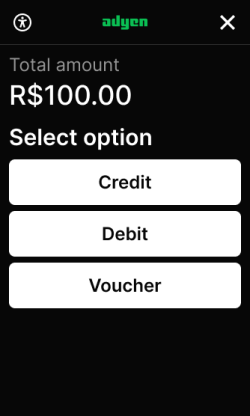
The terminal shows a series of prompts:
- First, the terminal asks the shopper to choose if they want to pay by credit, debit, or voucher.
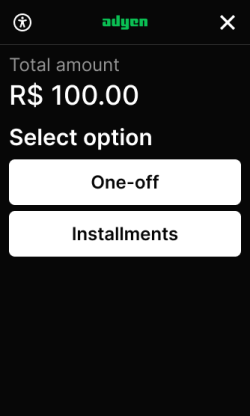
- If the shopper selects Credit, the terminal asks them to select if they want to pay in Installments or as a One-off payment.
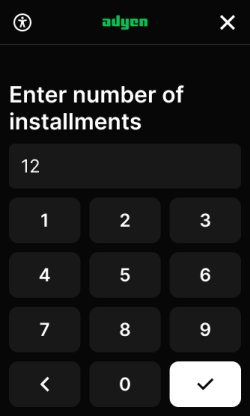
- If the shopper selects Installments, the terminal asks them to Enter the number of installments and select Confirm.
Select card type screen
Select payment type screen
Enter number of installments screen
-
The terminal asks the shopper to present their card.
-
The shopper completes the payment on the terminal. They may need to enter their PIN or signature to verify the payment.
When applicable, the generated receipt includes the number of installments, for example, "Crédito em 12 parcelas" ("Credit in 12 installments").
On an integrated terminal, you can find the installment information in the Terminal API response:
PaymentResult.PaymentType: Instalment.PaymentResult.Instalment: an object containing:InstalmentType: EqualInstalmentsSequenceNumber: 1Period: 1PeriodUnit: MonthlyTotalNbOfPayments: the number of installments.
Response.AdditionalResponse: installments= with the number of installments.
Your own UI
As an alternative to the Adyen UI, you can design your own custom UI to collect the customer's preference. Your Terminal API request then needs to flag the credit card transaction as credit and make credit card installment payments.
The flow at the point of sale is as follows:
- You collect the information about whether the shopper prefers to pay by credit, debit, or voucher, and if applicable, in how many installments. You can do this in various ways, for example:
- Your store staff asks the shopper about their preferences.
- You collect the shopper's preferences on a secondary screen, for instance a tablet.
- You use input requests to collect the shopper's preferences on the payment terminal.
- You use logic to pass the collected information to your POS app or your store staff enters this information manually into your POS app.
- Your POS app passes this information to the payment request.
- The shopper presents their card to the terminal and completes the payment.
If the customer paid in installments, the response contains the installment details and the receipt data includes the number of installments, for example, "Crédito em 12 parcelas" ("Credit in 12 installments").
Make a payment with Terminal API
When paying in installments, the Terminal API payment request needs to indicate that the payment type is credit, and contain an object to define the installments.
There are two ways to indicate the payment type:
selectedAccountType:
This method is recommended because it also applies to meal or food vouchers. You create a JSON object containingselectedAccountTypewith a value of CREDIT, CHEQUE, or MEAL_VOUCHER. Then you Base64-encode the JSON object and pass the resulting string in your Terminal API request, in theSaleToPOIDatafield.DebitPreferredFlag:
This method is limited to credit or debit. You addTransactionConditions.DebitPreferredFlagset to false for credit, or true for debit.
In the event that both DebitPreferredFlag and selectedAccountType occur in the same request, selectedAccountType takes precedence and its value is used.
-
Make sure that your POS app collects the following information and passes it to the Terminal API payment request:
- The payment type: credit or debit (or voucher).
- If credit: whether the shopper wants to pay in installments.
- If credit installments: how many installments.
-
If you want to indicate the payment type using
selectedAccountType:-
Create a JSON object consisting of the
selectedAccountTypeparameter with the value CREDIT, or CHEQUE for debit, or MEAL_VOUCHER for a voucher. -
Encode the JSON object to Base64. You will pass the resulting string in
SaleData.SaleToPOIData.
-
-
Make a payment request, specifying:
-
The standard
SaleToPOIRequest.MessageHeaderobject, withMessageClassset to Service andMessageCategoryset to Payment.Parameter Required Description ProtocolVersion
3.0 MessageClassService MessageCategoryPayment MessageTypeRequest ServiceIDYour unique ID for this request, consisting of 1-10 alphanumeric characters. Must be unique within the last 48 hours for the terminal ( POIID) being used.SaleIDYour unique ID for the POS system component to send this request from. POIIDThe unique ID of the terminal to send this request to. Format: [device model]-[serial number]. -
The PaymentRequest object with:
Parameter Required Description SaleData.SaleTransactionIDAn object with: TransactionID: your reference to identify a payment. We recommend using a unique value per payment. In your Customer Area and Adyen reports, this shows as the merchant reference for the transaction.TimeStamp: date and time of the request in UTC format.
PaymentTransaction.AmountsReqAn object with: Currency: the transaction currency.RequestedAmount: The final transaction amount.
-
The payment type, specified in one of the following ways:
-
SaleData.SaleToPOIDatawith the Base64-encoded string from step 2 as its value. -
TransactionConditions.DebitPreferredFlagset to false for credit, or true for debit.
For a debit card payment or a one-off credit card payment, no further parameters are required.
-
-
If the shopper is paying by credit card in installments, define the installments by adding
PaymentDataobject with:PaymentType: InstalmentInstalment.InstalmentType: EqualInstalmentsInstalment.SequenceNumber: 1Instalment.Period: 1Instalment.PeriodUnit: MonthlyInstalment.TotalNbOfPayments: the number of installments. The minimum is 2, the maximum 36.
To see some sample requests, select your method.
selectedAccountType method
DebitPreferredFlag method
-
-
If the payment is successful, the terminal shows the payment is approved, and you receive a PaymentResponse that contains:
-
PaymentReceipt: Dynamically generated receipt data that you can use for printing (or emailing) receipts. Both the merchant receipt and the shopper receipt have additional required keys:productType: Indicates if the shopper paid by debit, credit, or credit in a specified number of installments.-
cnpj: identification number issued for the Brazilian National Registry of Legal Entities.
-
If the shopper paid in installments, the response also includes:
PaymentResult.PaymentType: Instalment.PaymentResult.Instalment: An object containing the same installment details that you defined in thePaymentDataof your payment request.-
Response.AdditionalResponse: installments= with the number of installments.
Here is a sample response for a credit card payment with 12 installments:
-
Reconciling installments
If a shopper pays in installments, the first installment is immediately charged to the shopper's credit card, and all future installments will be charged automatically.
You receive the funds for each installment as it is settled. There is a settlement delay of 30 days. If you need the funds sooner, we also offer advancements. There is an additional fee for this service. Contact your Adyen Account Manager for details.
If you use standalone terminals, you need to manually reconcile your point-of-sale transactions against your sales and returns.
For more information on how installments are settled and reconciled, see Reconcile installment payments.