Terminal-2 icon

Show a virtual receipt on the terminal

Show a virtual receipt on the display of the payment terminal.

Before the payment transaction starts, you can use the payment terminal to show the shopper an overview of their purchase. You can also add a QR code to this virtual receipt.
This functionality is available for the following terminal models:

  • AMS1
  • e280
  • M400
  • P400 Plus
  • S1E
  • S1F2
  • SFO1
  • V400c Plus
  • V400m

A request to show a virtual receipt doesn't time out. The terminal continues to show the receipt until you send another request. For example, a payment request, or a request to show the standby screen.

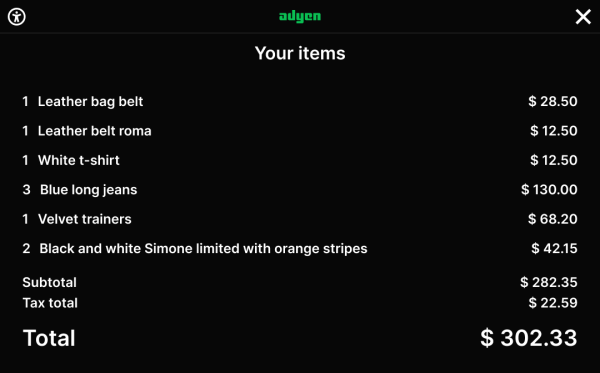
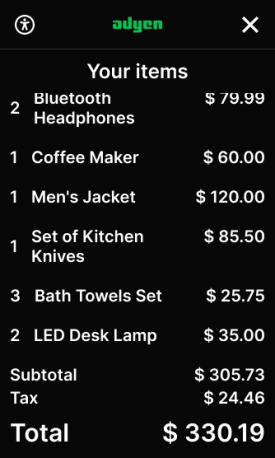
Without QR code

The next examples show what virtual receipts look like on landscape (wide) and portrait (narrow) terminal displays. The receipt lines are scrollable.
With QR code

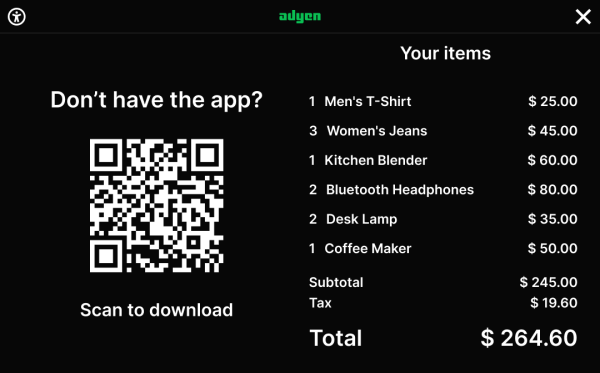
It is also possible to add a QR code. A terminal with a landscape display shows the QR code next to the receipt lines.
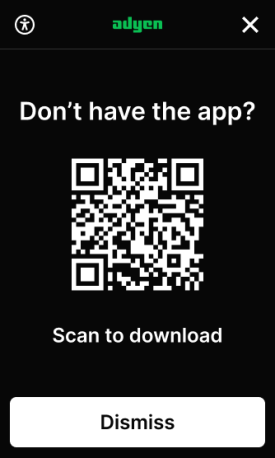
A terminal with a portrait display shows two screens. First a screen with the QR code and a button to proceed, and then a screen with the receipt lines.
 

Receipt XML file

To show a virtual receipt on the terminal display, you need to gather all content in an XML file, convert this file to a Base64 string, and pass that string in a display request.

The XML file can contain:

  • <screen name>: the XSLT to use. This determines whether a QR code is added to the virtual receipt.
  • <image> : the image to show on the left part of the screen. This is only supported on SFO1 payment terminals. The image must be converted to a Base64-encoded string.
  • <qrcodeblock>: a QR code with a header and footer. When used with a <screen name> that doesn't support showing a QR code, the <qrcodeblock> is ignored.
  • <list-header>: the header line of the virtual receipt.
  • <lines>: contains line items that represent the goods that the shopper is purchasing. Each line item can have a count, description, and amount. The amount can have currency and value. On SFO1 terminals, each line can also have an icon and a subtitle.
  • <subtotal>: the amount due before discounts and taxes.
  • <tax>: total discounts, amount and type of taxes, total tax amount.
  • <total>: final amount due.

Use the following example XML file to populate an XML input file with line items and total amounts from your POS app, making sure you specify a <screen name> that is compatible with the terminal and the result you want to achieve:

Effect <screen name> Terminal model
Receipt with QR code virtual-receipt-with-qr-code.xslt All that support virtual receipts
Receipt without QR code virtual-receipt.xslt AMS1, e280, P400 Plus, S1E, S1F2, SFO1, V400c Plus, V400m
virtual_receipt02.xslt M400
Receipt without QR code, receipt header not 'sticky' virtual_receipt01.xslt M400
Receipt without QR code, receipt header not 'sticky', receipt footer 'sticky', auto-scroll to the bottom virtual-receipt01.xslt AMS1, S1E, S1F2, V400M, P400
virtual_receipt03.xslt M400
Example XML file
Expand view
Copy link to code block
Copy code
Copy code
<?xml version="1.0" encoding="UTF-8"?>
<screen name="virtual-receipt-with-qr-code.xslt">
<!-- If you do not want a QR code, use virtual_receipt01.xslt or virtual_receipt02.xslt for M400; or virtual-receipt.xslt for other terminals. If you want the auto-scroll, use virtual-receipt01.xslt for AMS1, S1E, S1F2, V400M, and P400; or virtual_receipt03.xslt for M400. -->
<receipt>
<image>"iVBORw0KGgoAAAANS"</image>
<!-- Only on SFO1. To include the image, use virtual-receipt.xslt for the sreen name and the image tag. -->
<qrcodeblock>
<qrheader>
<description>Scan to access member card</description>
</qrheader>
<call-to-action>Scan</call-to-action>
<qrcodedata>https%3A%2F%2Fwww%2Eadyen%2Ecom%2Fsignup%2F%3Flocation%3Damsterdam%26store%3DStore42%26POSID%3DREG0042%26hash%3DAAhbcdfjkbckjwbnadsjkn4%3D</qrcodedata>
<qrfooter>
<description>Do not have the app? Scan to download</description>
</qrfooter>
</qrcodeblock>
<list-header>Your items</list-header>
<!-- a receipt can have 0 or 1 lines element -->
<lines>
<!-- the lines element can have 0 or more lineitems -->
<lineitem>
<icon>"iVBORw0KGgoAAAANS"</icon>
<!-- icon can only be added on SFO1-->
<description>** SALES **</description>
<subtitle>Quantity: 1</subtitle>
<!-- subtitle can only be added on SFO1-->
</lineitem>
<lineitem>
<!-- all elements (count, description, and amount) are optional -->
<count>1</count>
<description>Running shoes</description>
<amount>
<!-- an amount must have a currency symbol or code, and a value -->
<currency>$</currency>
<value>79.99</value>
</amount>
</lineitem>
<lineitem>
<count>2</count>
<description>Green T-shirt @ 9.89</description>
<amount>
<currency>$</currency>
<value>19.78</value>
</amount>
</lineitem>
<lineitem>
<description>** RETURNS **</description>
</lineitem>
<lineitem>
<count>1</count>
<description>Grey t-shirt @ 12.99</description>
<amount>
<currency>$</currency>
<value>-12.99</value>
</amount>
</lineitem>
<lineitem>
<description></description><!-- a lineitem containing only an empty description returns a blank line -->
</lineitem>
<lineitem>
<description>** DISCOUNTS **</description>
</lineitem>
<lineitem>
<description>Loyalty discount</description>
<amount>
<currency>$</currency>
<value>-4.48</value>
</amount>
</lineitem>
<lineitem>
<description>____________________</description>
</lineitem>
<!-- an empty lineitem returns a blank line (taking up vertical space) -->
<lineitem></lineitem>
</lines>
<!-- a receipt can have 0 or 1 subtotal element -->
<subtotal>
<!-- description and amount are both optional -->
<description>Subtotal</description>
<amount>
<currency>$</currency>
<value>86.78</value>
</amount>
</subtotal>
<!-- a receipt can have 0 or 1 tax element -->
<tax>
<!-- tax element can have 0 or 1 totaldiscount element-->
<totaldiscount>
<description>Total discount:</description>
<amount>
<currency>$</currency>
<value>-4.48</value>
</amount>
</totaldiscount>
<!-- tax element can have 0 or more taxitem elements -->
<taxitem>
<!-- description and amount are both optional -->
<description>State tax:</description>
<amount>
<currency>$</currency>
<value>5.97</value>
</amount>
</taxitem>
<taxitem>
<description>County tax:</description>
<amount>
<currency>$</currency>
<value>1.85</value>
</amount>
</taxitem>
<!-- tax element can have 0 or 1 taxtotal element -->
<taxtotal>
<!-- description and amount are both optional -->
<description>Total tax:</description>
<amount>
<currency>$</currency>
<value>7.82</value>
</amount>
</taxtotal>
</tax>
<!-- a receipt can have 0 or 1 total element -->
<total>
<!-- description and amount are both optional -->
<description>Total amount:</description>
<amount>
<currency>$</currency>
<value>90.12</value>
</amount>
</total>
</receipt>
</screen>

On the terminal screen, the currency symbol only shows for the total amount.

Make a display request for a virtual receipt

  1. Create the virtual receipt:

    1. Based on our example XML file, populate an XML file with line items and total amounts from your POS app. Make sure that you use the correct screen name:

      • <screen name="virtual-receipt.xslt">: shows a receipt without QR code where the receipt has a 'sticky' header which remains visible when scrolling down the receipt lines. For use on portrait terminals: AMS1, e280, P400 Plus, S1E, S1F2, SFO1, V400c Plus, and V400m.
      • <screen name="virtual-receipt-with-qr-code.xslt">: shows a receipt with a QR code. For use on any terminal model that supports virtual receipts.
      • <screen name="virtual_receipt01.xslt">: shows a receipt without QR code. For use on the M400.
      • <screen name="virtual_receipt02.xslt">: shows a receipt without QR code but with a 'sticky' header. For use on the M400.
      • <screen name="virtual-receipt01.xslt">: shows a receipt without QR code, a 'sticky' footer, and auto-scroll to the bottom. For use on the AMS1, S1E, S1F2, SFO1, V400M and P400.
      • <screen name="virtual_receipt03.xslt">: shows a receipt without QR code, a 'sticky' footer, and auto-scroll to the bottom. For use on the M400.
    2. Convert the XML content to a Base64 string.

  2. Make a POST request to a Terminal API endpoint, specifying:

    • MessageHeader: the standard SaleToPOIRequest.MessageHeader object. Specify:

      Parameter Required Description
      ProtocolVersion -white_check_mark- 3.0
      MessageClass -white_check_mark- Device
      MessageCategory -white_check_mark- Display
      MessageType -white_check_mark- Request
      ServiceID -white_check_mark- Your unique ID for this request, consisting of 1-10 alphanumeric characters. Must be unique within the last 48 hours for the terminal (POIID) being used.
      SaleID -white_check_mark- Your unique ID for the POS system component to send this request from.
      POIID -white_check_mark- The unique ID of the terminal to send this request to. Format: [device model]-[serial number].
    • DisplayRequest.DisplayOutput: an array containing a single array item with:

      Parameter Description
      Device CustomerDisplay
      InfoQualify Display
      OutputContent.OutputFormat XHTML
      OutputContent.OutputXHTML The Base64 string containing the XML content.
    Expand view
    Copy link to code block
    Copy code
    Copy code
    {
    "SaleToPOIRequest":{
    "DisplayRequest":{
    "DisplayOutput":[
    {
    "Device":"CustomerDisplay",
    "InfoQualify":"Display",
    "OutputContent":{
    "OutputFormat":"XHTML",
    "OutputXHTML": "...paste Base64 encoded XML here..."
    }
    }
    ]
    },
    "MessageHeader":{
    "ServiceID":"1116172359",
    "ProtocolVersion":"3.0",
    "MessageClass":"Device",
    "POIID":"M400-284251175",
    "MessageType":"Request",
    "SaleID":"POSSystemID12345",
    "MessageCategory":"Display"
    }
    }
    }

    If the request is successful, you receive a display response with:

    • OutputResult.Response.Result: Success
    Display response
    Expand view
    Copy link to code block
    Copy code
    Copy code
    {
    "SaleToPOIResponse":{
    "DisplayResponse":{
    "OutputResult":[
    {
    "InfoQualify":"Display",
    "Device":"CustomerDisplay",
    "Response":{
    "Result":"Success"
    }
    }
    ]
    },
    "MessageHeader":{...}
    }
    }

    If the request is not successful, you receive a display response with:

    • OutputResult.Response.Result: Failure.
    • AdditionalResponse and ErrorCondition: more information about why the request failed.

    See XML validation for information about how errors in the XML content are reported.
    The next example shows the response after sending the display request to an incompatible terminal:

    Response for a failed display request
    Expand view
    Copy link to code block
    Copy code
    Copy code
    {
    "SaleToPOIResponse":{
    "DisplayResponse":{
    "OutputResult":[
    {
    "Device":"CustomerDisplay",
    "InfoQualify":"Display",
    "Response":{
    "Result":"Failure",
    "AdditionalResponse":"message=DisplayRequest%20API%20cannot%20be%20used%20for%20this%20terminal%20model.",
    "ErrorCondition":"NotAllowed"
    }
    }
    ]
    },
    "MessageHeader":{...}
    }
    }

XML validation

When we receive your display request for a virtual receipt, we check whether we can parse the XML content. We can also check whether the XML content matches the XML Schema Definition (XSD). We only do this XSD check if it is enabled for your account.

  • Parsing
    We always check whether we can parse the XML content of your request.

    For example, if the XML contains a syntax error like a missing caret >, we cannot parse the XML. You receive a failure response with XHTML data could not be parsed.

    XHTML data could not be parsed
    Expand view
    Copy link to code block
    Copy code
    Copy code
    {
    ...
    "Response": {
    "AdditionalResponse": "message=XHTML%20data%20could%20not%20be%20parsed.",
    "ErrorCondition": "MessageFormat",
    "Result": "Failure"
    }
    }
  • XSD
    If we can parse the XML content and XSD checking is enabled, we validate the XML against the XSD.

    To use this validation, ask our Support Team to enable the virtual receipt XSD check.

    For example, if you add an element that is not in the XSD or if you omit a required element, the XML doesn't match the XSD. You receive a failure response with XSD validation failed.

    XSD validation failed
    Expand view
    Copy link to code block
    Copy code
    Copy code
    {
    ...
    "Response": {
    "AdditionalResponse": "message=XSD%20validation%20failed.",
    "ErrorCondition": "MessageFormat",
    "Result": "Failure"
    }
    }

    The details of any XSD errors are in the terminal log.

See also