Apart from accepting payments, you can use your payment terminals to interact with your customers in other ways. For example, to get feedback on your service, engage customers in your loyalty program, or ask their details for sending a digital receipt. Typically, the data is collected through input requests, and forwarded to a back-end system that produces the intended result.
You can set this up yourself. But you can also engage the services of companies specialized in surveys, customer loyalty, digital receipts, and so on. That is because we support third-party interactions, where another company can interact with your terminals directly without having to integrate with your POS system.
Depending on what you want to achieve, third parties can:
- Send non-payment requests to your terminals, like input requests for gathering answers from your customers, and display requests to show information like a 'Thank you' message.
- Receive Terminal API display notifications.
These notifications are generated by the terminal, are sent as webhooks, and contain updates on the progress of a payment on the terminal. - Receive standard webhooks.
These webhooks are generated on the Adyen payments platform and contain transaction details.
Third-party interaction with the terminal doesn't interrupt the payment process.
Third-party interactions currently do not work with the OPI integration.
Security and requirements
Third parties cannot send payment or card acquisition requests to your terminals. If they try to send such a request, the request is refused with an HTTP status code of 010 Not Allowed.
Third-party interaction is possible:
- In a Terminal API integration with WebSockets enabled.
You can check the WebSockets setting in your Customer Area, under Devices > Device settings > Integrations. - With specific terminal models: M400, P400 Plus, V210, V400m.
How it works
To enable third-party interactions you need to complete the setup as follows:
-
You set up display notifications for the third party. For every step of the tender process, the third party receives a display notification that contains:
- The
POIIDof the terminal. This tells the third party where to send a request. - The
TransactionID: the tender reference. When the payment is completed, the terminal sends a TENDER_FINAL display notification. In this notification, the PSP reference is added in the format `[tender reference].[PSP reference] is appended with the PSP reference: for cross-reference with a standard webhooks.
- The
-
You set up standard webhooks for the third party. For every payment, the third party will receive a webhook that includes the outcome of the payment, the amount, the PSP reference, and more. Based on the PSP reference, the third party can link the customer's transaction to their rating, for richer reporting.
-
You set up an API credential for the third party. This enables the third party to authenticate the input and display requests that they send.
Third-party interaction flow
The message flow with third-party interaction is as follows:
-
The POS app sends a payment request to the payment terminal.
-
The terminal sends display notifications to the third party for every step of the tender process, from TENDER_CREATED when the payment starts, to TENDER_FINAL when the payment is completed.
-
When the payment process is finished, the third party sends an input request to the terminal.
-
The customer provides their input on the terminal, and the third party receives the response.
-
To thank the customer, the third party sends a display request with an image. The image disappears after the time-out set in the request, or after a default time-out of three seconds. (This step is not shown in the diagram below.)
-
The third party receives a standard webhook for the payment from the Adyen payments platform.
The following diagram illustrates the message flow for third-party interaction. In the diagram, the POS uses cloud communications, but with local communications the third-party interaction with the terminal is the same.

Set up third-party webhook endpoints
To receive webhooks from Adyen terminals and the Adyen payments platform, the third party needs to configure their system. Then you need to set up third-party webhooks in your Customer Area.
Configuration by the third-party
-
Inform the third party of the requirements for receiving webhooks:
-
Their system needs to have:
- One or more endpoints that can receive webhooks in JSON format. They may get two kinds of webhooks: display notifications from the terminals, and standard webhooks from the Adyen payments platform.
- For the test environment: an open TCP port for HTTP traffic (80, 8080, or 8888) or HTTPS traffic (443, 8443, or 8843) with TLSv1.2.
- For the live environment: an open TCP port for HTTPS traffic (443, 8443, or 8843) with TLSv1.2.
- Optional: a username and password for basic authentication.
-
If they want to receive standard webhooks, they should verify the HMAC signature of the standard webhook and they must acknowledge every standard webhook with a successful HTTP response status code, for example 200. For instructions, refer the third party to our development resources for webhooks.
-
-
Ask the third party for the endpoints and basic authentication credentials they set up for receiving webhooks.
You need to provide those details in your Customer Area in the next steps.
Set up display notifications
To set up display notifications for the third party:
-
Make sure that you know the endpoint where the third party wants to receive display notifications, and the basic authentication credentials.
-
Log in to your Customer Area and switch to the account, store, or terminal that you want to set up notifications for.
-
Go to Devices > Device settings > Integrations > Terminal API.
-
Under Display URLs, select + Add.
The Display URLs dialog opens. -
Enter the details:
- URL: the URL of the endpoint where the third party wants to receive display notifications.
- Username and Password (optional): the basic authentication credentials that the third party set up on their server.
- Public: select this option. Indicates that the specified URL is on a public network.
-
Local: do not select this option; not applicable for third-party interactions.
-
Select Add URL and then Save.
-
If your integration uses local communications, ask our Support Team to ensure display notifications are not encrypted.
This step is necessary because with local communications the terminal generates encrypted notifications and the third party cannot decrypt those.
Set up standard webhooks
Currently there are no restrictions enforced on the details that third parties can receive in standard webhooks. We advise you to limit the details to the minimum required for your use case, by enabling as few additional settings as possible.
To set up third-party standard webhooks:
In your Customer Area, enable and configure webhooks for your company account, merchant account, and merchant account groups. However, we recommend to configure webhooks for your company account. To set up a webhook for a specific merchant account, create a webhook for your company account, and configure merchant accounts for that webhook.
- You can configure Payments webhooks on the company, merchant account, and merchant account groups.
- You can configure Platforms webhooks on the company account level only.
To configure a webhook:
1. Make sure that you know the endpoint where the third party wants to receive standard webhooks, and the basic authentication username and password of their webhook server. 2. If the payment terminals that the third party will interact with are boarded to one specific merchant account, switch to that merchant account.-
In your Customer Area, go to Developers > Webhooks.
If you have a Balance Platform integration, select Payments or Platforms to view the webhooks available to you based on your integration. -
Select Create new webhook.
If you are adding a webhook for your platform and have multiple platforms set up to run on Adyen, select the balance platform where you want to configure your new webhook. -
From the list of webhooks, select Add for the one to add.
-
Under General, configure the following:
Setting Description Enabled Select the toggle to enable or disable the webhook. Version The webhook version. Description Your description of the webhook. Merchant accounts You can apply the webhook to all merchant accounts for a company account, include only specific merchant accounts, or exclude specific merchant accounts for your company account. -
Under Server configuration, configure the following:
Setting Description URL The URL of the third-party webhook server. It must be a public URL. Method JSON, HTTP POST, or SOAP Encryption protocol TLSv1.2 or TLSv1.3 -
Under Security, configure the following:
Setting Description OAuth 2.0 Note: OAuth 2.0 support is available for the Standard webhook type only.
If you want to use OAuth 2.0 for access to your webhook endpoint, enter the following for your Identity Provider's OAuth 2.0 server:- Client ID
- Client secret
- URL: The location of your Identity Provider's OAuth 2.0 authorization server, where Adyen should request new access tokens. The time-to-live (TTL) setting of your access tokens must be 3599 seconds, at a minimum.
- Scope: The Scope is optional. The permission level Adyen's webhook service needs to access to your webhook endpoint.
Basic authentication Enter the following for the third-party webhook server: - username
- password
HMAC Key Generate a new HMAC Key or use an existing HMAC key. -
Under Events settings, select the event types for this webhook. Some webhook types do not support more than one event type, so this setting does not appear.
-
If the Additional settings section is available, optionally select the additional information you want to receive in this webhook. Some webhook types do not support more than one event type, so this section does not appear.
-
Select Save configuration.
READY_3RD_PARTY display notification
Set up the third-party API credential
If the third party wants to send Terminal API requests to your terminals, they must authenticate their requests with an API key. This means you need to create a special third-party API credential for your account and share it with the third party.
The third-party API credential has limited access and cannot be used to make payments. Like all API credentials, it consists of:
- An API key.
- API permissions: roles required for the type of request, and accounts that the API key is valid for.
To be able to create the third-party API credential, you must have one of the following user roles:
- Merchant admin
- Manage API credentials
To create the third-party API credential:
- Log in to your Customer Area, and go to Developers > API credentials.
This opens a list with all API credentials linked to your company account. - Select Add standardized user.
- Select thirdParty_xxxxxx@Company.[YourCompanyAccount].
In this third-party API credential username,xxxxxxwill be replaced with numbers. - Select Add.
- In the list of API credentials, select the new third-party API credential username.
- To generate an API key, under Server settings > Authentication select the API key tab. Select Generate API key, copy the API key using the copy icon and store the third-party API key securely in your system.
- Select Save changes.
- Under Permissions > Roles select the role Thirdparty interaction with in-store terminals, and make sure no other roles are selected.
- Under Permissions > Accounts select the accounts that the third-party credential needs to have access to.
Make sure that these are the accounts that you set up webhooks for. - Select Save changes.
- Securely send the API key to the third party.
Let the third party send requests
If the third party wants to send Terminal API requests to your terminals, inform them that they need to:
-
Listen to the Terminal API display notifications sent to their webhooks server. These include:
- A
MessageHeaderwith aPOIIDfield that identifies the terminal. -
A
ReferenceIDfield with aneventthat indicates when the terminal is ready to receive a request.
- A
-
In the
MessageHeaderof their input or display request, include aPOIIDfield with the same value received in the display notification. -
Format the rest of the request as described in our documentation.
-
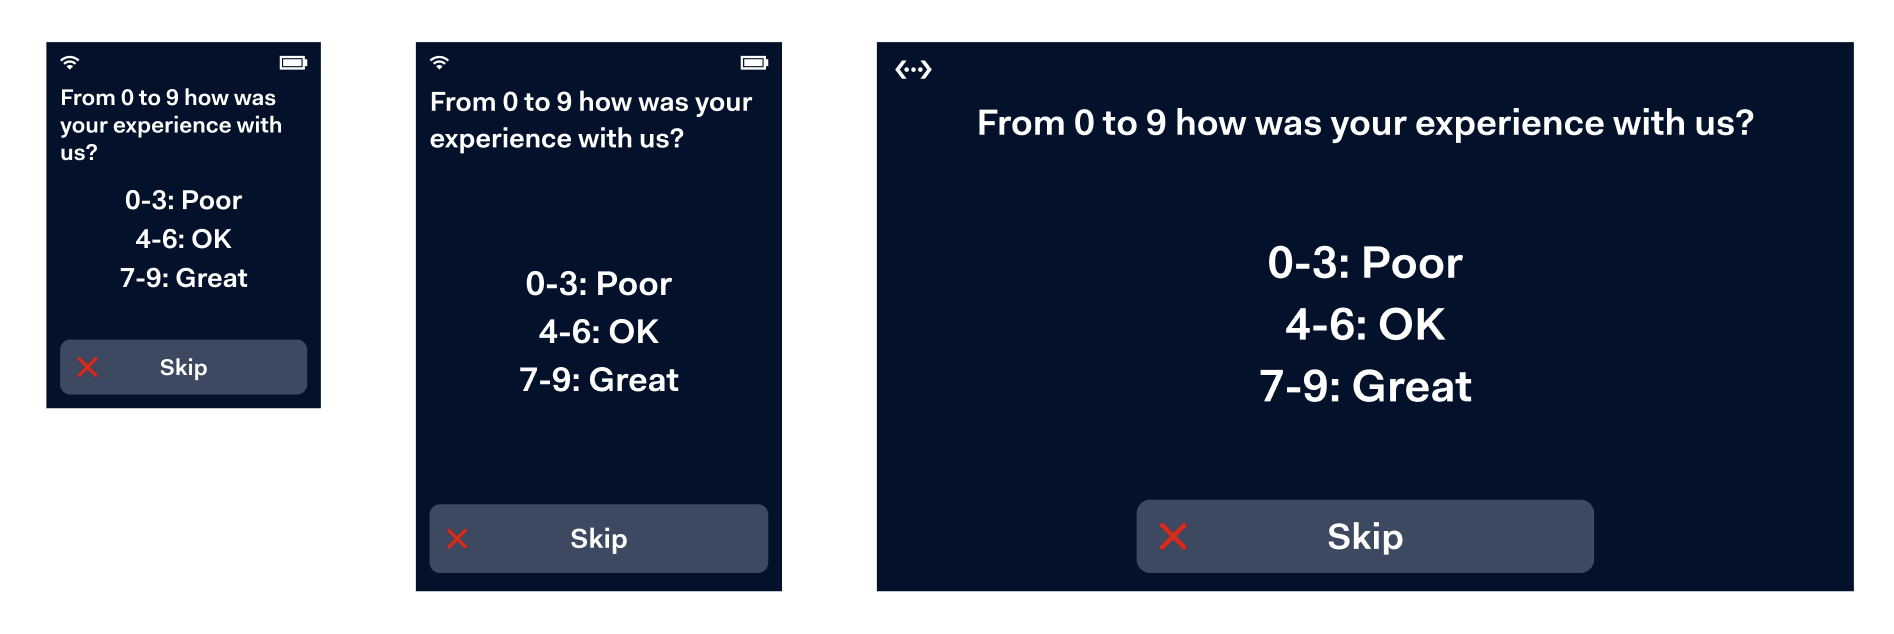
For an example input request, see Ask for a rating. That shows a screen that on various display sizes could look as follows:
-
For both input and display request, the third party should set a time-out using
MinimumDisplayTime. Otherwise the request will time out after three seconds.
-
-
Authenticate their request by specifying their third-party API key in the
x-API-keyheader of the HTTP request.
Canceling an in-progress interaction
To block an incoming third-party interaction request, you can cancel the request:
- From your POS app by sending a
DisplayRequestthat forces the terminal to show the standby screen. - On the terminal.
Cancel from your POS app
In general, requests are cancelled by sending an AbortRequest containing the ServiceID of the request you want to cancel. However, because the third party is sending the request, your POS app doesn't know the ServiceID. The solution is to send a DisplayRequest that instructs the terminal to show the standby screen.
To cancel an in-progress third-party request from the POS app:
-
Make a Terminal API display request, specifying:
-
The standard
SaleToPOIRequest.MessageHeaderobject, withMessageClassset to Device andMessageCategoryset to Display.Parameter Required Description ProtocolVersion
3.0 MessageClassDevice MessageCategoryDisplay MessageTypeRequest ServiceIDYour unique ID for this request, consisting of 1-10 alphanumeric characters. Must be unique within the last 48 hours for the terminal ( POIID) being used.SaleIDYour unique ID for the POS system component to send this request from. POIIDThe unique ID of the terminal to send this request to. Format: [device model]-[serial number].
-
The DisplayRequest.DisplayOutput array containing a single array item with:
Parameter Value DeviceCustomerDisplay InfoQualifyDisplay OutputContent.OutputFormatMessageRef OutputContent.PredefinedContent.ReferenceIDIdle
-
-
In the display response, check the OutputResult.
If the request is successful, this includesResponse.Result: Success.The terminal switches to the standby screen.
-
The third party receives a response containing:
ErrorCondition: CancelResult: FailureAdditionalResponse: the message A higher priority request has been received.
The next example shows the response to an input request after canceling from the POS app:
Cancel from the terminal
To cancel an in-progress third-party interaction on a terminal:
- On the terminal keypad, select the Cancel key

In case of a terminal without a keypad, on the display select the Cancel icon if the screen includes that.
If this is successful:
- The terminal shows the standby screen.
-
The third party receives a response containing:
ErrorCondition: CancelResult: Failure
The next example shows the response to an input request after canceling from the terminal:
Testing
After setting up all aspects of the third-party interaction, you need to check that the interaction behaves as expected. Contact the third party to discuss the scenarios to test for your specific use case.
Here is an example of tests to run for a use case where the third party sends an input request:
- Make a test transaction that is expected to trigger the third-party interaction.
- Check that the expected question appears on the terminal.
- React by giving an answer on the terminal.
- Repeat, but this time do not react when the question appears, and check that the interaction times out as expected.
- Repeat, but this time decline giving an answer, or cancel the interaction on the terminal.
-
Repeat, but this time cancel the interaction from the POS app.
- Repeat all the above tests with other test transactions that are expected to trigger the third-party interaction. For example, test different payment instruments like credit cards, debit cards, and digital wallets. Or test different entry methods like tapping, inserting, and swiping.