Before you start building a point-of-sale integration with Adyen-provided payment terminals, you need to choose between local or cloud communications. This determines how your POS system —also referred to as cash register— connects to the Adyen payment terminals and the Adyen payments platform.
This section of the documentation explains what to do if you have decided to use local communications.
Requirements
Before you begin, take into account the following information.
| Requirement | Description |
|---|---|
| Integration type | The information on this page is relevant for building a point-of-sale integration with the Adyen Terminal API and Adyen payment terminals using local communications. |
| API credentials | To set up a shared key using API calls, your API credential must have the following role:
|
| Customer Area roles | To set up a shared key using the Customer Area you must have the following user role:
|
How it works
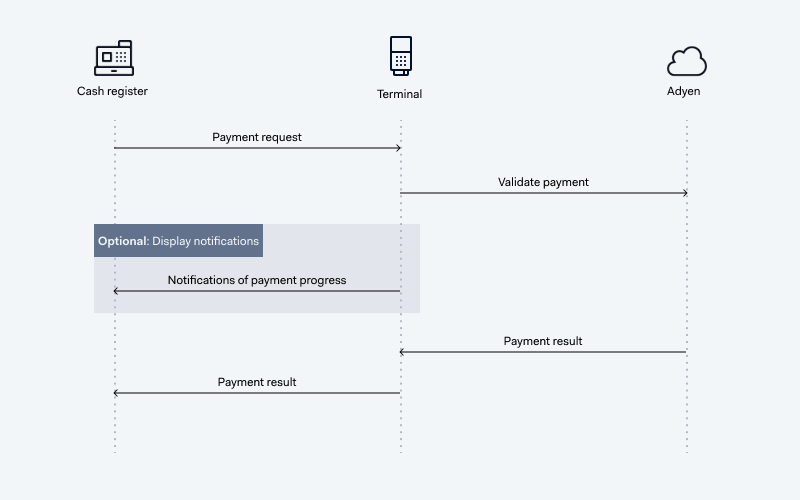
With local communications, your POS system sends an API request over the local network to the IP address of the payment terminal. When the shopper completes the transaction on the terminal, the terminal routes the request to the Adyen payments platform for processing. Optionally you can set up display notifications to inform your staff on the progress of the transaction and the result. You receive the API response synchronously.
To build a local integration, you need to:
- Configure your network. To allow outgoing HTTPS traffic, you need to add Adyen domains to your firewall's allowlist, and you need to open certain network ports.
- Optionally install an API library. This step can save you development time.
- Protect local communications. This step involves validating the terminal certificate against the Adyen root certificate, and adding code to encrypt API requests and decrypt API responses.
- Build the payment flow. For example, ensure your POS app can send Terminal API payment requests and other requests, and receive the synchronous response.
- Learn how to handle network issues.
1. Configure your network
To enable your POS app to connect directly to the terminal:
-
Add Adyen's domains to your firewall's allowlist.
Configure your firewall to allow outgoing HTTPS traffic from the IP addresses of your POS apps and terminals to:*.adyen.com*.adyenpayments.com
Allowlisting should be based on the DNS name of these URLs. Your firewall should dynamically check for IP address updates, at least every 60 seconds.
Do not hard-code Adyen's IP addresses, because these can change over time. We do not share a list of our IP addresses publicly.
-
Open the ports:
- tcp/443 to the internet.
- tcp/8443 on your LAN.
-
Use the correct Transport Layer Security (TLS) version and ciphers.
-
To assign IP addresses to your terminals, use DHC reservation (recommended), or manually configure static IP addresses. Optionally you can get notified about changes in terminal IP addresses.
For more information and recommendations, see Network and connectivity.
2. (Optional) Install an API library
On our GitHub, we provide server-side API libraries in several languages. Installing a GitHub library is not required, but can save you development time. The libraries include all Terminal API models so you can use these to create requests. Most libraries also send requests to Adyen using a built-in HTTP client, construct the correct test and live endpoints, and help to protect local communications.
The following Adyen GitHub libraries are available for a local Terminal API integration:
- .NET - adyen-dotnet-api-library
- iOS - adyen-terminal-api-ios
- Java - adyen-java-api-library
- Node - adyen-node-api-library
These GitHub libraries work with Terminal API and are completely separate from the classic libraries, which have been deprecated.
3. Protect local communications
While you are building a test integration, we do not enforce this step. This allows you to develop the functional and security aspects in parallel. However, you will not be able to process live transactions until you have secured the requests between your POS app and your terminal.
If your integration uses local communications, you need to protect your integration against man-in-the-middle attacks, eavesdropping, and tampering. The steps you need to take are:
- Install Adyen's root certificate.
- Set up a shared key.
- Add code to validate the terminal certificate against the root certificate and encrypt communications using the shared key.
Install Adyen's root certificate
The root certificate contains information about Adyen's public key, which is used to sign other certificates such as the certificate on the terminal. To verify the certificate on the terminal against the public key, you have to add Adyen's root certificate to a trust store that is available to your POS app.
The instructions differ depending on the operating system. Select one of the tabs below.
Set up a shared key
To prevent others from being able to read messages sent between your POS app and the payment terminal, you need to encrypt the communications. For that, you first need to create a key passphrase and share it with Adyen. Both your code (or the Adyen GitHub library you are using) and the terminal will apply a key derivation function to the passphrase, and use the resulting key material to encrypt communications.
You can create a shared key manually in your Customer Area or with an API call. For both options, you can set up the shared key at the company, merchant, store, or terminal level. If your use case does not require a specific level, we recommend setting up a shared key at the highest possible level. For more information, see Inheritance of settings in your Customer Area and Inheritance of settings with Terminal API.
Add code to protect local communications
Your integration must:
- Validate the terminal certificate: this confirms that your POS app is communicating directly with an Adyen-supplied payment terminal, and not an impostor.
- Encrypt communications: this prevents intruders from reading the messages transmitted between your POS app and the terminal.
There are two ways to get this done: use one of our GitHub libraries, or write your own code. For instructions, select one of the options below.

Use a GitHub library
Handle the protection of local communications through a library.

Do it yourself
Write your own code to handle the protection of local communications.
4. Build your payment flow
The payment features that you minimally need to integrate, are the same regardless if you use local or cloud communications. These features, described under Implement the payment flow, are:
- Make a payment.
- Issue a refund.
- Cancel an in-progress payment.
- Generate receipts.
- Add details about your application to your requests.
- Verify the status of a transaction (also see 5. Handle network issues).
With local communications you additionally need to consider the following points:
-
Sending requests and handling the synchronous response:
Adyen-supplied payment terminals listen for Terminal API POST requests to/nexoon port 8443. For example, if your terminal has the IP address 198.51.100.1 you make API requests tohttps://198.51.100.1:8443/nexo.When you make a payment, the result is provided through a synchronous API response. To receive the synchronous response, your POS app needs to make HTTPS requests to the terminal using a time-out of more than 120 seconds. During this time the connection is kept alive and a synchronous response will follow.
-
Whether you want your POS app to show messages, called display notifications, that keep your staff up to date with the progress of the transaction.
Showing display notifications in your POS app
During a transaction or tender, the payment terminal generates display notifications. You can show these in your POS app to keep your staff up-to-date on the progress of the tender. For example, whether the customer has selected Dynamic Currency Conversion, or finished entering their PIN.
To set this up, see Display notifications.
5. Handle network issues
To make your integration more resilient in case of connection issues, your integration should automatically make a transaction status request when it does not receive a synchronous payment response from Adyen.
Payment requests time out after 120 seconds. If you do not receive a payment response (or you receive a response indicating a time-out) after 150 seconds, your integration should automatically make a transaction status request.
Showing the result of the transaction status request in your POS app reduces the risk that your store staff will unnecessarily try to cancel or refund the transaction, or make a duplicate transaction.
You can optionally request the status of a transaction before 120 seconds. For example, you may also want to let store staff manually request the status of a payment at any time from the POS app.