When you start a payment from an Android or iOS POS app on your mobile device, you can use the Adyen NYC1 card reader to accept the payment. On the card reader, the customer can tap, insert, or swipe their card, or use a digital wallet like Apple Pay.
The mobile device and the card reader can communicate with each other through Bluetooth.
To indicate the progress of the payment and other events, the card reader has indicator LEDs, an illuminating contactless logo, and a buzzer. Transaction screens appear on the mobile device that is connected to the card reader.
Supplied components
- NYC1 card reader.
- USB-C cable.
- Adhesive metal plate for card reader magnet.
To attach the card reader to the back of a phone, stick the metal plate to the back of the phone, and place the card reader on the plate.
If you also received an NYC1 dock, see NYC1 card reader with NYC1 dock for instructions.

Get started
- Inspect the card reader.
- Connect the card reader to a power source using the supplied USB-C cable.
Let the battery charge for at least an hour and a half while you continue with the next steps. - Connect the card reader to a phone or other mobile device.
When you have completed these steps, you are ready to make transactions and install mandatory updates.
Inspect the card reader
Because card readers process sensitive card data, you must verify that the reader you received is the correct one, supplied by Adyen, and has not been tampered with.
-
Verify that the shipping box containing the reader has not been opened and that the tamper-evident security packing tape is intact.
-
If you have access to the Adyen Customer Area, log in and under Devices > Orders & returns find the order for your reader. Then:
- Verify that the serial number (S/N) on the box is the same as in the Customer Area.
- Using the track & trace link, track the order with the carrier to verify that they confirm having delivered the payment terminal.
-
Open the box, take the reader out of the box, and verify that the serial number (S/N) on the reader is the same as the serial number on the box.
-
Inspect the reader for tampering. Check for missing screws, additional wires or labels, holes in the device, and anything inserted in or attached to any part of the reader.
If any of the above checks fails, contact our Support Team immediately.
Connect the card reader
To process transactions, the card reader uses a Bluetooth connection to communicate with a POS app that is installed on your mobile device.
Another option is to connect your mobile device directly to the card reader using the USB-C cable. However, that is only possible on Android mobile devices that support USB host mode.
To connect your mobile device to the card reader, select the tab that applies to the desired connection type.
Make a payment
When the mobile device and the card reader have a Bluetooth or USB connection, you are ready to accept payments.
When connected through Bluetooth, the devices disconnect after five minutes of inactivity, but they remain paired. To save battery power, the card reader goes into sleep mode. When you start a payment, the mobile device automatically re-connects to the card reader it was most recently paired with. The card reader is activated automatically, but this takes a bit longer than usual because the reader has to "wake up" first. You can also activate the reader by pressing the power button on the side of the reader two times.
When connected through USB, the card reader is always ready for use.
To accept a payment:
-
On the mobile device, start the transaction from your POS app.
Screens related to the transaction appear on the mobile device. -
Present the card reader to the customer to complete the transaction.
The customer can tap, insert, or swipe their card, or use a digital wallet like Apple Pay.
If your reader supports PIN transactions, the customer can enter their PIN on your mobile device. -
When the transaction is completed, send the receipt to the customer, or print the receipt on an external printer.
Understand PIN transactions
If shoppers need to enter their PIN for a payment, a PIN entry pad appears on your mobile device. For security and compliance reasons, the PIN entry pad is not always centered on the screen. Instead, it appears in a random position as shown in the following examples.
Bottom-left 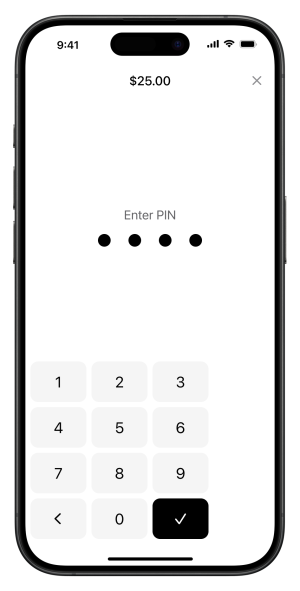 |
Top-right 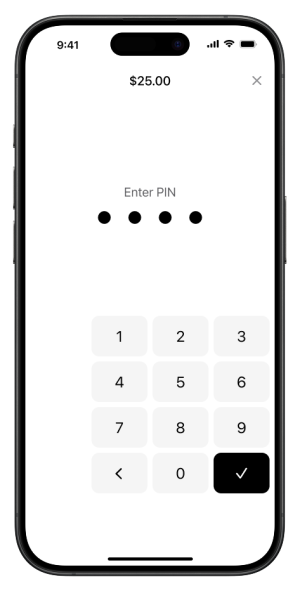 |
PIN transaction with a card reader in the US
In the US, not all NYC1 card readers support PIN. You can check that on your mobile device:
- If the card reader supports PIN, the card reader details show the name NYC1, but no model.
- If the card reader does not support PIN, the card reader details show the name NYC1 and the model NYC1-SCR.
Your POS app will show a screen similar to the following examples for Android and iOS.
Manage battery power
When not connected to a power source, the card reader runs on a rechargeable battery. In case of a Bluetooth connection, the reader never completely turns off because Bluetooth is on continuously. Therefore, it is important to keep an eye on the charge level.
Check the charge level
For the most accurate measurement of the battery charge level, the card reader must not be connected to a power source.
To view the battery charge level on the card reader itself:
- Press the power button on the side of the card reader, and check the LEDs.
Each green LED represents 25% of the battery capacity. For example, if two of the four LEDs are on and green, the card reader has 50% charge left.
To use your mobile device to view the battery charge level of a card reader:
- On the mobile device, go to the list of card readers.
For example, your POS app may show the list under Settings > Card readers, or under Devices. - From the list, select the card reader to see its details, including the battery charge level.
Charge the battery
A charger is not included.
Always use the USB-C cable supplied by Adyen and a 5V DC, 1A charger to recharge the battery.
The battery cannot be replaced.
To prevent damage to the USB-C charging cable and the USB-C socket on the card reader, follow these guidelines:
- Insert and remove the USB-C charging cable by holding the end that connects to the card reader or the power plug.
- Do not insert or remove the USB-C charging cable in an upward, downward, left, or right direction.
- Do not bend or fold the USB-C charging cable.
- Do not use excessive force to insert or remove the USB-C charging cable.
- Always inspect the USB-C charging cable and the USB-C socket on the card reader for foreign objects.
Install mandatory updates
From time to time, new software is released for the NYC1 card reader and the Bluetooth functionality.
Updates can take several minutes. During this time you cannot use your mobile device because the POS app must remain open. The following table shows estimated update times depending on how the devices are connected. Bluetooth updates are only available when the devices are connected through Bluetooth.
| Update type | Bluetooth | USB cable to card reader |
|---|---|---|
| Multiple updates | 8 minutes | 2 minutes |
| Device update | 6 minutes | 2 minutes |
| Bluetooth update | 2 minutes | N/A |
When you need to perform an update, this is indicated in the UI on your mobile device:
- The list of card readers shows an indicator (for example, a red dot) next to the reader.
- The Device info screen shows Update available with a button to start the update.
The next images show example screens. Your POS app may show different screens.
To update the firmware:
- Pick a moment when you do not need to use the mobile device for a while.
- On the mobile device, go to the list of card readers or devices.
- If a card reader is marked with a red dot (or a similar indicator), select the reader.
-
On the screen with information about the selected device, select Update (or a similar button, depending on your POS app).
Keep the POS app open and do not switch to another app until the update has finished.
The update will be downloaded and installed. Then the card reader reboots and connects again.
Bluetooth update failed
It is possible that a firmware update failed because it required a Bluetooth connection and the card reader did not have an active Bluetooth connection. When this happens, a screen appears with instructions on how to reset the reader before you can try updating again.
Understand the LEDs
Connecting the card reader
| LEDs | Description |
|---|---|
 LEDs turn on and off sequentially. |
Power on. |
 All LEDs turn on and off simultaneously until pairing is complete. |
Reader is in pairing mode. |
| All LEDs remain on for four seconds. |
Pairing was successful. |
 |
Pairing failed. |
Taking a payment
| LEDs | Description |
|---|---|
 |
Ready to take a payment. |
 |
Reading a card. |
 |
Transaction is approved. |
|
Transaction failed. |
Battery
| LEDs | Description |
|---|---|
 LEDs turn on and off sequentially. |
Battery is charging. When the reader is fully charged, the LEDs turn off. |
|
Press the power button on the side of the card reader for battery charge information. Each LED represents 25% charge. If all four LEDs are green, the battery is fully charged. |
Other events
| LEDs | Description |
|---|---|
 |
Reader is tampered. Stop using the card reader and contact our Support Team immediately. |
Troubleshooting
When there is an issue with the card reader, check the following general causes and solutions.
Reader does not pair
| Cause | Solution |
|---|---|
| Low battery | Try again with one of the other card readers that are paired with the mobile device. In the meantime, recharge the card reader where the issue occurred. |
| Bluetooth issue | On the mobile device, ensure Bluetooth permissions are enabled. Turn Bluetooth on and try again. |
| Mobile device and reader are already paired | Check if the devices are already paired: compare the serial number on the back of the reader with the serial numbers in the list of card readers on the mobile device. |
| Reader is paired with different device | To unpair the reader from nearby devices, turn the reader off by pressing the power button for three seconds. Then turn the reader on again by pressing the power button once. |
| Out of range | Bring the mobile device and the card reader closer together. |
| Wrong pairing method | Pair the reader using the POS app on your mobile device. Do not use the system settings for pairing. |
If pairing still doesn't work, remove reader from your mobile device's Bluetooth settings. Then try pairing again.
Reader does not take payments
| Cause | Solution |
|---|---|
| No network connection | Make sure that the mobile device is connected to a Wi-Fi or cellular network. |
| Low battery | Try again with one of the other card readers that are paired with the mobile device. In the meantime, recharge the card reader where the issue occurred. |
| Card entry failed | Help the customer to correctly tap, insert, or swipe their card, or tap their digital wallet device. |
Reader is inactive
The reader times out after ten minutes of inactivity, to preserve battery charge. The reader 'wakes up' again when you start a new transaction or press the power button.
Reader is tampered
If the first and last LED turn white, the reader is tampered. Stop using the card reader and contact our Support Team immediately.