This page describes how to set up and use tipping options for your customers on Adyen payment terminals. Depending on what is customary in your region, there are various ways to let the payment terminal ask your customers to add a tip:
- Ask for a tip amount: the customer chooses a predefined tipping option on the display or enters a custom tip amount (or chooses to skip giving a tip).
- Ask for a total amount: if the customer wants to give a tip, they enter a total amount that is higher than the original purchase amount. This is customary in Nordic countries/regions.
The payment request to trigger tipping, is the same in both cases.
Requirements
Before you begin, take into account the following requirements, limitations, and preparations.
| Requirement | Description |
|---|---|
| Integration type | Terminal API integration with Adyen-provided payment terminals. |
| Webhooks | Set up standard webhooks and optionally display notifications to keep your staff informed. |
| Hardware | All terminal models are supported, except unattended terminals. |
| Setup steps | Before you begin:
|
Ask for a tip amount
You can configure tipping options either from the Customer Area or with the Management API. Customers can then choose one of the predefined tipping options or enter a custom tip amount. Asking for a tip can appear before or after the customer enters their card. The default is tipping before card entry.
Before card entry
The terminal shows the purchase amount plus the tipping prompt or options you configured, and waits for the customer to respond. Then the terminal asks the customer to present their card and, if required, complete the payment by providing their PIN or signature.
No configuration from our side is needed for this.
To ask for a tip before card entry:
- Configure tipping options in your Customer Area or with Management API.
- Make payment requests using the tender option AskGratuity.
After card entry
The terminal shows the purchase amount and asks the customer to present their card. Then the terminal shows the tipping prompt or options you configured, and waits for the customer to respond. If required, the terminal asks the customer to complete the payment by providing their PIN or signature.
To ask for a tip after card entry:
- Contact our Support Team and ask them to:
- Enable tipping options after card entry.
- Optionally, enable single tap. For contactless transactions, this ensures the terminal does not ask the customer to tap their card again after selecting a tip.
- Configure tipping options in your Customer Area or with Management API.
- Make payment requests using the tender option AskGratuity.
Configure tipping options
It is possible to ask for a tip without tipping options. The payment terminal then shows a prompt to enter a tip plus an option for not giving a tip. To give a tip, the customer enters the amount and confirms.
To make tipping easier for your customers, you can define tipping options that your customer can select on the terminal. The options can be any combination of percentages, calculated amounts, and a custom amount. You can configure the terminal to show only the percentage, the percentage and the calculated total amount together and only the fixed tip amount.
Tipping without options:  |
Tipping with percentage options:  |
Percentage and calculated tip amounts:  |
You can configure tipping either from your Customer Area or by using the Management API.
Ask for a total amount
The terminal shows the original purchase amount and a prompt to enter the total amount. This must at least be equal to the original amount. By entering a higher total amount, the customer adds a tip. After the customer enters the total amount, the terminal asks the customer to present their card and, if required, complete the payment by providing their PIN or signature.
To use tipping by asking for a total amount:
- Contact our Support Team to enable tipping by asking for a total amount.
- Make payment requests using the tender option AskGratuity.
For currencies that in practice do not use decimals in transactions (like SEK), we make sure the tipping screen doesn't show decimals.
Total tipping for currency with decimals: 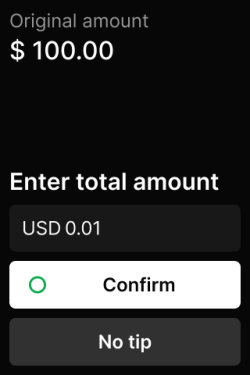 |
Total tipping for currency without decimals:  |
Make a payment
To trigger the payment terminal to ask the customer for a tip amount or a total amount, you need to make a payment request with the AskGratuity tender option.
-
Make a payment request, specifying:
-
The standard
SaleToPOIRequest.MessageHeaderobject, withMessageClassset to Service andMessageCategoryset to Payment.Parameter Required Description ProtocolVersion
3.0 MessageClassService MessageCategoryPayment MessageTypeRequest ServiceIDYour unique ID for this request, consisting of 1-10 alphanumeric characters. Must be unique within the last 48 hours for the terminal ( POIID) being used.SaleIDYour unique ID for the POS system component to send this request from. POIIDThe unique ID of the terminal to send this request to. Format: [device model]-[serial number].
-
The PaymentRequest object with:
Parameter Description SaleData.SaleToAcquirerDataThe AskGratuity tender option that triggers the terminal to start the tipping flow. See the instructions below.
PaymentTransaction.AmountsReqAn object with: Currency: The transaction currency.RequestedAmount: The purchase amount, with decimals.
In
SaleData.SaleToAcquirerData, specify the tender option in one of the following formats:
-
Option 1: a JSON object converted to a Base64 encoded string.
Encode{"tenderOption": "AskGratuity"}to Base64, and pass the resulting string:
"SaleToAcquirerData": "eyJ0ZW5kZXJPcHRpb24iOiAiQXNrR3JhdHVpdHkifQ==" -
Option 2: a key-value pair:
"SaleToAcquirerData": "tenderOption=AskGratuity"
The format that you use here, will also be the format of the
AdditionalResponsethat you receive. If there are more tender options (for example ReceiptHandler ) or other data elements that you need to pass in theSaleToAcquirerDatafield, see Add information to a payment.
The example below shows how to show tipping options and initiate a transaction of EUR 142.50.
When the customer has responded, the payment terminal sends the request for the original purchase amount plus the tip amount to the Adyen payments platform.
If successful, the terminal shows the payment is approved.
-
-
In the PaymentResponse note the following:
-
PaymentReceipt: receipt data with the original purchase amount, the gratuity amount, and the total amount. If the customer didn't add a tip, the gratuity amount is not included. -
PaymentResult.AmountsResp:TipAmount: the amount of the tip. If the customer didn't add a tip, this field is not included.AuthorizedAmount: the total authorized amount of the transaction, consisting of the original purchase amount plus the tip amount.-
Currency: currency of the payment.
-
Response.AdditionalResponse: additional transaction data. Depending on the format you used in the request, you receive either a string of form-encoded key-value pairs or a Base64 string that you need to decode to get a JSON object. This includes:posadditionalamounts.originalAmountValue: the original purchase amount in minor units.posAmountGratuityValue: the tip amount in minor units.authorisedAmountValue: the total authorized amount in minor units.
The example below shows the response for a transaction of EUR 142.50 with a 10% tip added.
-
Keep your staff informed with display notifications
While your customer is interacting with the terminal, you can keep your staff informed of the tip amount by showing progress messages in your POS app.
These messages are delivered using display notifications, which are webhooks that are sent to an endpoint that you specify. For information on how to set up and use display notifications, see our display notifications documentation.
Add tip amounts to reporting
The Settlement details report is an overview of payments details that have been settled and paid out to you by Adyen, and the cost of each transaction. When you generate a Settlement details report, you can include an overview of tips by adding the gratuity amount column to your report in your Customer Area.
For more information on how to add the gratuity amount column to your report, see Configure report columns.
High tip warning screen
When tipping from a terminal, it can happen that customers accidentally enter a tip amount that is too high. To prevent making a payment with incorrect amounts, the terminal can show a warning screen if the tip amount is higher than a certain percentage of the original purchase amount.
For example, you can set the warning screen threshold to 50% of the original purchase amount. If the original amount is EUR 100.00 and the customer enters a tip of EUR 50.00 or more, the terminal shows the warning screen. The customer can then confirm the amount or go back to the previous screen.
When enabled, the warning screen works with both methods of tipping from the terminal (asking for a tip amount, and asking for a total amount). This feature is available on standalone terminals as well as terminals integrated with a POS system.
To show the high tip warning screen:
- Enable tipping by asking for a tip amount or total amount.
- Ask our Support Team to enable the warning screen for tips that are higher than the percentage you want of the original purchase amount.
- Make payment requests using the tender option AskGratuity.