


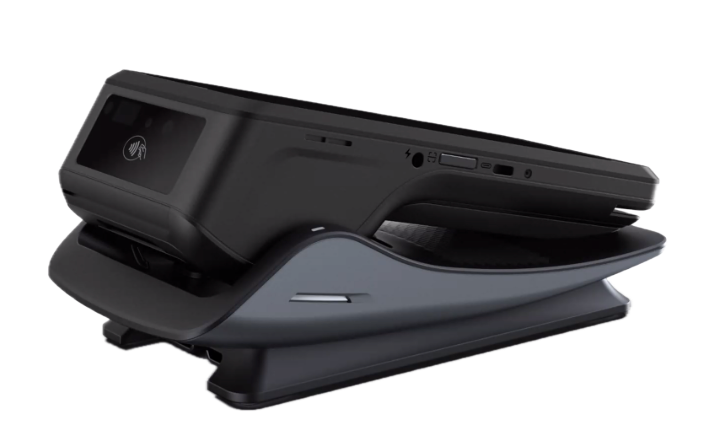
You can use the Bluetooth base station in various ways:
- Connect the S1F4Pro to Ethernet for fixed countertop use by docking it in the base station.
- Connect the S1F4Pro to Ethernet for mobile use by pairing it through Bluetooth with the base station.
- Charging: The base station charges the terminal whenever it is docked.
Components and accessories
-
S1F4Pro terminal package:
- Payment terminal
- USB cable and region-specific power plug for charging. Use these to power the base station.
- eSIM card
- Receipt paper roll. You can order new paper rolls in your Customer Area, under Devices > Orders & returns.
- Bluetooth base station. This accessory is ordered separately, so it arrives in its own box.
The S1F4Pro terminal must use software v1.135.2 or later to work with the Bluetooth base station.
The S1F4Pro terminal has a barcode scanner button, but this is not functional. Instead, the terminal supports scanning through the built-in camera. Scanning using the camera can be started from the Android app on the terminal (if implemented by your organization).
Get started
These are the steps to get your new S1F4Pro payment terminal up and running. Some steps include a link to more detailed instructions.
- Inspect the terminal.
- Insert the receipt paper roll.
- Connect the base station to power.
- To turn on the terminal, dock it in the base station. Then, press and hold the power button until the display turns on.
Let the battery charge for at least four hours while you continue with the next steps. - On the Welcome screen, select your language.
- Set up the base station and the terminal connection.
- On the Confirm store screen, assign the terminal to your store by selecting the check mark button. If the store shown is not your store, use the edit button to change it.
If the store screen doesn't show, wait until the next synchronization with the Adyen platform (on average three hours) and try again.
When you have completed these steps, you are ready to process payments!
Inspect the terminal
Because payment terminals process sensitive card data, you must verify that the terminal you received is the correct one, supplied by Adyen, and has not been tampered with.
-
Verify that the shipping box containing the terminal has not been opened and that the tamper-evident security packing tape is intact.
-
If you have access to the Adyen Customer Area, log in and under Devices > Orders & returns find the order for your terminal. Then:
- Verify that the serial number (S/N) on the box is the same as in the Customer Area.
- Using the track & trace link, track the order with the carrier to verify that they confirm having delivered the payment terminal.
-
Open the box, take the terminal out of the box, and verify that the serial number (S/N) on the terminal is the same as the serial number on the box.
-
Inspect the terminal for tampering. Check for missing screws, additional wires or labels, holes in the device, and anything inserted in or attached to any part of the terminal.
If any of the above checks fails, contact our Support Team immediately.
Insert the receipt paper roll
- Pull up the cover of the paper roll compartment.
- Insert the paper roll making sure the paper sticks out a bit.
- Close the cover of the paper roll compartment.
Turn on/off
If you turn on the payment terminal for the first time or after it was off for a long time, it may make a maintenance call to synchronize the configuration and update the software. This can take 10 to 20 minutes.
When connected to a power supply, the battery charges. An icon at the top of the display indicates the battery charge level.
Turn on the terminal
- Press and hold the power button until the display turns on.
If necessary, connect the terminal to a power supply to charge the battery.
Turn off the terminal
- Press and hold the power button until a dialog box appears, then confirm you want to turn off the terminal.
Maintain battery performance
Storing payment terminals for longer periods of time can reduce the capacity of the battery or damage it permanently.
To prevent battery degradation:
-
Check the storage conditions:
- Store the terminals in a cool, dry place.
- Keep the terminals away from direct sunlight or heat sources.
- Avoid overcharging - do not store terminals with battery levels over 70 percent.
- Avoid discharging - do not store terminals with battery levels below 40 percent.
-
Inspect the batteries regularly:
- Every six months, check for battery leakage or swelling.
- Recharge batteries to the optimal level.
In case of battery failure, you can return or replace the terminal. For certain models, you can order spare batteries.
When returning a payment terminal, make sure to dispose of the faulty battery according to your local regulations. Do not include the faulty battery in the return package as it can lead to leakage and thermal discharge.
For more information, refer to Manage battery power.
Use the USB-C charging cable
The S1F4Pro payment terminal is supplied with a USB-C charging cable. This cable is compliant with the USB industry and UL standards.Always use the charging cable provided by Adyen.
To prevent damage to the USB-C charging cable and the USB-C socket on the payment terminal, follow these guidelines:
- Insert and remove the USB-C charging cable by holding the end that connects to the terminal or the power plug.
- Do not insert or remove the USB-C charging cable in an upward, downward, left, or right direction.
- Do not bend or fold the USB-C charging cable.
- Do not use excessive force to insert or remove the USB-C charging cable.
- Always inspect the USB-C charging cable and the USB-C socket on the terminal for foreign objects.
- If the terminal operates in areas of high humidity, dust, or food residue, consider getting a charging station.
Set up the base station and the network connection
First, connect the base station to your Ethernet network. Then follow the steps for your use case:
- For countertop use, connect the terminal to Ethernet and keep it docked in the base station.
- For mobile use, connect the terminal to the base station through Bluetooth.
Connect the base station
To connect the base station:
- Connect the USB-C cable from the terminal package to the base station and to a power source.
A green light appears on the base station. This indicates the base station has power. - Connect an Ethernet cable to the Ethernet port on the back of the base station.
- Wait until the blue light starts blinking.
This indicates the base station is ready to pair.
Connect the terminal for countertop use
Use this setup for a fixed countertop terminal that remains docked in the base station. For this setup, you configure the connection through the terminal's Ethernet settings.
To connect the terminal for countertop use:
- Connect the base station, if you did not do this already.
- On the terminal, open the Settings menu and go to Network > Ethernet.
- Enable Ethernet and select Static or DHCP depending on your network setup.
- Dock the terminal in the base station.
The terminal shows Base station detected.
Connect the terminal for mobile use
Use this setup for a mobile terminal that you remove from the base station and use within Bluetooth range. For this setup, you enable Bluetooth on the terminal and pair it with the base station.
- Connect the base station.
- On the terminal, open the Settings menu.
- Select Network > Bluetooth.
- Turn on the Bluetooth toggle switch.
The Bluetooth icon appears at the top of the terminal display. - Go to IP settings, and select Static or DHCP depending on your network setup.
Before you pair, make sure the blue light on the base station is blinking. This means the base station is ready to pair. - Dock the terminal in the base station.
The terminal shows Base station detected. - Select Pair now.
Pairing starts. The blue blinking light on the base station becomes solid blue. - Wait for the terminal to show Paired and Connection successful.
Pairing is complete.
You can now remove the terminal from the dock and use it within Bluetooth range.
The terminal disconnects if it goes out of Bluetooth range. If it comes back into range within 10 minutes, it reconnects automatically. After 10 minutes, you need to dock the terminal in the base station to reconnect it.
Disconnect and reconnect the Bluetooth connection
To disconnect the Bluetooth connection:
- On the terminal, go to Settings, and select Network > Bluetooth.
- Under Connected devices, select Saved devices.
- Select the base station, and then select Disconnect.
To reconnect the Bluetooth connection:
- On the terminal, open the Settings and select Network > Bluetooth.
- Turn on the Bluetooth toggle switch.
- If the terminal does not reconnect automatically, dock it in the base station.
As long as the terminal remains paired with the base station, Bluetooth reconnects automatically after you restart the terminal.
Forget the base station
Forgetting the base station removes the saved pairing. To reconnect the terminal later, you must pair it with the base station again.
To remove the pairing between the terminal and the base station:
- On the terminal, go to Settings, and select Network > Bluetooth.
- Under Connected devices, select Saved devices.
- Select the base station.
- Select Forget.
Cellular failover
If the terminal loses its connection to the base station, it can automatically switch to a cellular connection. For more information, see Cellular 3G/4G failover in the S1F4Pro user manual.
Test the payments platform connection
Payments are processed on the Adyen payments platform. To test the connection with that platform:
- Select Settings > Diagnostics > PSP connection.
- Check if the Status is Successful.
You can also View results and check if all items have a green check mark .
.
Do not worry if Receiving data has a red cross and the result is No Error; the terminal successfully connected with our platform.
Test the POS system connection
If you are going to use the terminal with a POS system (not as a standalone terminal), test the connection with your POS system:
- Select Settings > Diagnostics > Terminal API.
- Check if the Status is Successful.
You can also View results and check if all items have a green check mark. - Select the Back button to go back to Diagnostics, and select Endpoints.
The terminal runs tests on four URLs and then shows a final screen. - Check if the Status is Successful or select View results to check whether all four URLs in the final screen have a green check mark .
Payment terminal menus
Your payment terminals have a menu with options related to payments, and a menu with options related to configuration. The access to some menu options is protected by passcodes.
| Menu/Button | Description | Passcode |
|---|---|---|
 Settings |
|
|
 Transactions |
|
|
 Payment |
|
|
You can get the passcodes from your Customer Area or from your company's admin user.
Device info
To view information about the terminal:
- Select Settings > Device info.
The screen shows:
- Model, serial number, and IP address of the terminal.
- Software version that the terminal currently uses.
- The configuration version.
- Merchant account that the terminal belongs to.
- The store that the terminal is boarded to, and the store address.
- A button to show a QR code with device info.
When you contact our Support Team, they may ask you to scan this QR code.
View, print, and reset totals
The terminal can generate a Totals report. This gives an overview of the total amounts for sales, refunds, gratuities (tips), and cancellations that the terminal processed since the last reset of the report. By resetting the report, you can use this functionality to get day totals or shift totals.
To obtain the Totals report:
- Select Transactions > Totals.
- Enter the Transactions menu passcode.
- You can now:
- View a Totals report for the period shown at the top of the report.
- Print the Totals report by selecting the print button:

- Start a new reporting period by selecting the reset button:

- Access the report from the previous reporting period.
Resetting automatically
To automatically reset the Totals every day at a specific hour, contact our Support Team.
Standalone solution
If you will be using the payment terminal as a standalone terminal, transactions are not initiated from a POS system. Instead, you start transactions using the Payment button.
Refer to Standalone terminals for instructions on how to make payments, cancel payments, issue refunds, and (when needed) manually enter card details to make a payment.
Kiosk mode
Kiosk mode is intended for payment terminals in unattended environments, such as next to a vending machine, token dispenser, or parking payment system. It hides the navigation bar and the settings and transaction buttons at the bottom of the screen. In this way, you can prevent customers from using the terminal screen to change or minimize the default app, or to power off the terminal.
Refer to Kiosk mode for instructions to enable this feature.
Airplane mode
For the airline industry the payment terminal has an airplane mode. When preparing for take-off, turning on airplane mode is the quickest way to turn off all cellular and other network connections on the terminal.
When you turn airplane mode off again, the previous connections are restored.
Enable airplane mode
To be able to use airplane mode, contact our Support Team and ask them to enable this feature. The Network menu on the terminal will then include an Airplane mode option.
Use airplane mode
To turn on airplane mode:
- On the terminal, select Settings > Network.
- Enter the passcode.
- In the Network menu, turn on the Airplane mode toggle.
All connections (Wi-Fi, Bluetooth, and Cellular) are now Off.
To turn off airplane mode:
- On the terminal, select Settings > Network.
- Enter the passcode.
- In the Network menu, turn off the Airplane mode toggle.
All previous connections (Wi-Fi, Bluetooth, and Cellular) are now restored.
Troubleshooting
Self-service
If there is an issue with your payment terminal, first try to diagnose and solve the issue yourself, using our Troubleshooting documentation. In many cases, this is the quickest solution.
Ask for assistance
If you cannot resolve the issue using the Troubleshooting documentation, your company's support staff may be able to help instantly through a remote troubleshooting session. They will ask you to select Start session on the terminal and enter a passcode. This enables them to see and interact with the screen on your terminal.
Otherwise you can contact our Support Team. They too may be able to help through a remote troubleshooting session. Provide the following information:
- Merchant account.
- PSP reference of the transaction, if applicable.
- Terminal serial number. This number is available in the Device info and also printed on the back of the terminal (for example, S/N:123-456-789).