You can add Revolut Pay to your existing integration. The following instructions show only what you must add to your integration specifically for Revolut Pay.
If an instruction on this page corresponds with a step in the main integration guide, it includes a link to corresponding step of the main integration guide.
Requirements
| Requirement | Description | |
|---|---|---|
| Integration type | Make sure that you have an existing API-only integration. | |
| Redirect handling | Make sure that your existing integration is set up to handle the redirect. action.type: redirect. |
How it works
- The shopper selects Revolut Pay as the payment method.
- The shopper enters their details in the payment form that you build.
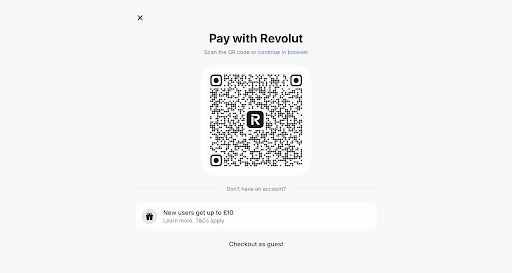
- The shopper is redirected to the Revolut Pay app (mobile devices) or a Revolut Pay hosted payment page (desktops or laptops) where four different sign-in methods are offered: QR code, email, SMS, and passkey.
- The shopper authorizes the payment in the Revolut Pay app.
Build your payment form
Include Revolut Pay in the list of available payment methods. You do not need to collect any information from the shopper in your payment form.
You can download the logo for Revolut Pay to use in your form.
Get Revolut Pay as an available payment method
When you make the /paymentMethods to get available payment methods, specify the following so that Revolut Pay is included in the response.
| Parameter | Values |
|---|---|
| amount.currency | EUR, GBP, PLN, RON, HUF, CHF, CZK, NOK, DKK, SEK |
Add additional parameters to your /payments request
When you make a payment, add the following parameters:
| Parameter | Required | Description |
|---|---|---|
paymentMethod.type |
 |
revolutpay |
shopperName |
The name of the person funding the money. | |
telephoneNumber |
The shopper's telephone number. | |
shopperEmail |
The email address of the person funding the money. | |
shopperStatement |
The text to be shown on the shopper's bank statement. Allowed characters: a-z, A-Z, 0-9, spaces, and special characters . , ' _ - ? + * /. The complete descriptor is built using the following format: {base}{suffix}, where:{base} is your Merchant name as specified in your Merchant settings at the time you added Revolut Pay to your merchant account. This name can't be changed afterward.{suffix} is defined by the value specified for the shopperStatement parameter. You can use <= 19 characters. We recommend sending a maximum of 22 characters for the complete descriptor, otherwise banks might truncate the string. |
The response includes the action.type: redirect.
Handle the redirect
-
To complete the payment, redirect the shopper to the
action.urlreturned in the /payments response, taking into account the following recommendations:- When using the HTTP GET method:
For security reasons, when showing the redirect in the app, we recommend that you use SFSafariViewController for iOS or Chrome Custom Tabs for Android, instead of WebView objects. Also refer to the security best practices for WebView. - Redirection for mobile integrations:
For mobile integrations, we strongly recommended that you redirect the shopper to the default browser of their device. Redirecting to the default browser ensures the best compatibility, handling of multi-factor authentication, app-to-app redirection, and error handling.
- When using the HTTP GET method:
-
After the shopper is redirected back to your website, check the payment result by making a POST /payments/details request, specifying:
details: object that contains the URL-decodedredirectResultreturned when the shopper was redirected back to your site.
You receive a
/payments/detailsresponse containing:resultCode: Use this to present the result to your shopper.pspReference: Our unique identifier for the transaction.
Show the payment result
Use the resultCode that you received in the /payments/details response to show your shopper the payment result.
The resultCode values you can receive for Revolut Pay are:
| resultCode | Description | Action to Take |
|---|---|---|
| Authorised | The payment was successful. | Inform the shopper that the payment has been successful. Ship the goods after you successfully capture the payment. |
| Cancelled | The shopper cancelled the payment while in the Revolut App. | Ask the shopper whether they want to continue with the order, or ask them to select a different payment method. |
| Error | There was an error when the payment was being processed. | Inform the shopper that there was an error processing their payment. You'll receive a refusalReason in the same response, indicating the cause of the error. |
| Pending or Received | The shopper has completed the payment but the final result is not yet known. | Inform the shopper that you have received their order, and are waiting for the payment to be completed. You will receive the final result of the payment in an AUTHORISATION webhook. |
| Refused | The payment was refused by the provider. | Ask the shopper to try the payment again using a different payment method. |
If the shopper fails to return to your website or app, wait for webhooks to know the outcome of the payment:
| eventCode | success field | Description | Action to take |
|---|---|---|---|
| AUTHORISATION | false |
The transaction failed. | Cancel the order and inform the shopper that the payment failed. |
| AUTHORISATION | true |
The shopper successfully completed the payment. | Inform the shopper that the payment is successful and proceed with the order. |
Capture the payment
Depending on your capture settings, Revolut Pay payments are captured manually or automatically, with or without a delay.
If you use manual capture, or delayed automatic capture, make sure to capture authorized Revolut Pay transactions within 7 days. After this timeframe, the authorization expires.
Partial captures are supported. However, any portion of the authorization that is not captured is permanently released and cannot be captured later (single capture).
Before you ship the goods, make sure that the payment is captured.
If you do not intend to capture the payment, make a request to cancel the payment and release the authorized balance amount. This returns the receivable credit back to the shopper.
Refund a payment
Make a /refunds request to refund captured Revolut Pay payments. There is a twelve-month refund window for a payment after it has been captured.
Test and go live
Test your Revolut Pay integration using the test environment by following these steps:
- Add Revolut Pay to your Customer Area.
- Create a payment request with Revolut Pay and perform the redirect.
- After you are redirected, select the option to continue in browser.
- Use the phone number +31613390484 and click Continue.
- When prompted to provide your passcode, enter 124455.
- When prompted to provide your 6-digit code, click Autofill code in the top right corner of the modal.
- Click Pay to proceed with the payment.
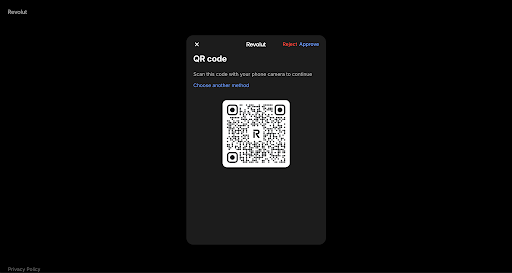
- When prompted to scan the QR code, click Approve or Reject the payment in the top right corner of the modal. You are then redirected back to the
returnUrl.
The test environment differs from the live Revolut Pay flow. Because there is no test version of the Revolut retail app, some interactions are simulated rather than replicated exactly. You can learn more about testing in the Revolut developer documentation.
Check the status of Revolut Pay test payments in your Customer Area > Payments > Payment list.
Before you can accept live Revolut Pay payments, submit a request for Revolut Pay in your Customer Area.